- Introduction to contentACCESS
- contentACCESS setup package
- contentACCESS components
- contentACCESS Tools
- Tenants in contentACCESS
- General system configurations
- Connection
- User interface
- Users in contentACCESS
- Invitations
- Roles
- Login providers
- System
- Licensing
- Notifications
- Monitoring — how to find out possible misconfigurations / reasons of potential system/job failures
- Distributed environment in contentACCESS — Clusters
- Statistics
- How to create/configure databases — All databases
- Common features
- Creating new jobs in contentACCESS
- Jobs’ page, jobs’ context menu
- File Archive
- Introduction to File system archive
- File Archive settings
- File archive Databases
- File archive System settings
- File archive Retentions
- File archive Storages
- Root folders
- Aliases
- File archive Schedules
- Provisioning settings and managing access to contentWEB
- Configuring aliases
- Configuration of jobs available in contentACCESS File Archive
- Configuration of File system archive job
- Configuration of a File system restore job
- Configuration of File system recovery job
- Configuration of Remote shortcutting job
- Active/inactive documents in File system archive
- Email Archive
- Important settings before creating an Email Archive job
- Database settings
- Email archive System settings
- Email archive Provisioning settings
- Retention settings
- Shortcuts in email archiving
- Storing of archived emails
- Creating email archive schedulers
- User experience
- Exchange 2013+: Mail app in OWA 2013+ or on MS Outlook 2013+ desktop version
- Exchange 2010: OWA 2010 integration
- Address book objects
- Granting access rights for mailbox users and explicit users to view the mailbox archive
- Creating contentWEB users (option 1)
- Manage access to a mailbox archive (option 2)
- Database and store assignment in email archiving
- How to assign database and storage to an Exchange group?
- How to assign database and storage to a mailbox?
- How to move data from source database/storage into a second (target) database/storage?
- Creating Email archive jobs: archive, restore, recovery, mailbox move, shortcut synchronizaion, shortcut repair
- Email archive job
- Email restore job
- Email recovery job
- Mailbox move job
- Shortcut synchronization job
- Shortcut repair job
- Public folder archiving
- SharePoint archive plugin
- Custom plugins
- officeGATE
- accessGATE Mobile
- Virtual drive configurations
- Application settings
- Terms of use
- FAQ
- Download sample for the file to be imported does not work
- Archiving is not working, if MAPI is set to communicate with the Exchange server
- Virtual drive is still appearing after the uninstall
- Outlook forms problem
- Unable to open shortcuts of archived file on the server side
- Samples are not shown using 'Show sample" option in the Import dialog
- Do I need to create separate tenants for file archiving and email archiving
- What is the recommended database size for email, file and Sharepoint archiving
- The TEMP folder is running out of space when archiving big files
- The attachment could not be opened
- After updating Exchange 2013, the EWS connection might not work in contentACCESS
- If Windows authentication is not working in contentACCESS and an alias was created for contentACCESS
12.2.SharePoint Archive job configuration ↑ Back to Top
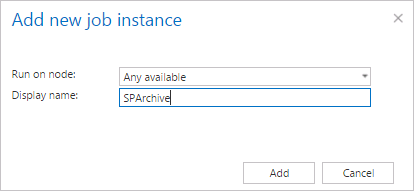
After you have configured all necessary settings, you can create and configure a SharePoint Archive job. Click “+ new” on the Jobs page (SharePoint Archive tab => Archive group => Jobs), fill the required settings (Run on node, Display name) in the pop up window and click on “Add”.

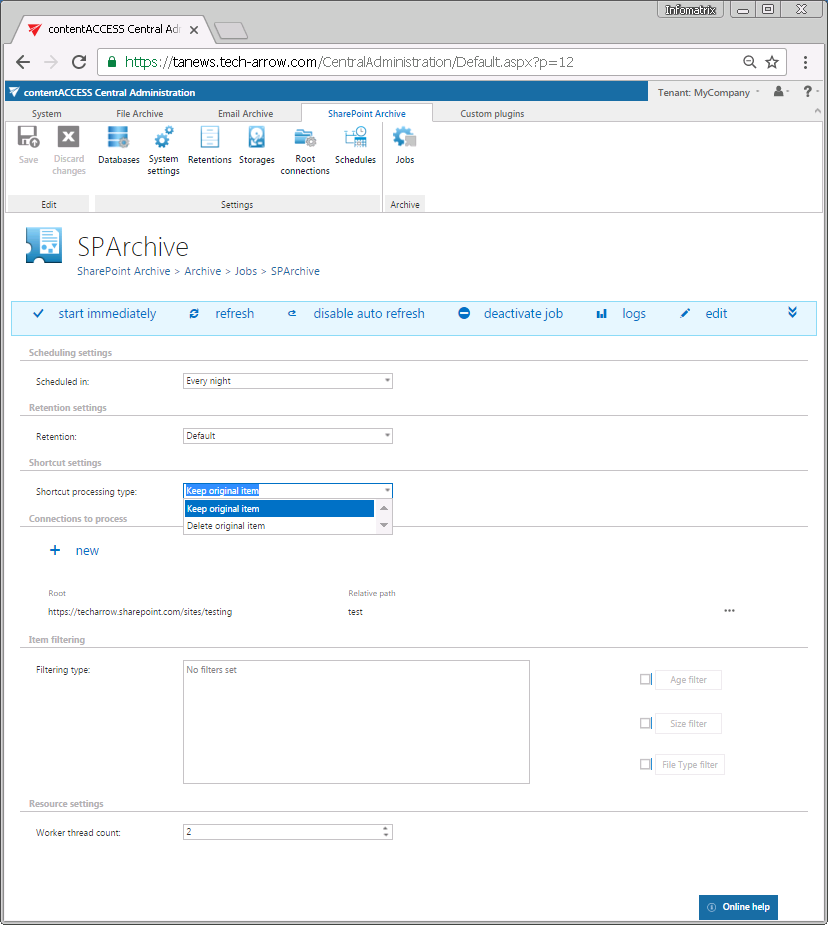
To configure the job immediately, click “Yes” in the next pop up window, or configure it later on (using the “Edit” option in the job’s context menu). On the job’s configuration page set the:
- Scheduling settings – time slots of the job running
- Retention settings – time period of keeping the archived item in the storage
- Shortcut settings – the administrator can decide, if the archived item
– will remain in the original location, and will be directly accessible from there – option “Keep original item”, or
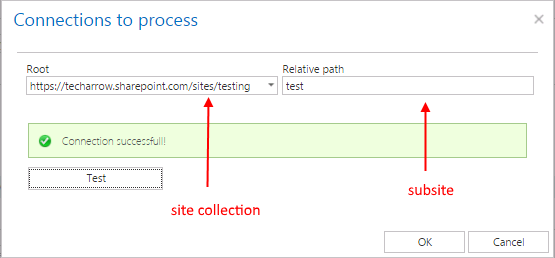
– it will be deleted and will be accessible from the archive interface only – option “Delete original item”. With this option only the items are deleted, folder, libraries etc. are kept untouched. - Connections to process – Click “+new”, and specify the root connection and the relative URL in the pop-up window. A root can be a site collection, a subsite, a library or folder already defined in the Root connections section. In this use case we will archive our items on subsite https://techarrow.sharepoint.com/sites/testing/test, where the root is a site collection.
- Item filtering – Set the age, size and/or file type filters to be used by the archive job. These filtering settings are the same like in a File system archive job.
Important!!!: When the user changes the file content of an already archived item, e.g. deletes a picture from the file and saves it to the original location, (and thus the file size will be reduced e.g. from 110 to 85 kB) and file size filter is set on >100 kB, then SharePoint archive job will not archive the newly created item by the next processing. The newly created item will be saved in the original location. From this reason, it is recommended to always check the size filter settings first, if a file has not been archived by the archiving process. - Resource settings – The number of worker threads responsible for the archive processes can be set here; by default this value is set to 2.


If the job is configured, save your changes and wait until it is started based on the defined schedule (or start it manually from the status bar).
Help Guide Powered by Documentor