2.1.Installation of contentACCESS
To install contentACCESS, first download and run the setup package (contentACCESS X.X Setup.exe). As default it unzips to c:\TECH-ARROW\contentACCESS_Package folder but you can use the Browse button if you want to change the directory. Click Unzip. After the files have been successfully unzipped click OK.
Welcome! Now the contentACCESS installation wizard will open which will lead you through all the steps of the deploying process. All components of contentACCESS can be deployed during this deployment process. Click Installation on the Welcome page.
1. EULA. After you have read the End User License Agreement carefully check checkbox I accept the term of the agreement and click NEXT.
2. Installation type. This installation step is available at the very first install only. When updating the product, this step is no more available. In this step the user is asked to select between 2 types of installations:
- First server – choose this option if a) you are installing a standalone server (so everything will be installed on the same machine as in this use case), or b) you are installing the first contentACCESS server of a future cluster;
- Additional server or component – choose this option if you are installing an additional server or component (Virtual Drive, Central Administration, contentWEB etc.) in an existing contentACCESS environment or in a cluster.
In case that you are installing an additional server in a cluster, or a component in an existing contentACCESS environment (i.e. you marked the 2nd radio button), you will be required to set the connection with the already existing central database that missing requisites
you have specified at installing the first contentACCESS server. Test the connection and click Next.
3. Components.In this step you have to choose which contentACCESS components you want to install on a server. The components are fully described in chapter contentACCESS components. It is recommended to read this section before you select the respective components to be installed. Check all the checkboxes in this step if you want to have all components on a single server.
If you have selected the contentACCESS server component, you need to apply the license before proceeding the installation. License activation can be done either a) online or b) offline.
a) If the machine where the setup is running has internet connection, you can activate the license ONLINE. Follow the next steps:
- Choose Online activation in the wizard.
- Enter your license key and click
- License will be validated and you can continue the installation.
b) If the machine where the setup is running has NO internet connection, you can either 1) use the Web Proxy’s credentials to activate the license through the configured proxy server or or 2) activate the license offline.
1st option: Configure the proxy URL and applicable credentials to the proxy. The proxy that you configure here is used by the licensing component to reach the licensing server for the activation. By default the proxy server is disabled. To enable it, open the Proxy settings dialog (option Proxy settings in the wizard). You can either
- Use default proxy settings that is configured on the contentACCESS server in Control Panel => Internet options => Connections tab => LAN settings => Proxy server
or you can
- Use explicit credentials (explicit proxy server URL and user)
![]()
If the proxy is configured, you can continue with online license activation based on point a) above.
2nd option: Activate the license OFFLINE by following the steps below
- Insert your license key.
- Select the Offline activation button and click Next.
- Activate your product on the offline license activation page of TECH-ARROW. The page can be accessed using the link in the activation dialog:
- Copy/paste (or download/upload) the License request information from the above wizard and activate it on the offline license activation page. Use the “Choose” option to upload the .dat file if you have saved it, or copy the activation string into the text box and click “Activate now“.

- Copy/paste (or download/upload) the activation code (1st screenshot below) from the web page to the License activation wizard (2nd screenshot below):
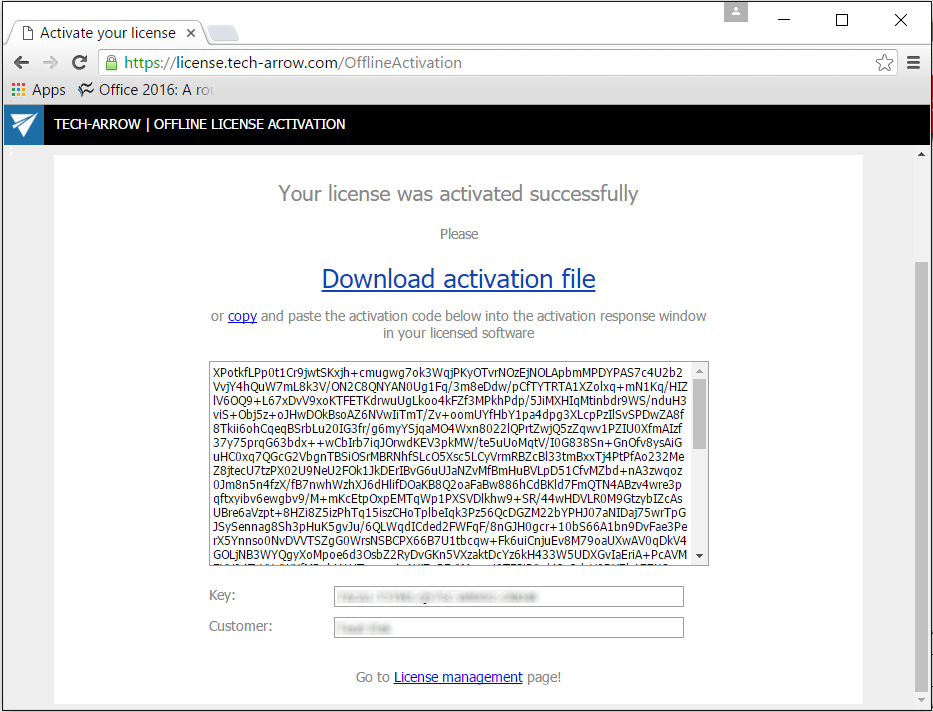
- When you have successfully applied the license, click “Next” in the wizard to continue the installation. In the last window click “Close” to complete the activation process.
4. Prerequisites. During this step the wizard will check if your system fulfills the software requirements. The missing prerequisites will be installed during the installation. Use the [refresh] button to actualize the prerequisite information after the missing software is installed. Once it is ready, the user can continue with the installation process. After the wizard has run the system requirements check click NEXT.
For more information about these requirements check the section above: Software requirements.
5. Base folder. The next step is to select the installation base folder. By default the contentACCESS server, contentWEB and the Central Administration installs in C:\Program Files\TECH-ARROW folder. Other components are automatically installed one level deeper, in the base folder\contentACCESS folder. So if the default base folder is set, then the further components are installed in C:\Program Files\TECH-ARROW\contentACCESS folder. The installation folder can be changed. Click on the ![]() button and browse for the desired destination. Click NEXT.
button and browse for the desired destination. Click NEXT.
6. Service settings. The administrator may set here, under which credentials the contentACCESS service should run. There are multiple choices:
- The service can be run as Local System; no credentials are needed;
- The service can be run under custom Windows credentials (local or domain user); the administrator may run a test also, to verify the Windows credentials are OK.
7. Database connection. The next step is to specify the system database server to be used by contentACCESS. contentACCESS is storing data in MS SQL server. If you do not have a database server installed, you can install an SQL 2012 Express (free version) with this installer. In this case check the Install new SQL Server 2012 Express radio button and the database will be automatically created with the following credentials:
Database server: [ServerName]\contentACCESS
Database name: contentACCESSDB
User name: system
Password: c0ntent@ccess
Schema: dbo
If you already have an SQL Server installed, select the Connect to existing SQL server radio button and follow the next steps:
Continue with setting the user credentials to connect contentACCESS with SQL server. Enter the SQL user name and password into the textboxes. You have multiple options here: a) You can use either an SQL user, or b) you can use WIA (Integrated Windows Authentication) with checking the “Use Windows integrated authentication” checkbox. In this second case contentACCESS will connect to SQL with the service credentials specified in step 6 above, in the service settings.
If you would like to make sure that all entered data are right run a test connection with a simple click on the Test button.
a) Using SQL user
b) Using WIA
If the connection was successfully established the following Setup window will confirm it:
Click NEXT.
In the next steps the contentACCESS components’ settings will be specified.
8. contentACCESS Central Administration: On this page you can define the port number that this component will use:
Port: This port is the physical port of Central Administration used by the Internet Information Services (IIS) on the current server.
The physical port cannot be changed later on, for example at updating the product. First the given component (in this case Central Administration) must be uninstalled, and then the port can be changed in the setup wizard. This rule refers to each contentACCESS component.
Fully qualified domain name: FQDN enables for the user to access the given component (in this case Central Administration) from everywhere (from home, from the office etc.). From this reason, this URL must be accessible from everywhere where the user is coming from. The FQDN that’s defined here is written to the Application settings (System tab => Client applications group => Application settings page) in the Central Administration, and can be changed from there at any time. By the next update the setup will automatically read the value which is defined in the Application settings.
Hint: By double clicking the empty text field the wizard puts there the FQDN of that server. This functionality is the same by FQDN settings of further contentACCESS components, on the next installation pages as well.
Usually the physical port matches the port that FQDN used. However, in special cases, the FQDN port can differ from the physical port on the IIS. In such cases the following warning pops up for the user – this is expected if the FQDN port is routed to the physical port. In such cases the user can continue with these settings. The same rule applies for other contentACCESS components as well.
contentACCESS service connection: This URL is used by the Central Administration to communicate with the contentACCESS server. If contentACCESS server is installed on the same machine, you can use “localhost” as host name.
9. contentACCESS Web Services (Proxy): On this page you can define the settings, that contentACCESS Web Services (Proxy) will use. The same rule applies for these configurations as for the contentACCESS Central Administration settings above.
Port: This port is the physical port of contentACCESS Web Services used by the Internet Information Services (IIS) on the current server.
Fully qualified domain name: This URL must be accessible from everywhere where the user is coming from. If you want to enable a secure connection for the user, choose https. Keep in mind, that https must be configured manually on the IIS (more here). This value is used for Email archive shortcut retrieve as well.
The FQDN that’s defined here is written to the System settings (System tab => Services group => System page, section External accessibility settings: Retrieve server FQDN) in the Central Administration, and can be changed from there at any time. By the next update the setup will automatically read the value which is defined on the System page.
If Proxy uses https, the FQDN URLs of further contentACCESS components (contentWEB, Central login page) will be automatically prefilled by the package with https connection, too.
contentACCESS service connection: This URL is used by the contentACCESS Web Services to communicate with the contentACCESS server. If contentACCESS server is installed on the same machine, you can use “localhost” as host name.
Hint: If the communication port with the contentACCESS server is changed, then the communication between the given component and the contentACCESS service is ensured by the contentACCESS Proxy. If the Proxy is not installed and the port is changed, then the service connection won’t be established. The same rule applies for the connection between the contentACCESS service and another contentACCESS components as well (in the Central administration and Central login page setup windows it is disabled to change the port number).
10. ContentWEB. On this page you can define the settings that contentWEB (contentACCESS archive user interface) will use.
The same rules apply for contentWEB as for the contentACCESS Central Administration settings above with one exception. contentWEB connection with the contentACCESS server supports net.pipe connection as well.
Port: This port is the physical port of contentWEB used by the Internet Information Services (IIS) on the current server.
Fully qualified domain name: This URL must be accessible from everywhere where the user is coming from. By double clicking the empty text field the wizard puts there the FQDN of that server. If you want to enable a secure connection for the user, choose https.
The contentWEB FQDN that’s defined here is written to the Application settings (System tab => Client applications group => Application settings page) in the Central Administration, and can be changed from there at any time. By the next update the setup will automatically read the value which is defined in the Application settings.
contentACCESS service connection: This URL is used by contentWEB to communicate with the contentACCESS server. If contentACCESS server is installed on the same machine, you can use “localhost” as host name. There are 3 communication types that can be used between contentWEB and the contentACCESS server:
- http – use this if you want to establish a direct connection with contentACCESS. If direct connection should be used, do not change the port number that’s prefilled by the setup package (8736), otherwise contentACCESS proxy connection will be used automatically.
- https – use this to establish a secure connection through the contentACCESS Proxy server
- net.pipe – use this type if contentWEB and contentACCESS are installed on the same machine; this is the fastest and most recommended connection type.
11.Central login: On this page you can specify the settings that the Central login page will use. Same rules apply as for the connection settings of components from above. The FQDN that’s first configured is written by the setup to the System settings of the Central Administration (System tab => Services group => System page, section External accessibility settings: Central login). It can be changed on the respective page of the Central Administration at any time, and the new configuration will be then read and prefilled by the setup when updating the product.
12. Virtual drive: Here you define the settings that Virtual drive will use:
Virtual drive fully qualified server name: this value is used to retrieve archived files from shortcuts
Virtual drive letter: drive for publishing the virtual drive content (the archive files)
contentACCESS service connection: URL used for the communication with the contentACCESS server. There are 3 communication types that can be used:
- http – use this if you want to establish a direct connection with contentACCESS. If direct connection should be used, do not change the port number that’s prefilled by the setup package (8736), otherwise contentACCESS proxy connection will be used automatically.
- https – use this to establish a secure connection through the contentACCESS Proxy server
- net.pipe – use this type if Virtual drive and contentACCESS are installed on the same machine; this is the fastest and most recommended connection type.
The installation package writes at first install/reads at each product update these parameters into/from the Virtual drive configurations page of Central Administration (System tab => Client applications group => Virtual drive configurations page).
Further specify the user credentials used to run the Virtual drive service. This can be either Local system user, or an explicit user.
13. Overview: In this step the contentACCESS setup gives a general overview about the components that you have selected to install on server. Click NEXT.
14. Installation. Click Install and wait until the installation process is completed. Then click on NEXT.
15. Summary window will give an overview for you about the already installed products:
Click Finish to complete the whole installation process.
After installation is completed and you want to continue with further settings and configurations in the contentACCESS Central Administration, click on Yes in the following popup window. This dialog pops up if you have installed the component now or if you have already installed it on another server (distributed environment).