25.26.Azure app registration for O365 archiving
In this section, we will explain how an app is registered on the Azure portal which enables contentACCESS to authenticate and connect to the Microsoft Dataverse environment using a modern and more secure way of authentication. Modern authentication is a category of several different protocols (instead of being a single authentication method – like username and password) that aim to enhance the security posture of cloud-based resources. Modern authentication relies on token-based claims, which are used to authenticate with an identity provider to generate a token for access. OAuth is an open standard that is used for many applications and websites that can grant access to other systems’ information, but without giving them the password.
Set-ExecutionPolicy -ExecutionPolicy Unrestricted -Scope CurrentUser
Invoke-WebRequest -Uri “https://static.contentaccess.cloud/appregistration/Register-contentACCESSAADapp.ps1” -OutFile
“Register-contentACCESSAADapp.ps1”
.\Register-contentACCESSAADapp.ps1
Please, be aware that Windows PowerShell needs to be run as Administrator for the process.
Why contentACCESS needs modern authentication?
For years, Microsoft allowed basic authentication to Exchange Online, SharePoint, and other resources, meaning that only a username and password were required. But, due to security reasons, Microsoft is progressively deprecating the legacy authentication, which will be then permanently blocked in the future. (Read more about the act in this article.) After that date, OAuth 2.0 (also known as modern authentication) will be required instead. These changes require vendors of third-party apps that integrate with Exchange Online and other resources like Teams and SharePoint to support modern authentication.
contentACCESS is also affected by these changes because it must use modern authentication to connect to Exchange Online, SharePoint, OneDrive, and Teams. This requires an Azure App registration to be configured on the O365 tenant.
App registration
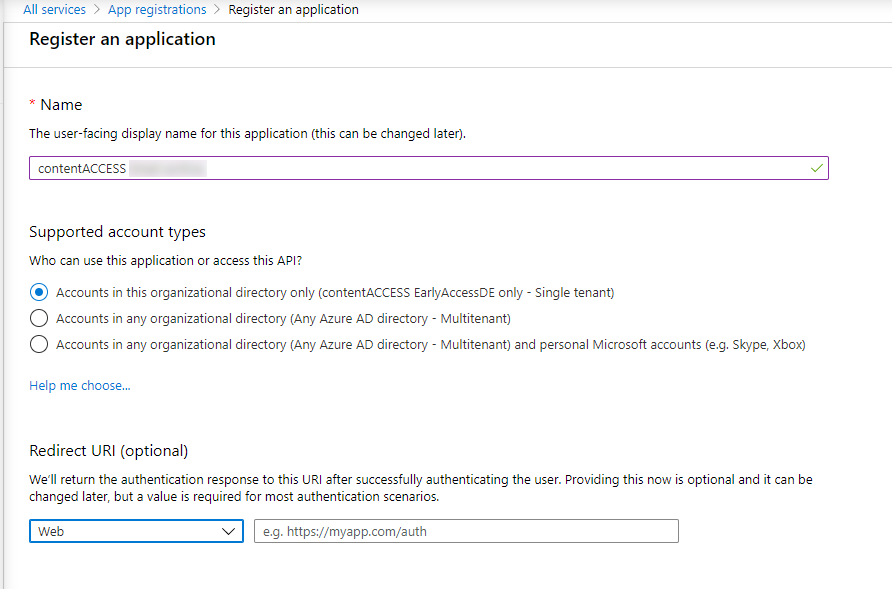
Navigate to portal.azure.com. Go to All services -> App registrations -> + New registration. Fill in the details of the new application. The only mandatory field that needs to be changed is the name of the application, the other options can be left as-is. Click the Register button.
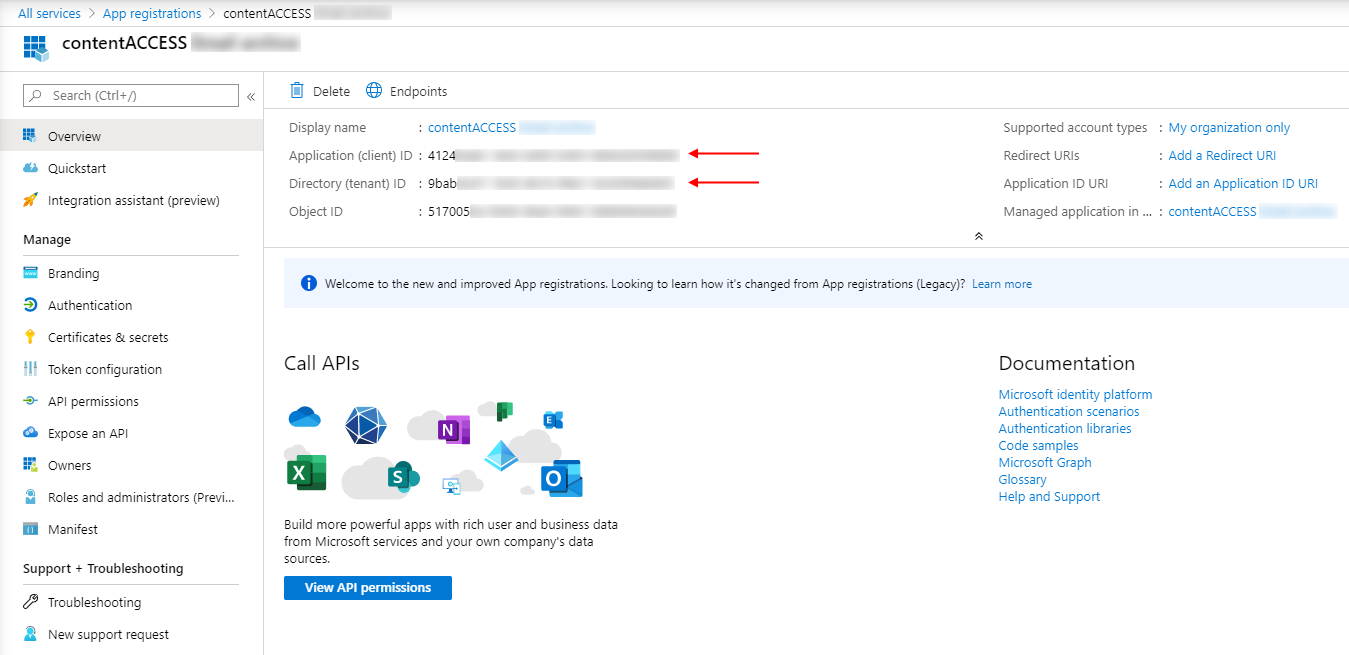
After the app is successfully registered, you will be able to see the Application ID and Directory ID in the app’s Overview. (These are used in archive settings to connect contentACCESS with the Teams application).
The next step is to grant the necessary permissions for the application. These permissions vary from the archive:
- If you need to grant permissions for the Email archive, read the Grant permissions for Email archive section below.
- If you need to grant permissions for the SharePoint archive, read the Grant permissions for the SharePoint archive section below.
- If you need to grant permissions for the Teams archive, read the Grant permissions for Teams archive section below.
Grant permissions for the Email archive
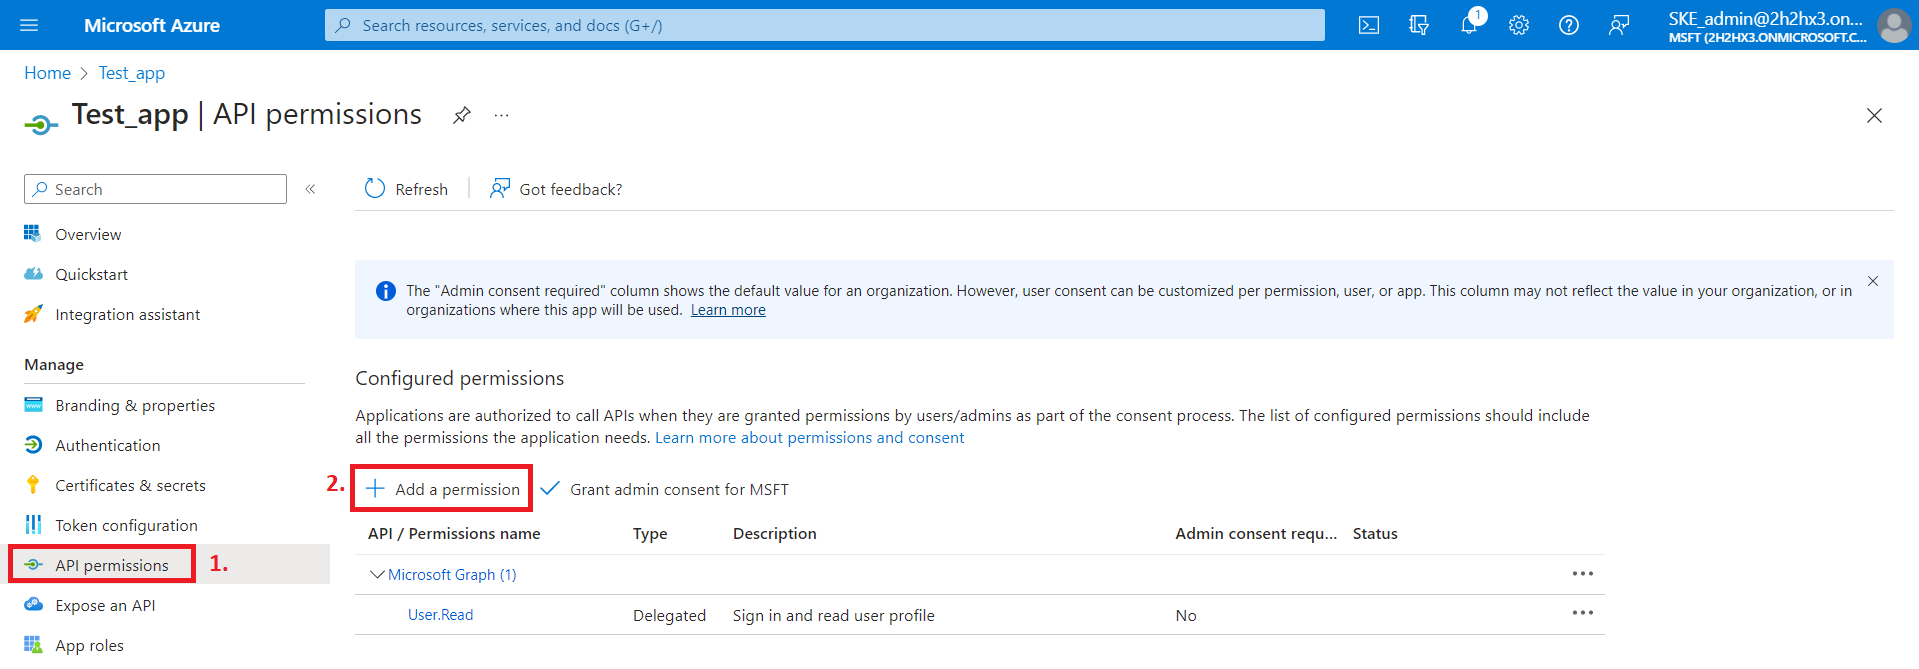
1) On the application details page, click the API permissions button on the left menu. When the configured permissions page loads, click the + Add a permission button and select the requested API.
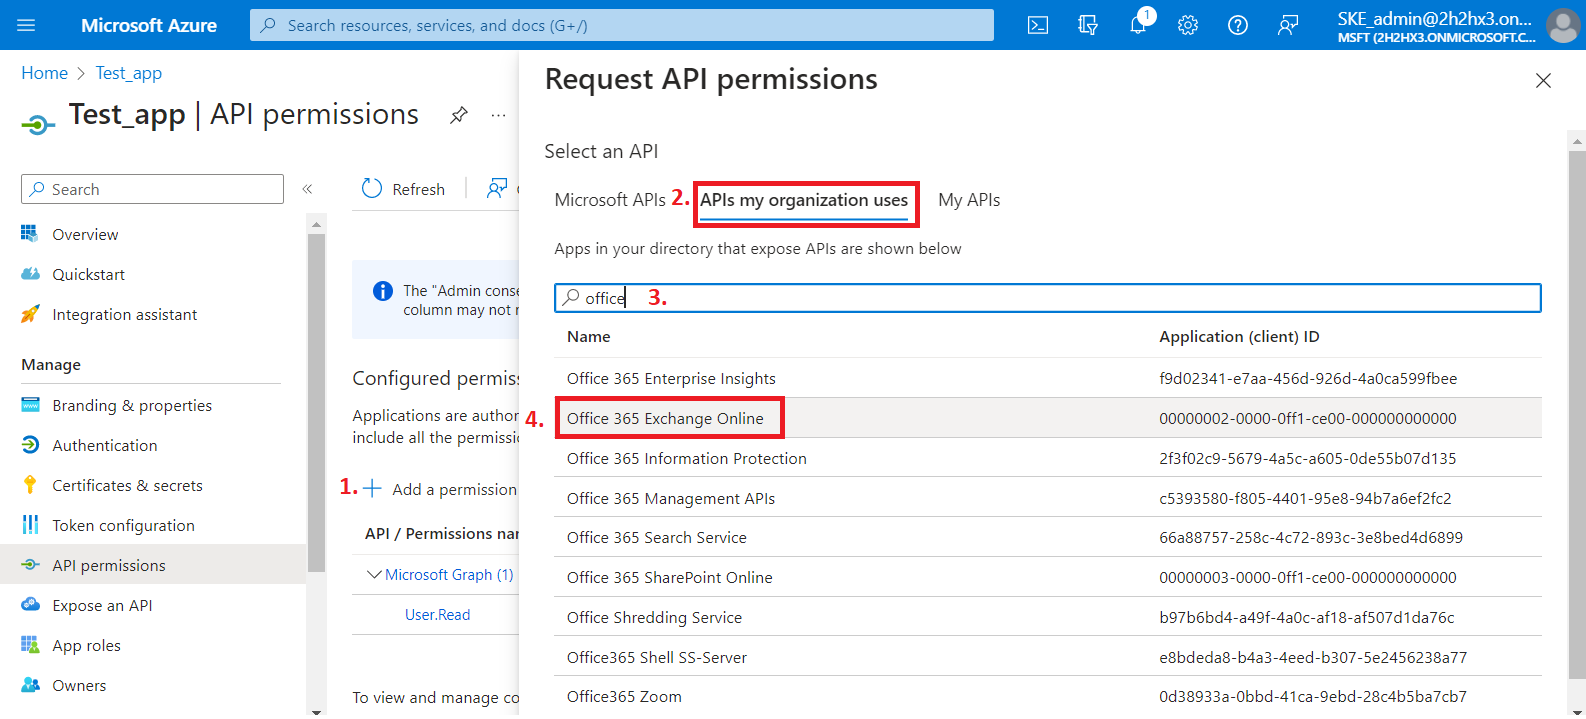
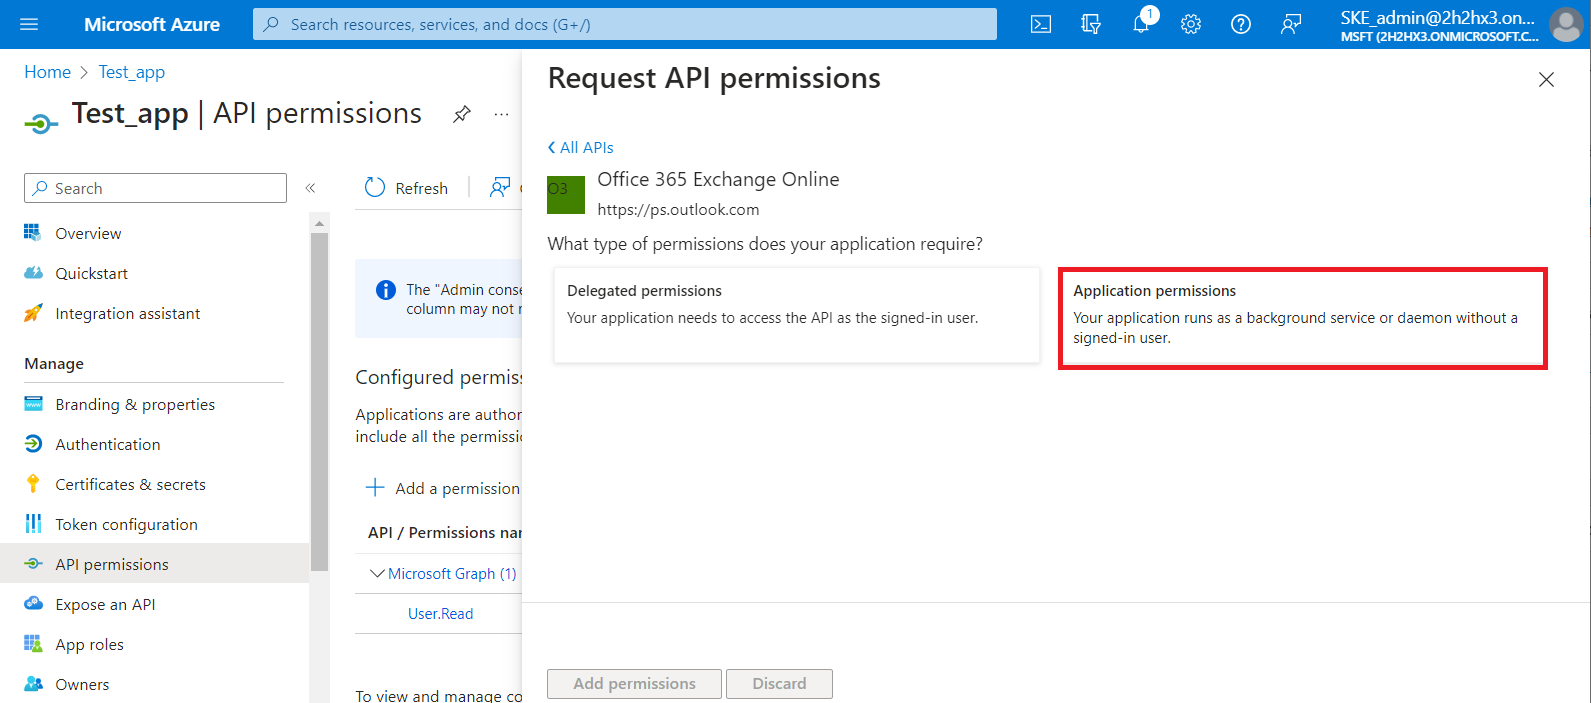
2) On the Request API permissions tab, search for Office 365 Exchange Online and select it.
3) Then select the Application permissions box, where the available permissions from this category will be shown.
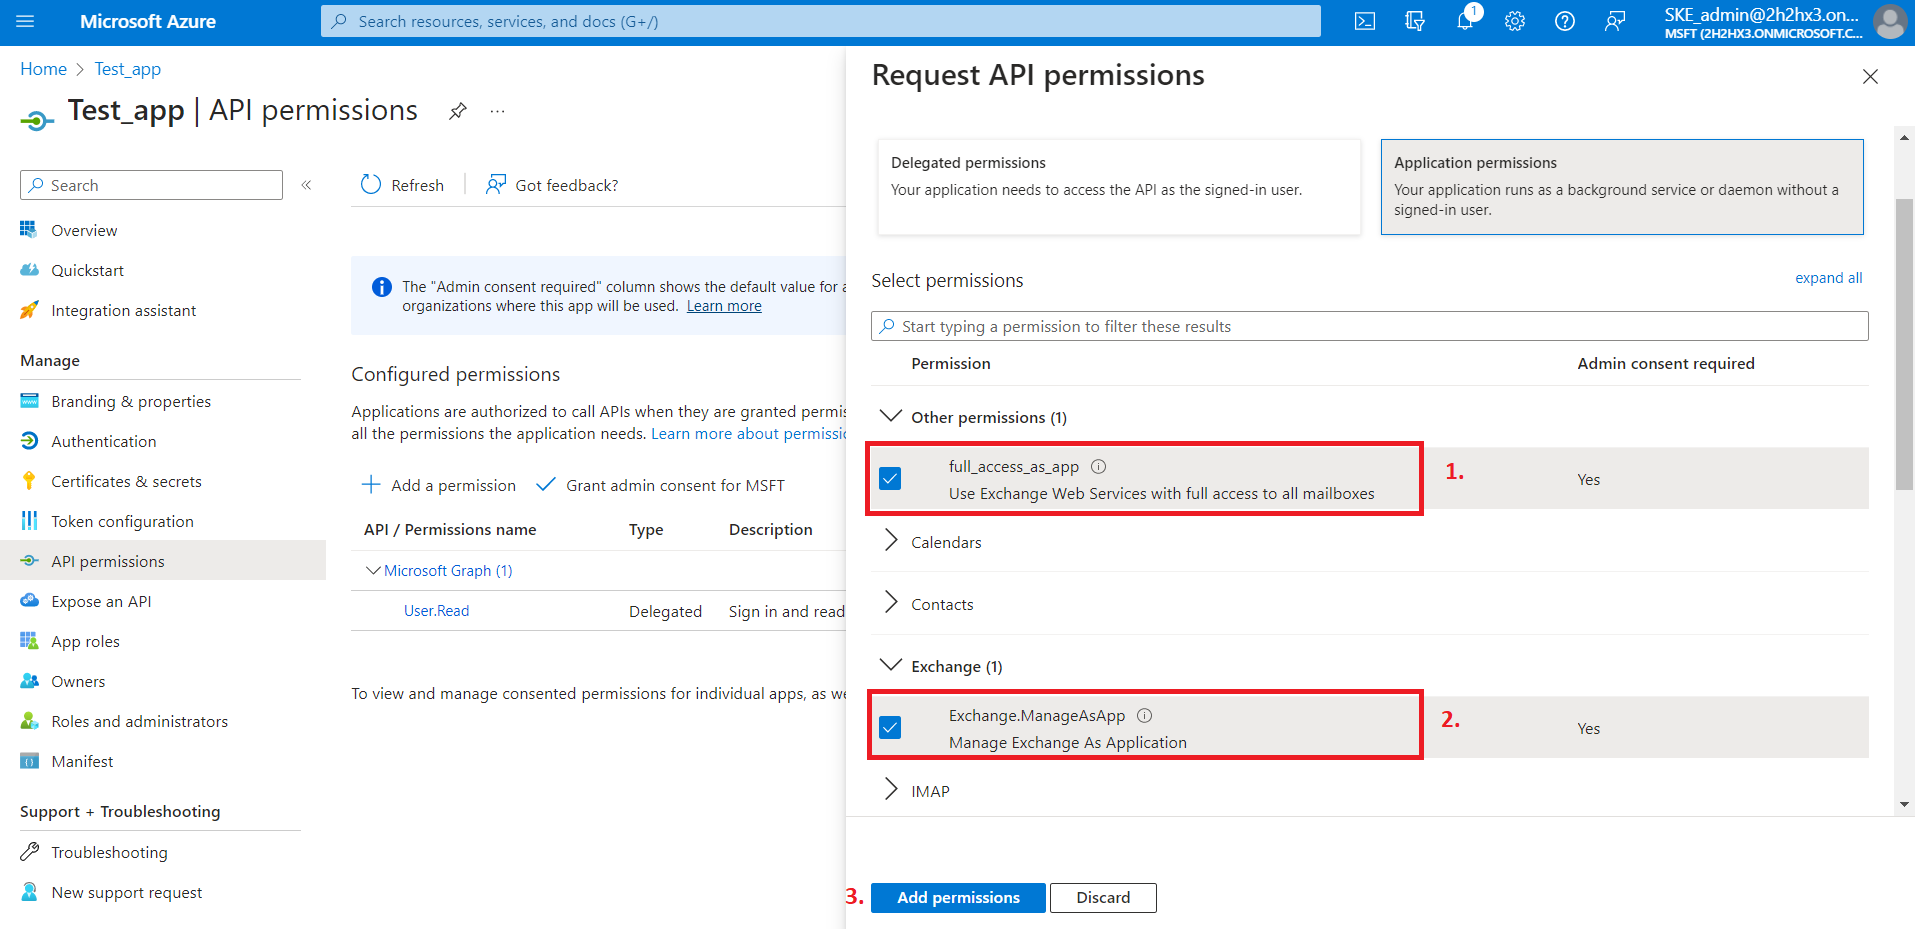
Locate the full_access_as_app permission from the Other permissions option and the Exchange.ManageAsApp permission from the Exchange option, then click on the Add permissions button.
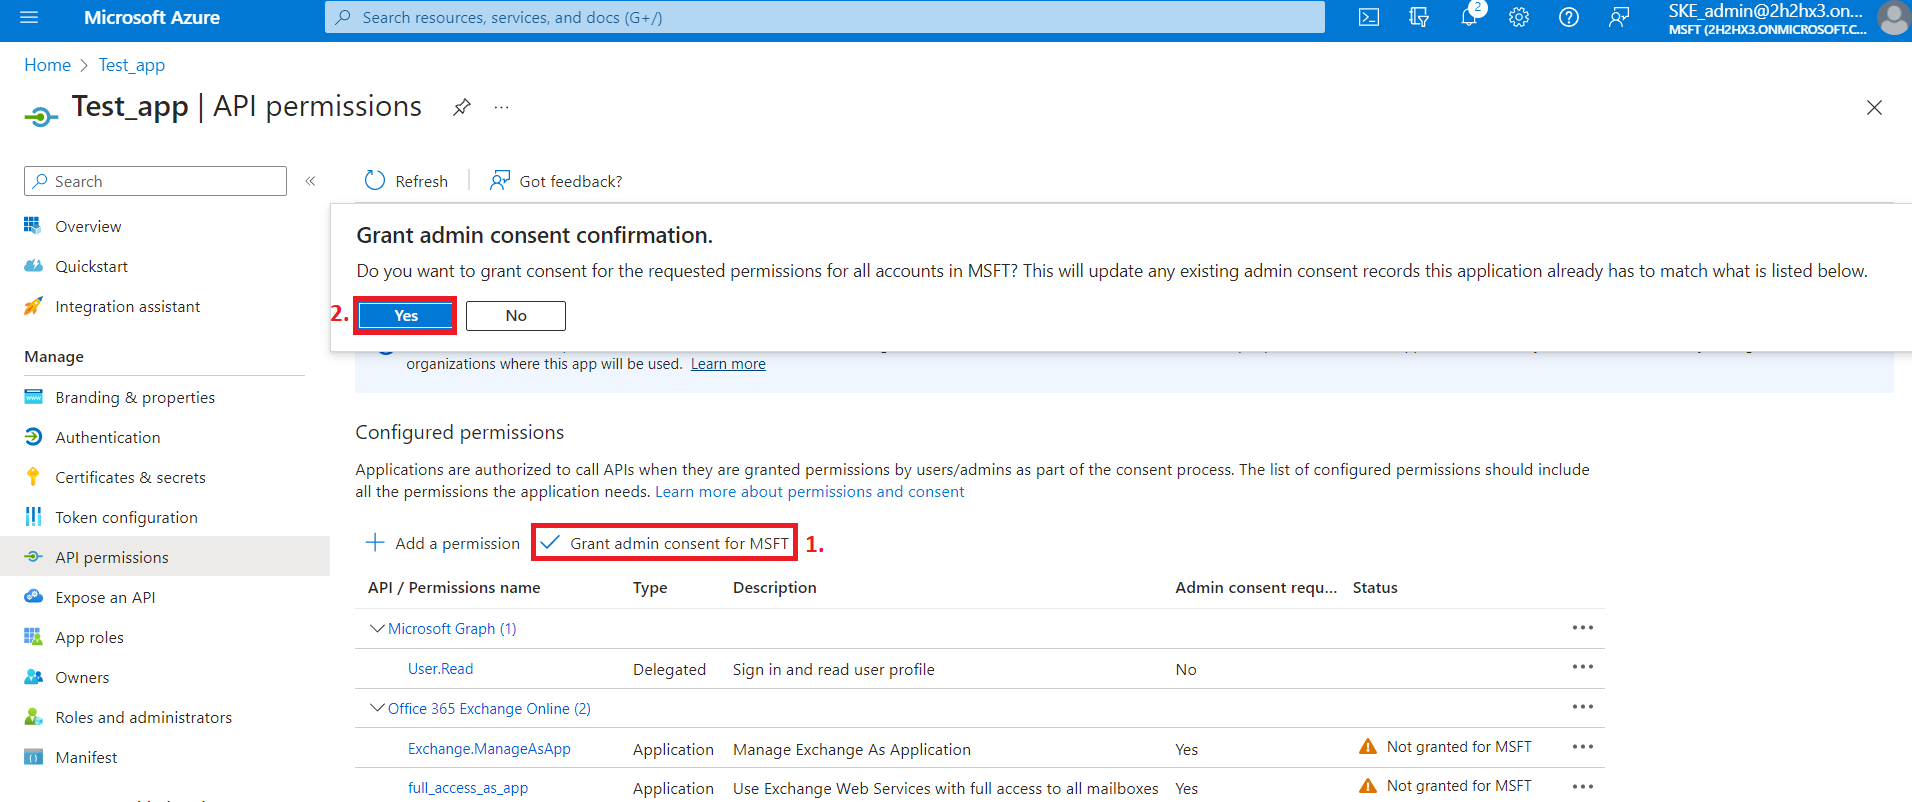
4) After the permissions have been assigned to the application, the administrator must grant consent for these permissions. Click on the Grant admin consent for “TENANTNAME” button.
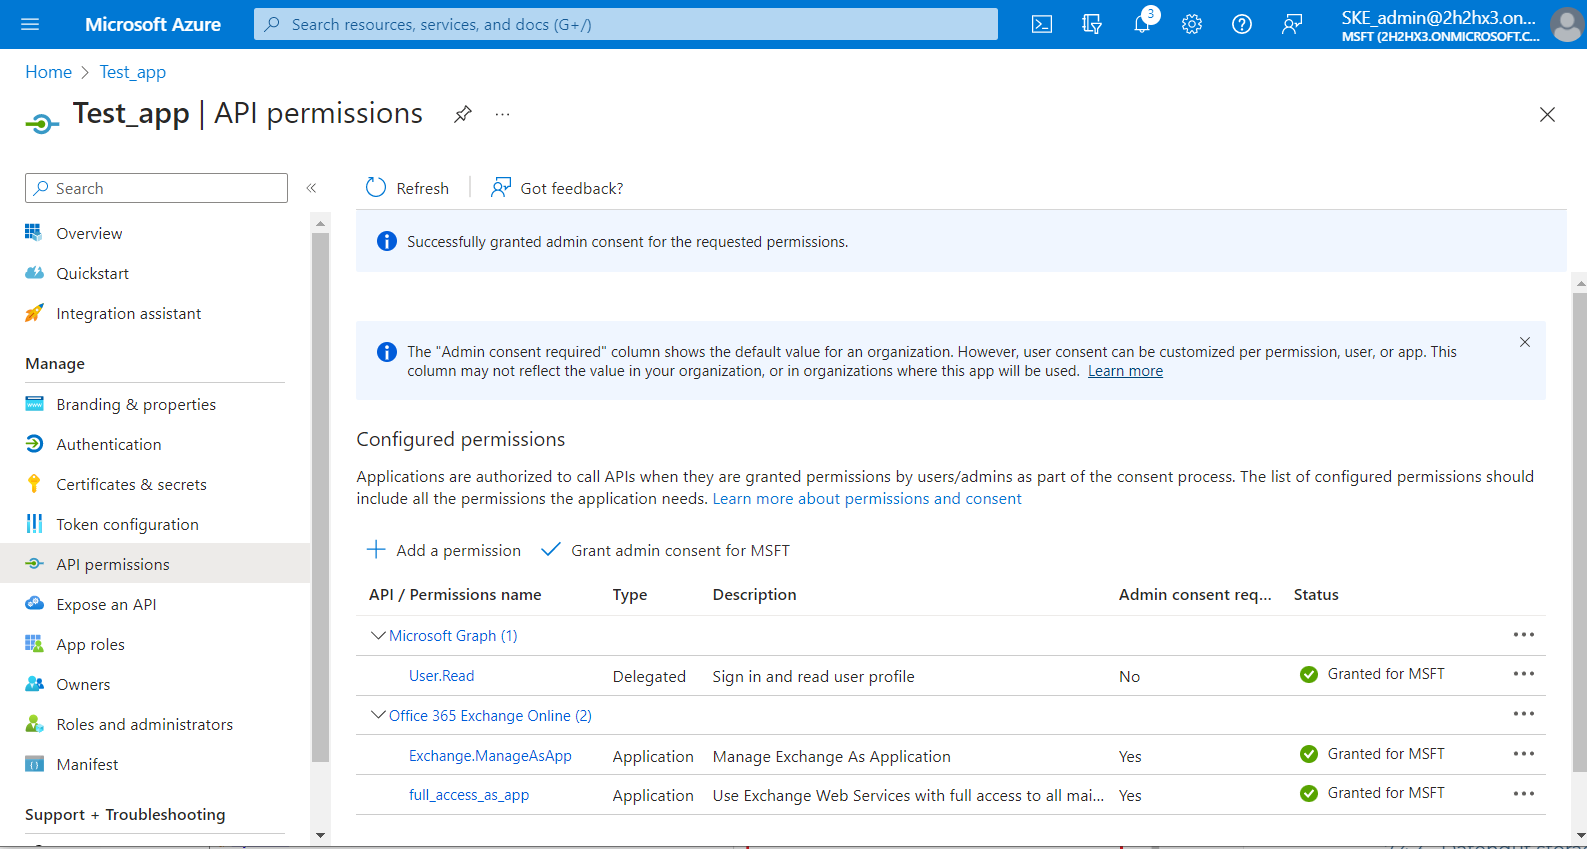
5) The Exchange.ManageAs.App permission allows the applicant to connect to PowerShell but does not grant access to any PowerShell commands or Exchange objects. The permission to access Exchange objects is granted through the Role Based Access Control (RBAC). This means that the App registration needs to be granted to the Exchange Administrator role or Exchange Recipient Administrator role.
First, you need to go back to the Azure Active Directory page, then go to the Roles and administrators | All roles page, select Exchange Administrator from the list, and click the role.
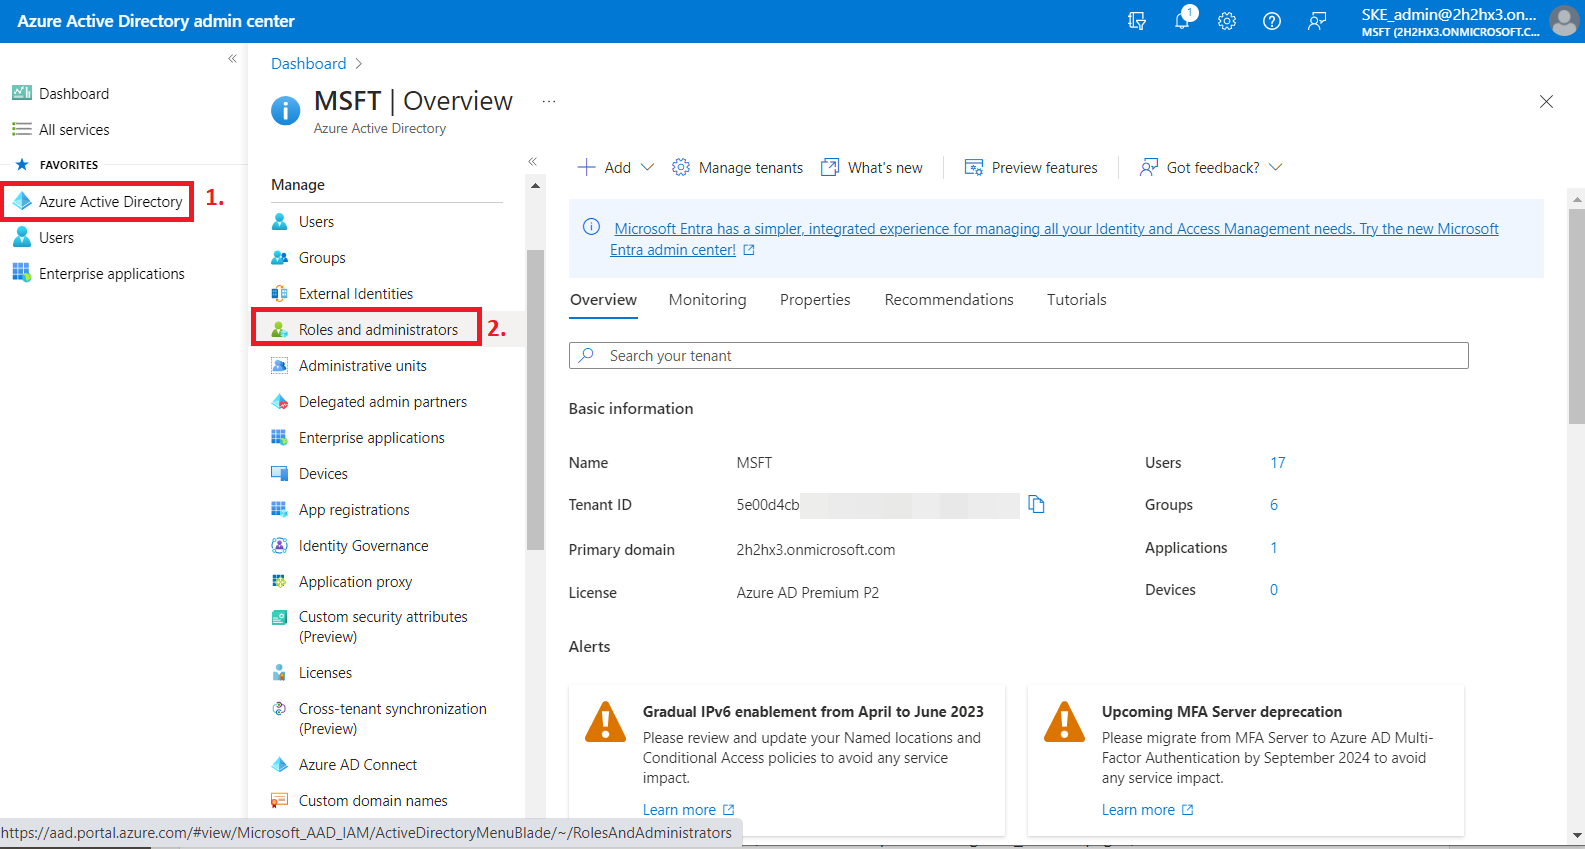
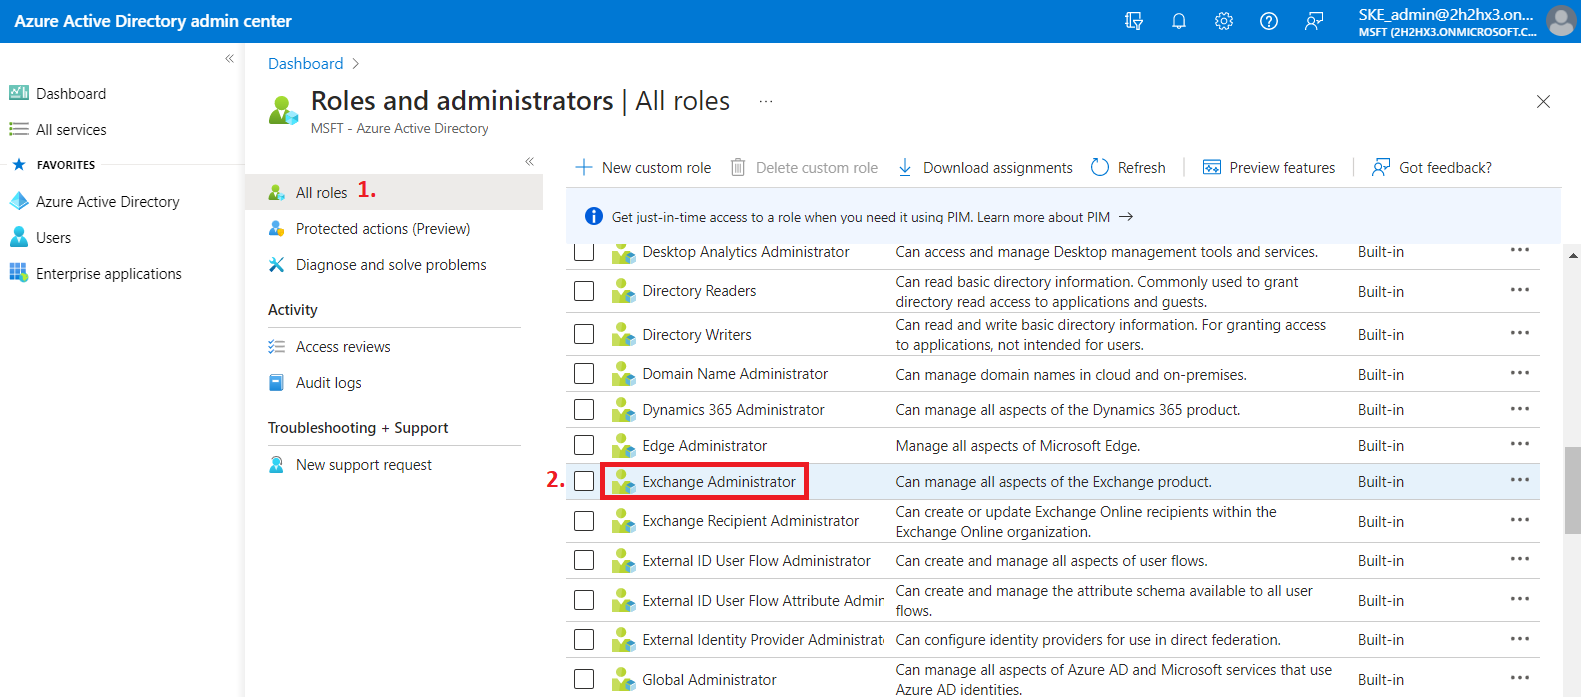
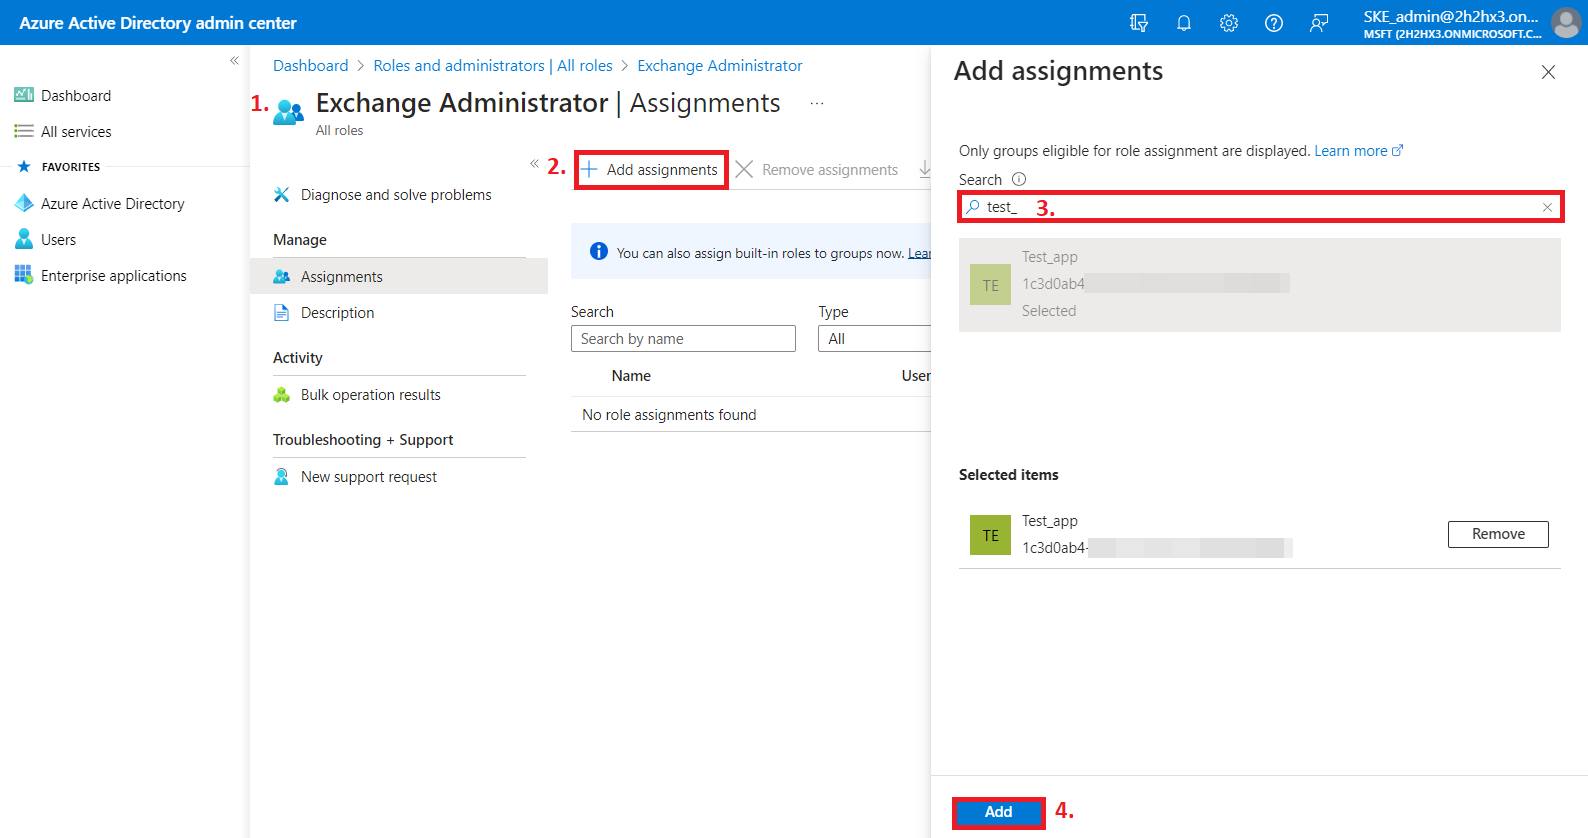
6) After you open the role, click on the Add assignments button, then search for your App registration (Test_app in our example), and assign it to the role. Please note that the App registration is of type “Service Principal”.
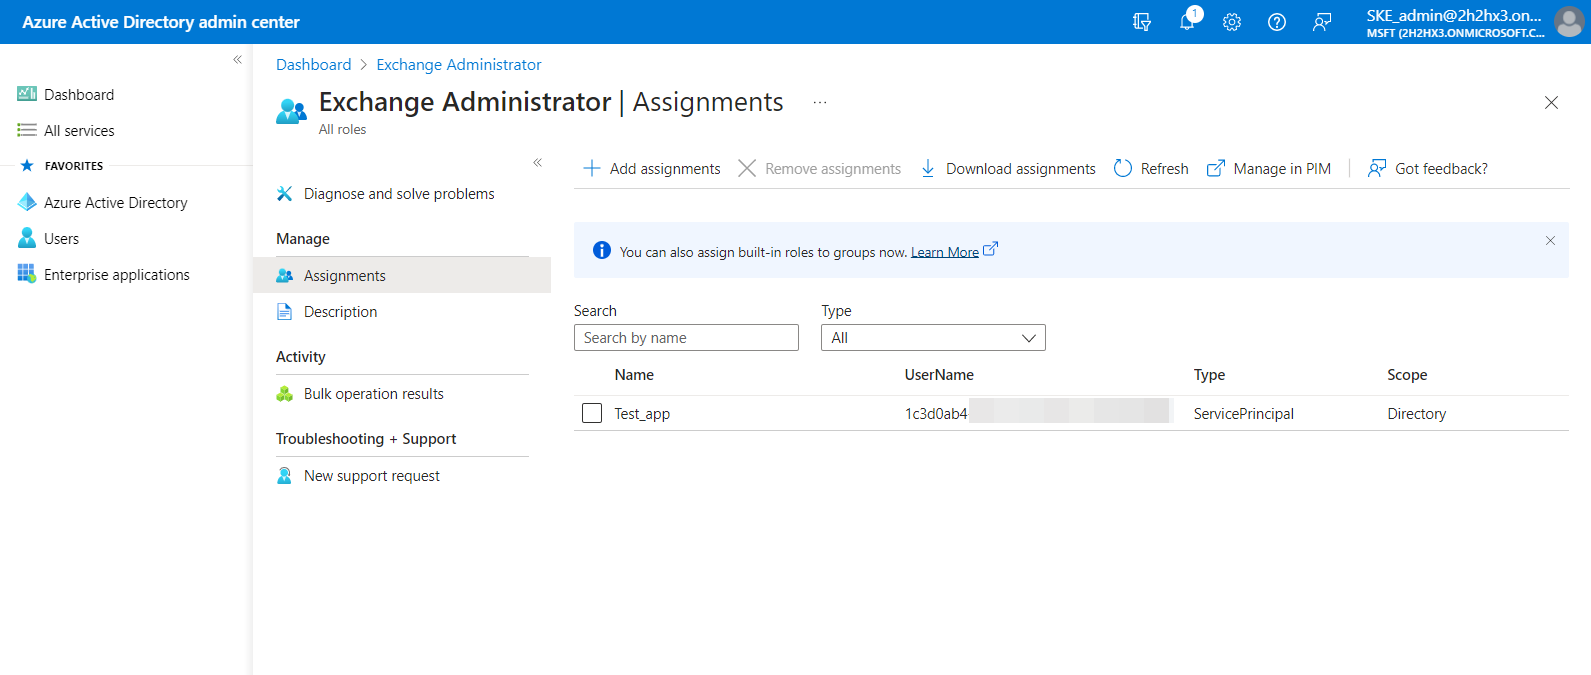
7) The roles will be listed on the Exchange Administrator | Assignments page now.
8) When the permissions are assigned to the application, the admin consent is granted, and the roles are assigned, add a new client secret by clicking on the + Next client secret button. This is necessary for some plugins and client applications.
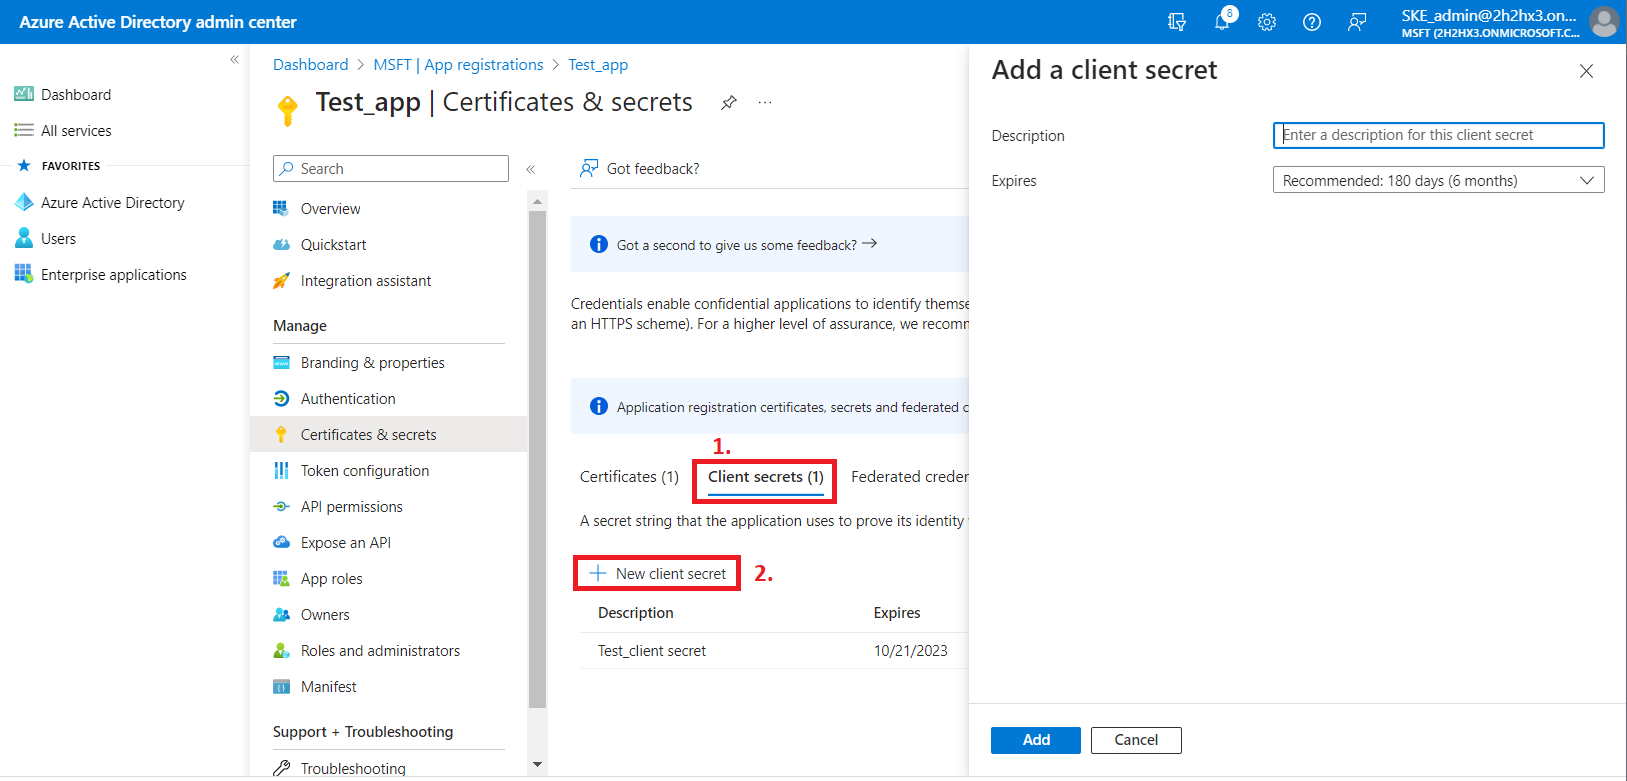
After the configuration is done, copy the client secret shown on the Get client secret dialog box to a secure location so that you can refer to it later. The client secret will be required when configuring certain contentACCESS models with modern authentication– like Email archive, SharePoint archive, Teams archive, GDPR Exchange, and Exchange connection.
Now you can configure contentACCESS to use the modern authentication for PowerShell. Read more about the Exchange connection configuration here.
Grant permissions for SharePoint archive
1) Navigate to your registered application (Azure Active Directory => App registration => Owned applications => registered application [Test_app in our example] => open the application by clicking on the title). On the application details page, click the API permissions button on the left menu. When the configured permissions page loads, click the + Add permission button and select the requested API.
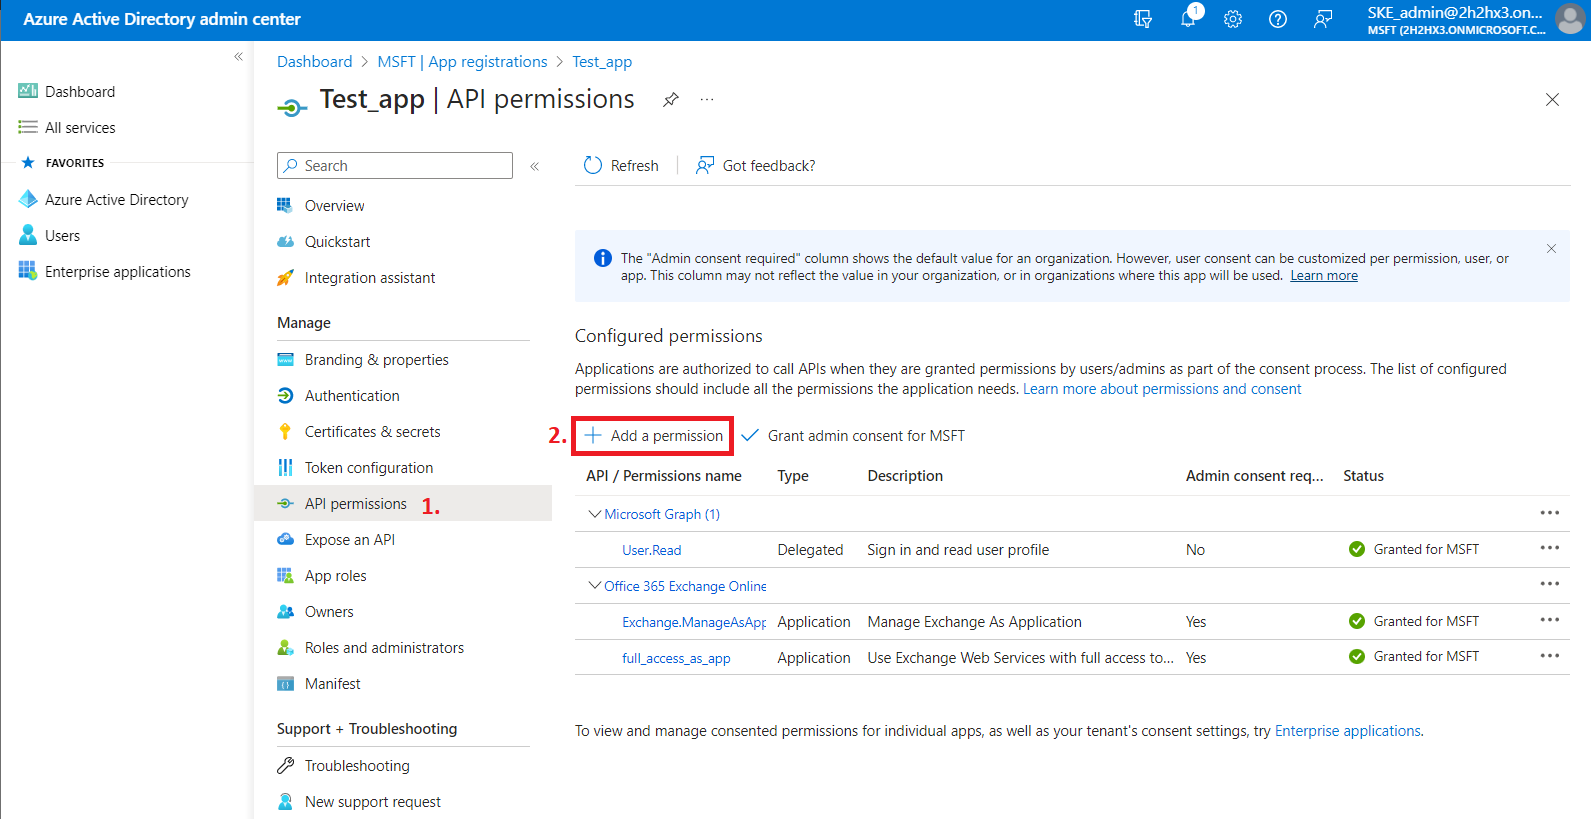
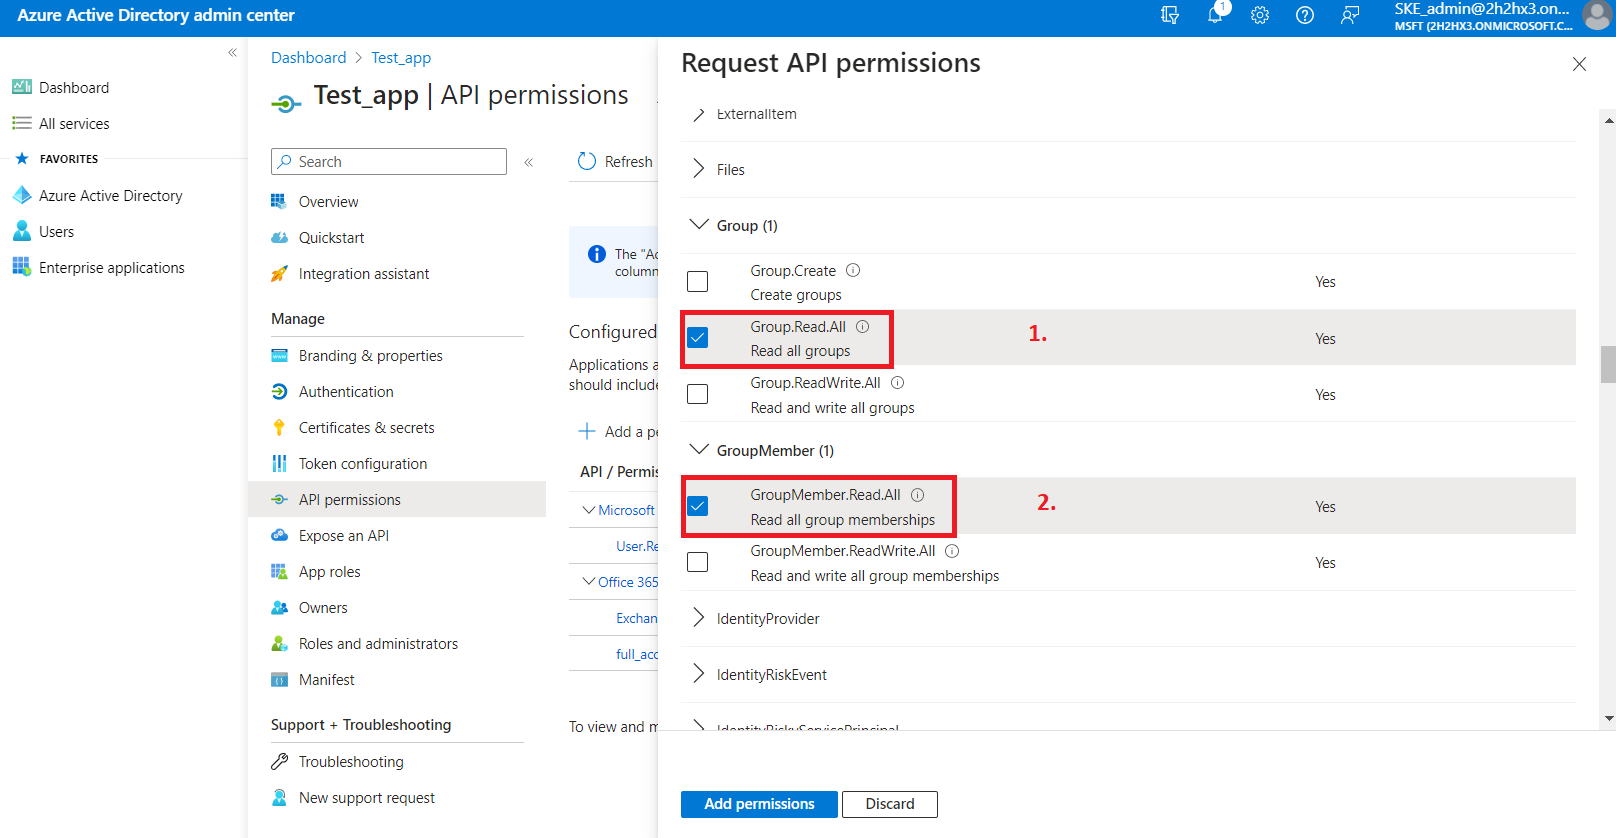
2) On the Request API permissions => Microsoft APIs tab, you need permissions from Microsoft Graph and SharePoint options to support all the functions of contentACCESS and other client applications (including AAD groups support in SharePoint archive).
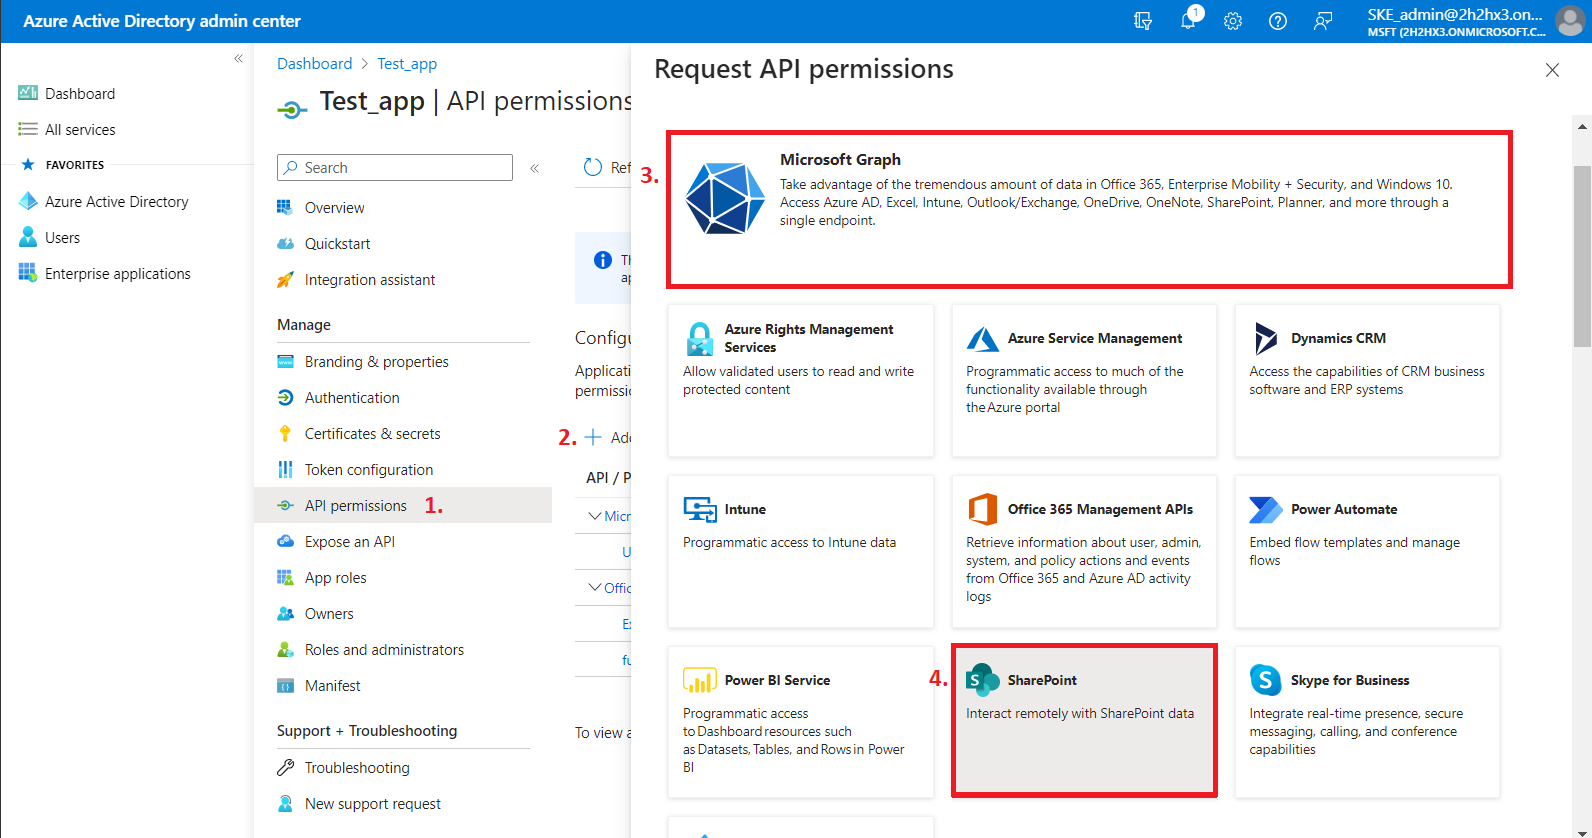
First, let’s go through with the Microsoft Graph permissions. After selecting the option from the list, choose the Application permissions box, where the available permissions from this category will be shown.
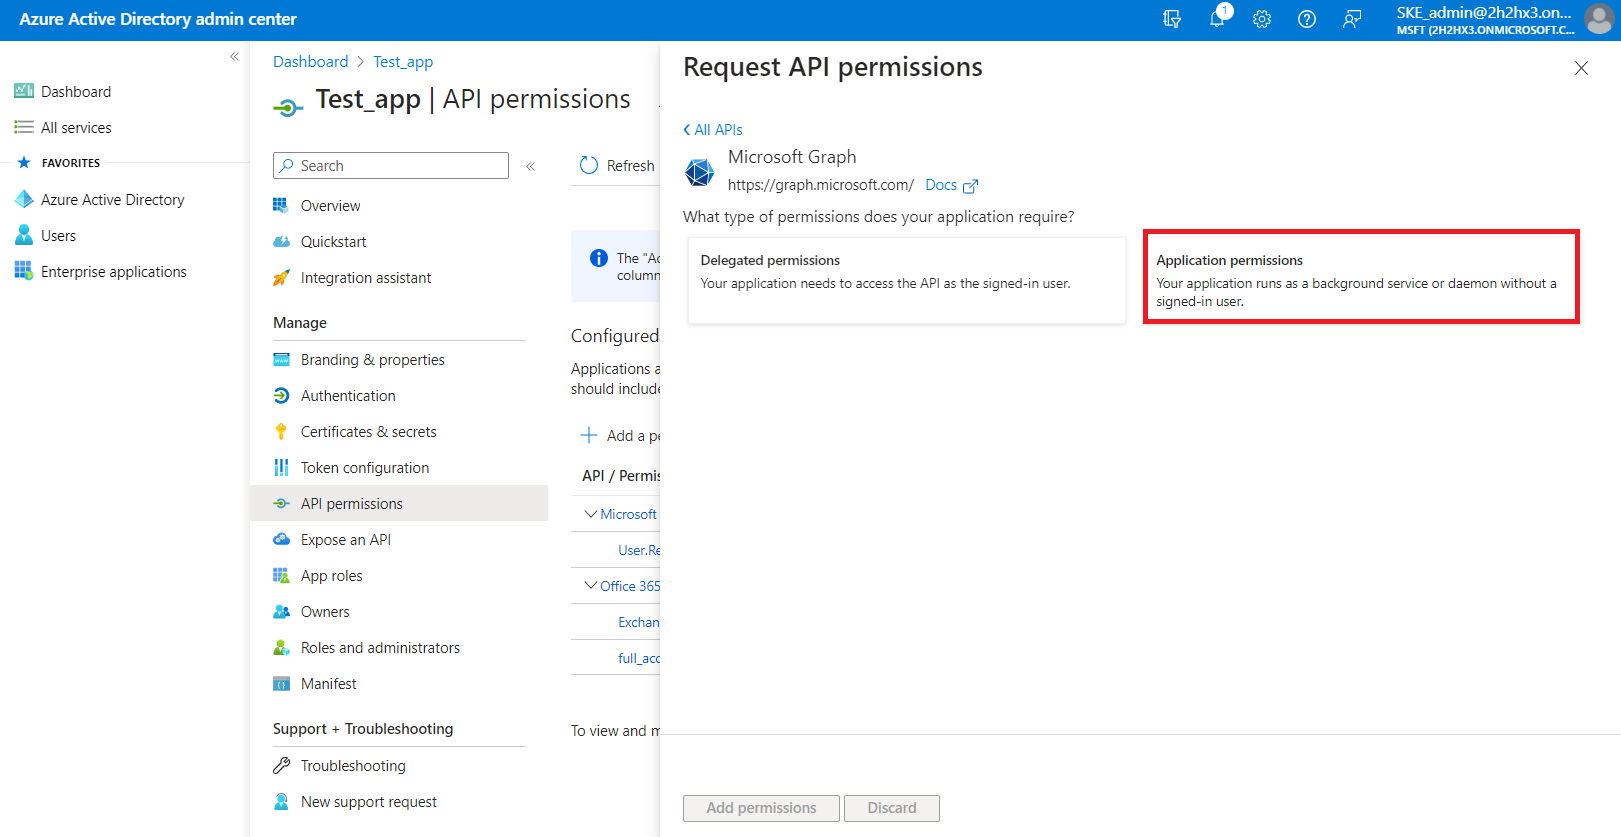
Locate the:
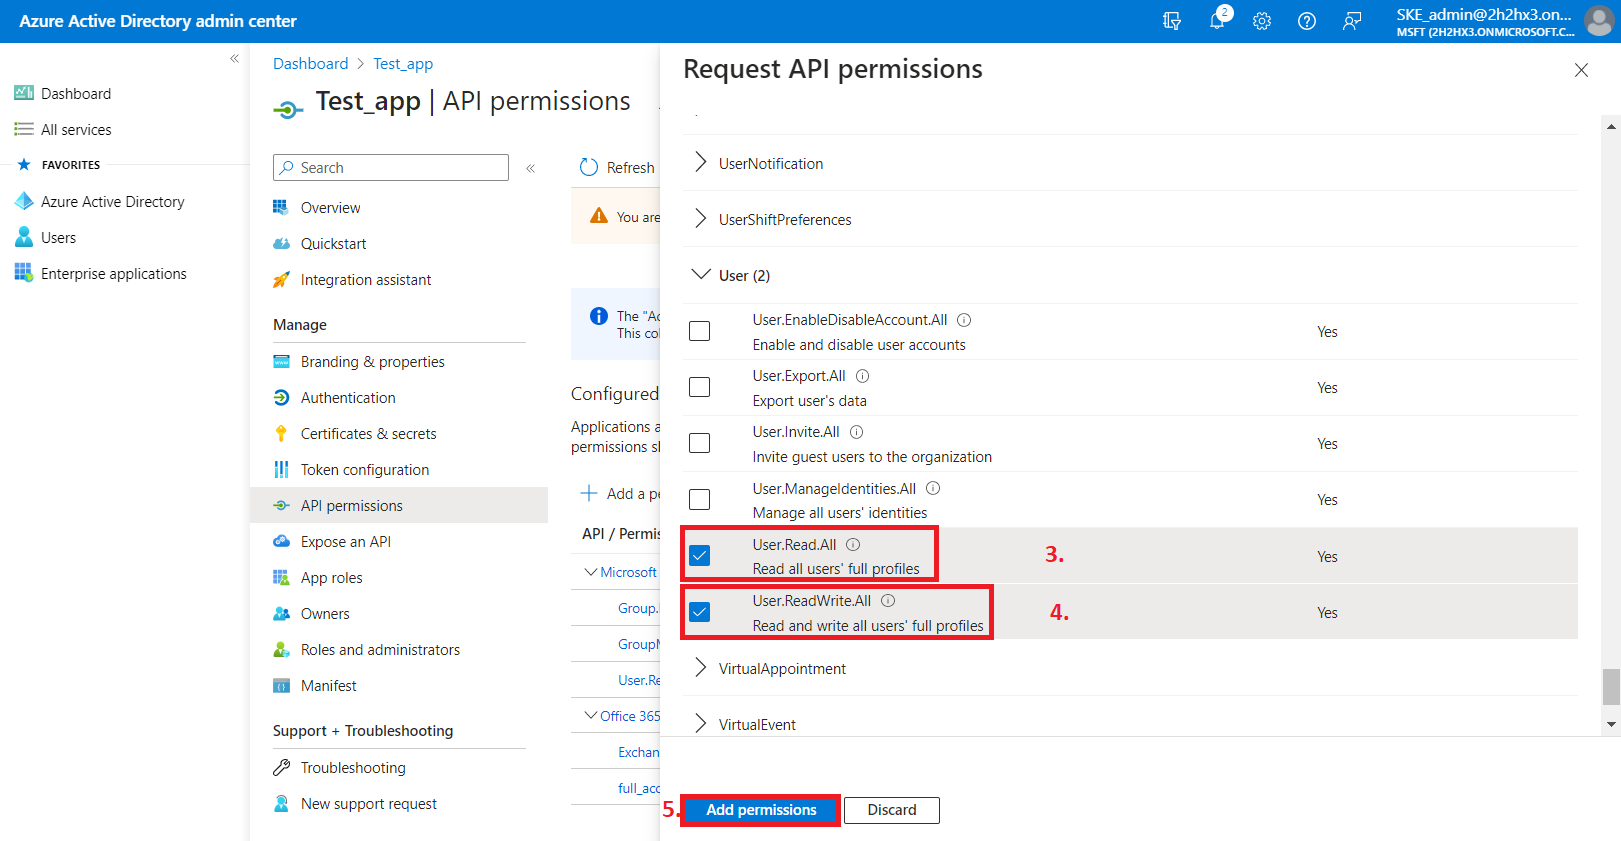
- Group.Read.All (read all groups) from the Group option;
- Group.Members.Read.All (read all group memberships) permission from the GroupMember option;
- User.Read.All (read user profiles) and User.ReadWrite.All (read and write user profiles) permissions from the User option,
then click on the Add permissions button.
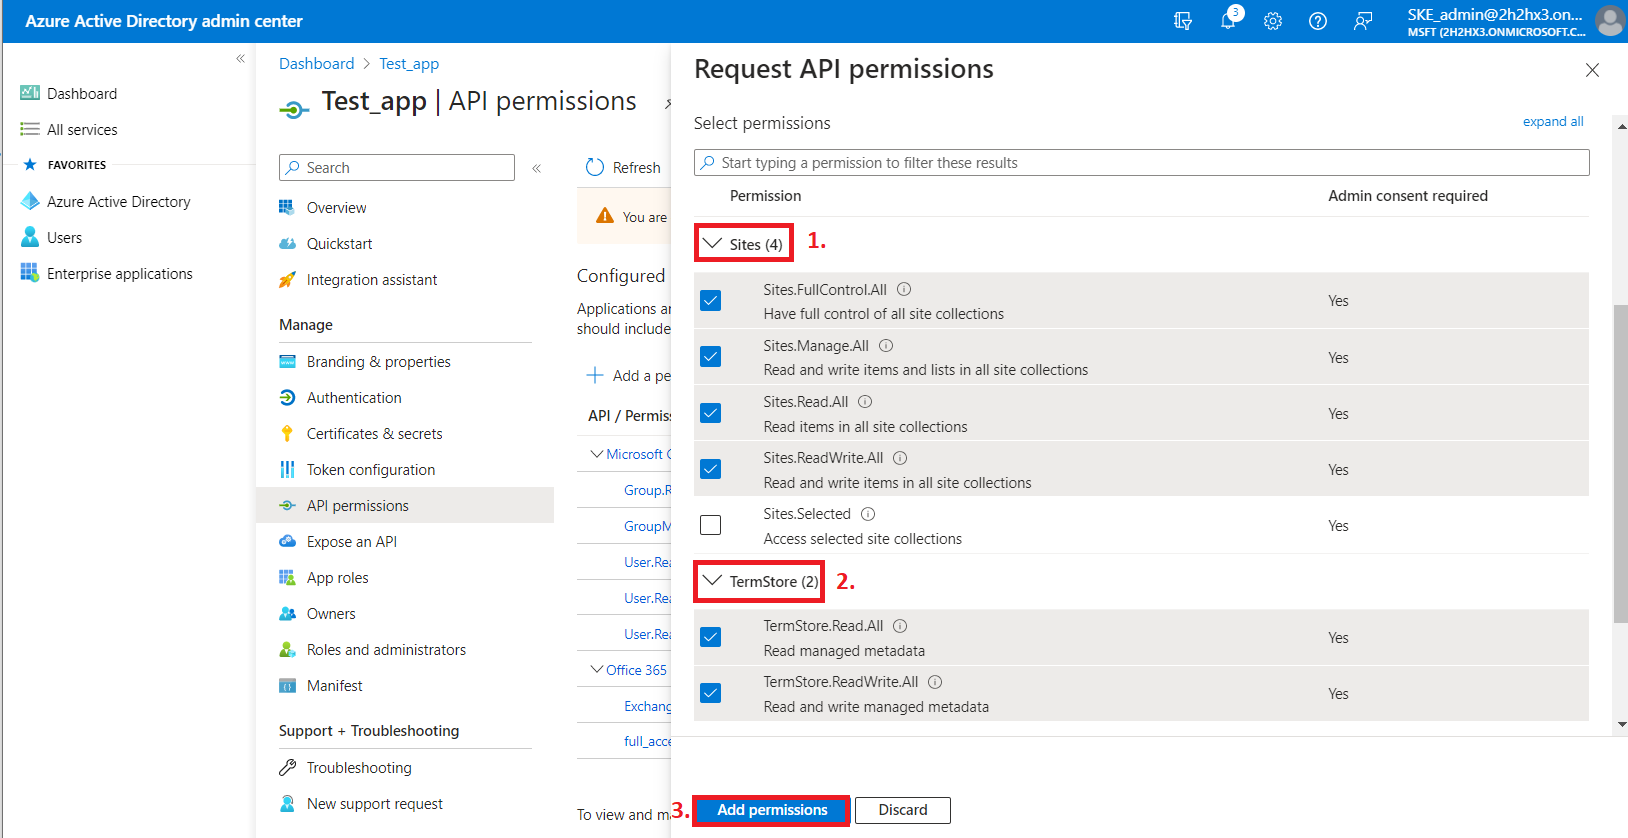
From the SharePoint option, the following Application permissions are required (from the Sites and TermStore groups):
- Sites.FullControl.All – have full control of all site collections
- Sites.Manage.All – Read and write items and lists in all site collections
- Sites.Read.All – Read items in all site collections
- Sites.ReadWrite.All – Read and write items in all site collections
- TermStore.Read.All – Read managed metadata
- TermStore.ReadWrite.All – Read and write managed metadata
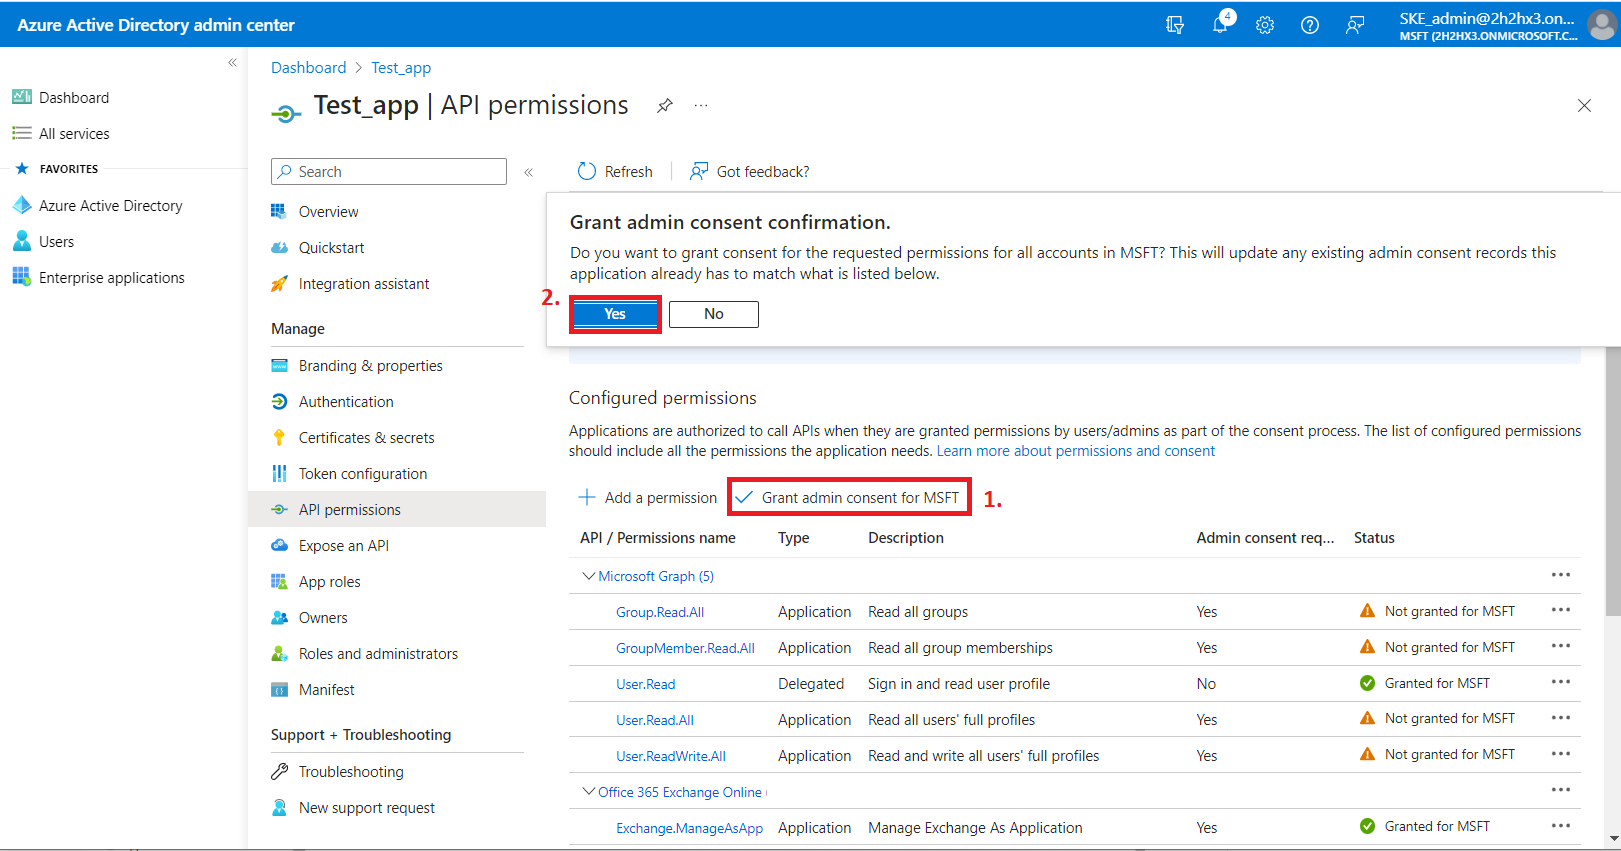
3) After the permissions have been assigned to the application, the administrator must grant consent for these permissions. Click on the Grant admin consent for “TENANTNAME” button.
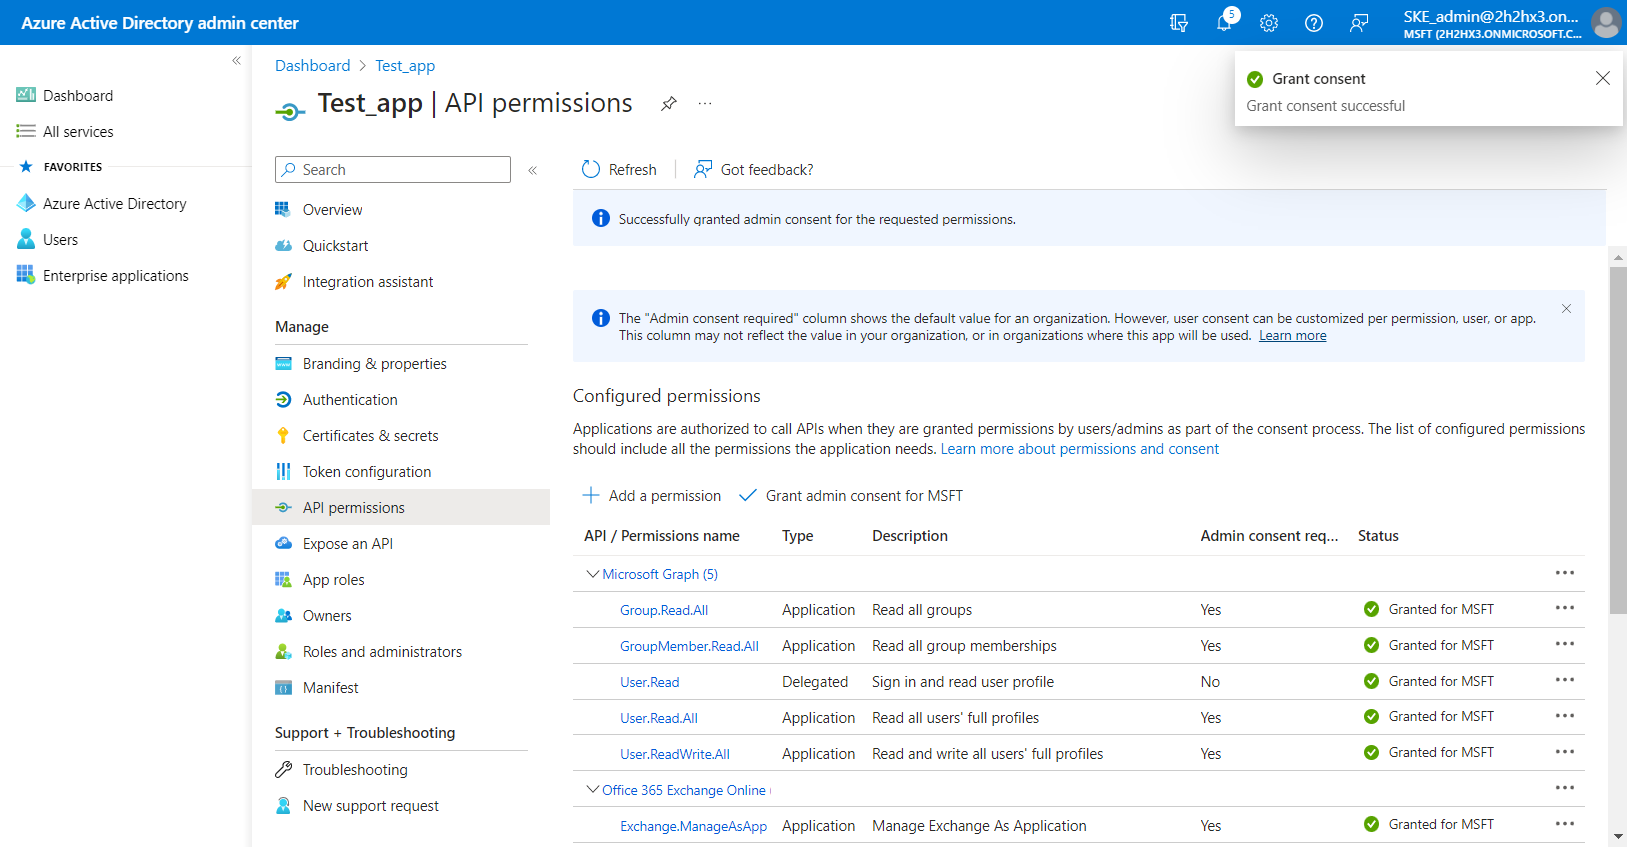
4) When the permissions are assigned to the application and the admin consent is granted, the client access certificate needs to be assigned to the application. Click on the Certificates & secrets option in the left side menu. On the certificate management screen click on the Upload certificate (Certificates tab) button. Browse the client certificate you want to use and upload it. It can be a self-signed certificate or an already existing one. A PowerShell script for creating a self-signed certificate can be downloaded here.
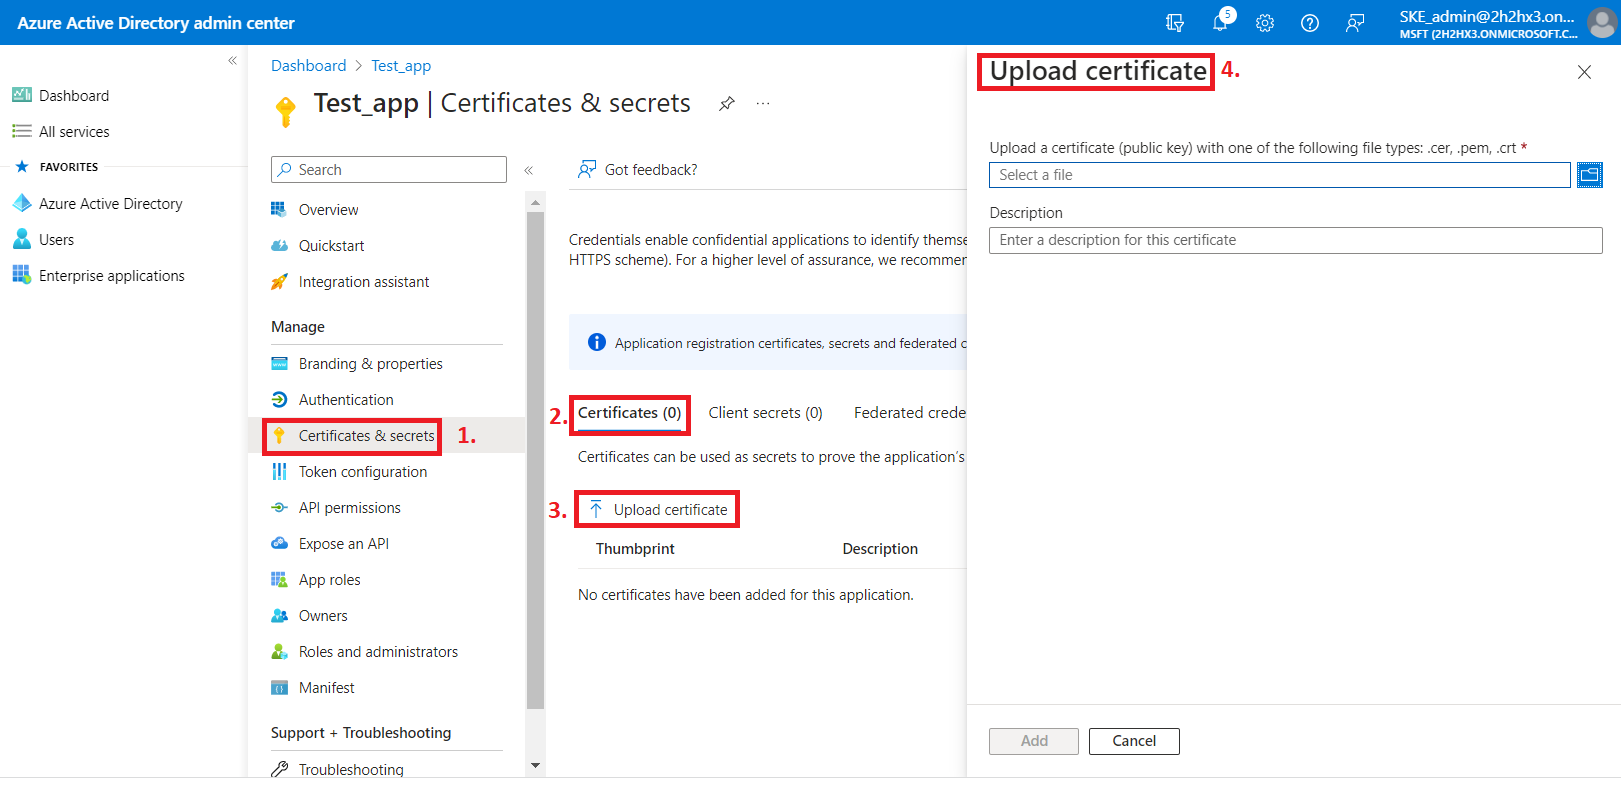
5) Next, add a new client secret by clicking on the + Next client secret button. This is necessary for some plugins and client applications (Test_client secret in our example).

Grant permissions for the Teams archive
1) Navigate to your registered application (Azure Active Directory => App registration => Owned applications => registered application [Test_app in our example] => open the application by clicking on the title). On the application details page, click the API permissions button on the left menu. When the configured permissions page loads, click the + Add permission button and select the requested API.

2) On the Request API permissions => Microsoft APIs tab, you need permissions from Microsoft Graph and SharePoint options. In the case of Teams archive, some permissions need to be selected from the Delegated option, and some from the Application option. The required permission set depends on the Teams Archive configuration in contentACCESS you would use.
There you can use delegated access or application access. When you choose delegated access, contenACCESS will connect and access the Teams data in the name of a superuser. This superuser MUST have owner access to every team you would like to archive.
The second approach is application access, where contentACCESS will connect to Microsoft Teams using a configured application. This application must NOT have owner access to any of the Teams, but you need to request access to Microsoft Protected API. For more information about how to request more access to Microsoft Protected API, read the following subsection, or follow the guideline here. The request is usually accepted within a day or two. The recommended approach is application access.
If you do not know at this point which approach will fit the best for you, add both permissions to the application. You can decide later during the archive configuration which option to use.

First, let’s go through the Microsoft Graph permissions. After selecting the option from the list, you need to choose the required Application and Delegated permissions from these categories.
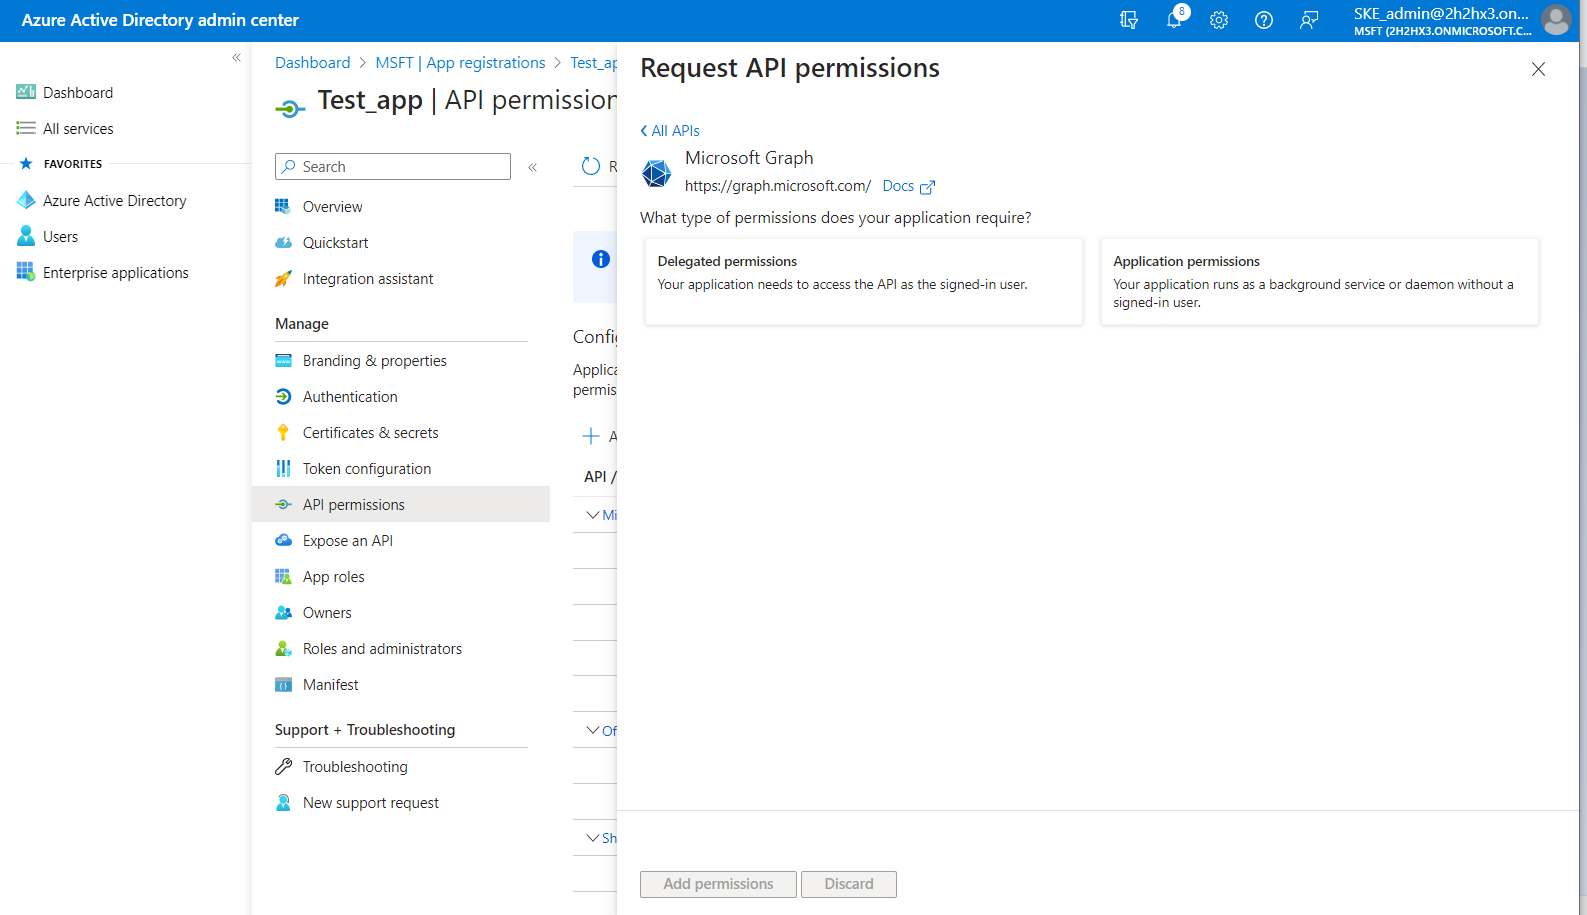
From the Delegated permissions category locate the following permissions, then click the Add permissions button:
- ChannelMessage.Read.All – Read user channel messages
- Directory.Read.All – Read directory data
- Group.ReadWrite.All – Read and write all groups
- GroupMember.Read.All – Read all group memberships
- TeamsTab.Read.All – Read tabs in Microsoft Teams
- TeamworkTag.ReadWrite – Read and write tags in Teams
- User.Read – Sign in and read user profile
From the Application permissions category locate these permissions, then click on the Add permissions button:
- ChannelMessage.Read.All – Read all channel messages
- Directory.Read.All – Read directory data
- Group.ReadWrite.All – Read and write all groups
- GroupMember.Read.All – Read all group memberships
- TeamsTab.Read.All – Read tabs in Microsoft Teams
- Teamwork.Migrate.All – Creating and managing resources for migration to Microsoft Teams
- TeamworkTag.Read.All – Read tags in Teams
From the SharePoint option, the following Delegated and Application permissions are required:
Delegated permissions
- Sites.FullControl.All – Have full control of all site collections
- Sites.Manage.All – Read and write items and lists in all site collections
- Sites.ReadWrite.All – Read and write items in all site collections
- TermStore.ReadWrite.All – Read and write managed metadata
- User.ReadWrite.All – Read and write user profiles
Application permissions
- Sites.FullControl.All – Have full control of all site collections
- Sites.Manage.All – Read and write items and lists in all site collections
- Sites.ReadWrite.All – Read and write items in all site collections
- TermStore.ReadWrite.All – Read and write managed metadata
- User.ReadWrite.All – Read and write user profiles
Click on Add permissions.
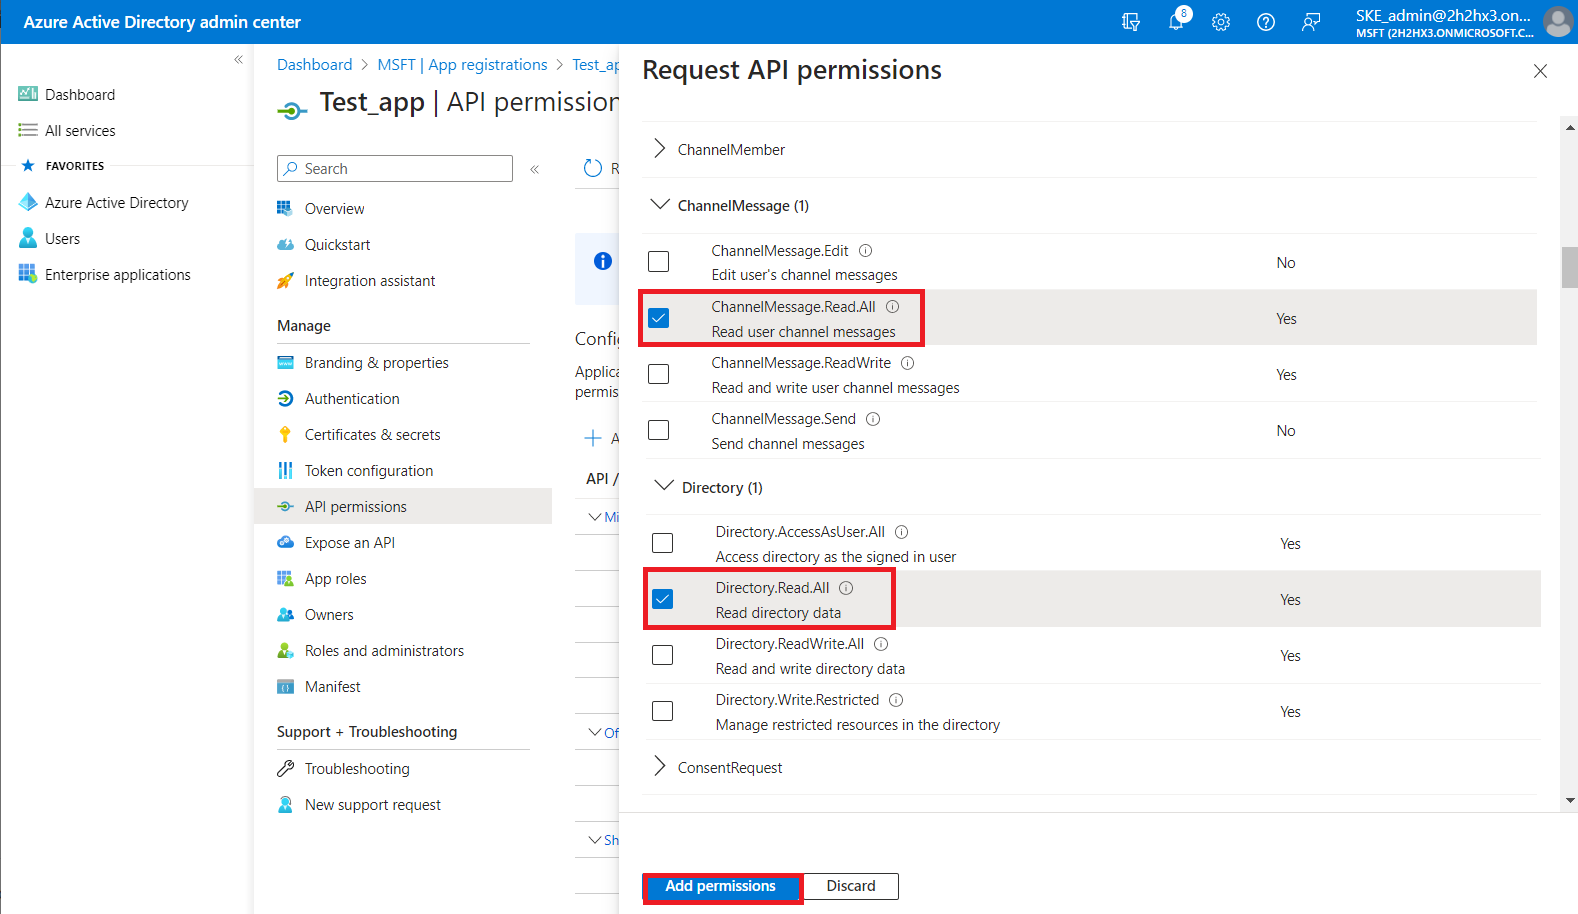
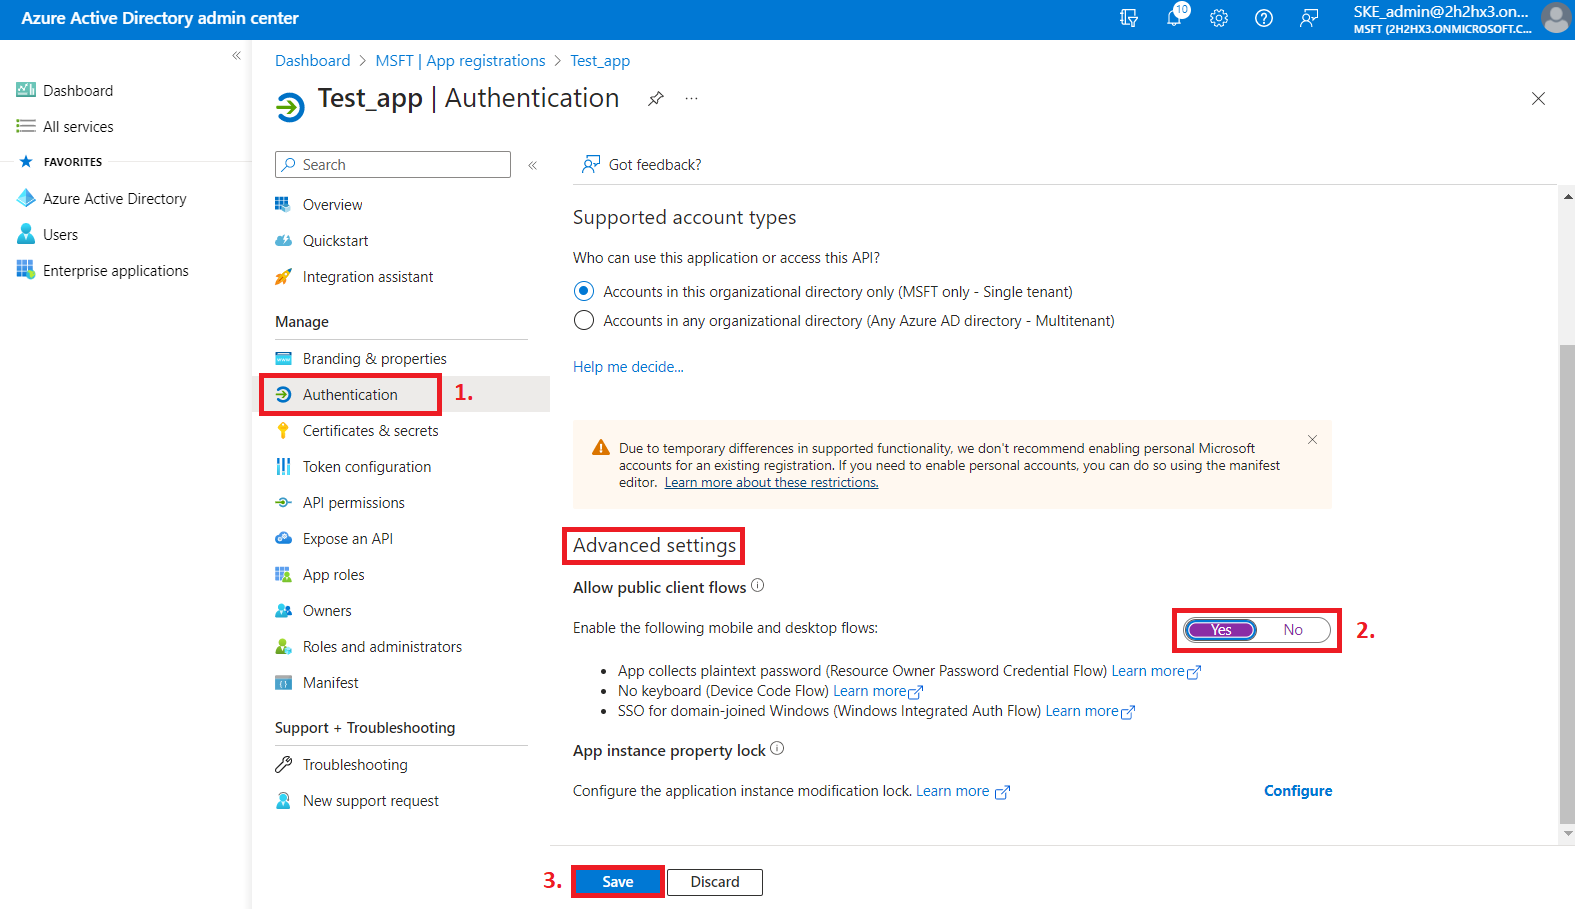
3) For delegated access, the following option must be enabled:
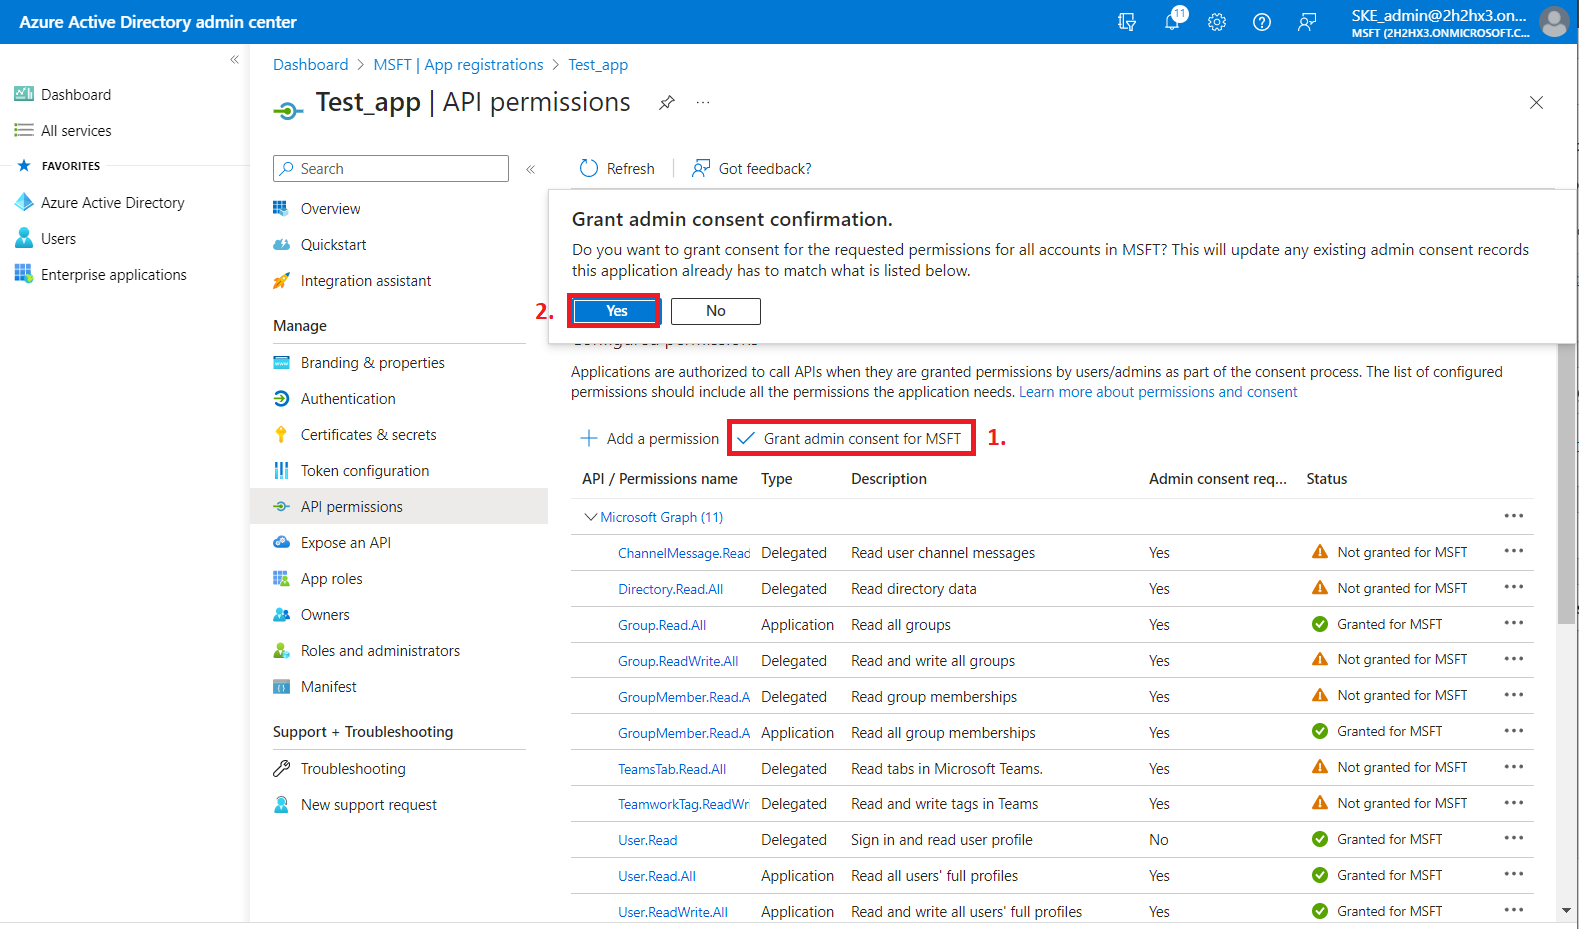
4) After the permissions have been assigned to the application, the administrator must grant consent for these permissions. Click on the Grant admin consent for “TENANTNAME” button.
5) When the permissions are assigned to the application and the admin consent is granted, the client access certificate needs to be assigned to the application.
Click on the Certificates & secrets option in the left side menu. On the certificate management screen click on the Upload certificate (Certificates tab) button. Browse the client certificate you want to use and upload it. It can be a self-signed certificate or an already existing one. A PowerShell script for creating a self-signed certificate can be downloaded here.

6) Next, add a new client secret by clicking on the + Next client secret button. This is necessary for some plugins and client applications (Test_client secret in our example).

