7.4.7.HybridStore
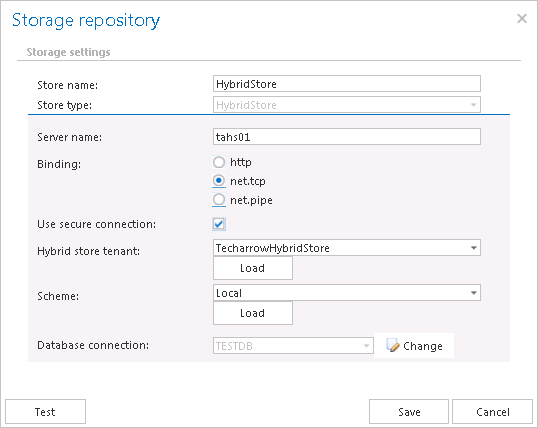
contentACCESS supports the connection with the Hybrid Store. This connection allows contentACCESS to connect to any third-party storage that is supported by this store type. If you want to store the binaries in the Hybrid Store, select it from the Store type dropdown list and specify the required connection settings. The following storage settings are required:
Store name: optional name for the Hybrid Store that contentACCESS will use
Store type: HybridStore
Server name: the server where the Hybrid Store is installed
Binding: http – universal protocol
net.tcp –can be used only in case that the Hybrid Store and contentACCESS are in the same domain
net.pipe – the fastest and recommended protocol; can be used only in case that the Hybrid Store and contentACCESS are installed on the same machine
Use secure connection: Check this option to allow a secure connection with the Hybrid Store. The communication will be secured by a Windows authentication (the contentACCESS service user will be used).
Hybrid store tenant: Click on “Load” to load the list of available tenants based on your Hybrid Store configurations and select the one that should be applied. There are some requirements to load the tenants:
- NET.TCP or NET.PIPE connection must be used (on HTTP the loading is not supported)
- the contentACCESS service user must be a local system administrator on the HybridStore machine
If the tenants are not loaded, then the user needs to enter the HybridStore tenant ID (GUID) manually.
Scheme: Click on “Load” to load the available Hybrid Store schemes and select the one that should be applied. If Hybrid Store uses secure connection and the option is not checked in the dialog, the schemes will not be loaded.
Database settings: Select here an already created database that contentACCESS will use to store the necessary data. It is NOT recommended to change the already configured database that the Hybrid store uses. However, it can be changed using the “Change” button if it is really necessary.
It is recommended to verify the database connection using the “Test” button at the bottom of the dialog.

