25.28.Shortcut Handler Azure App registration
Introduction
.alink files are contentACCESS shortcuts used in Microsoft 365 SharePoint, OneDrive, and Teams when rarely used documents are offloaded from Microsoft 365 to contentACCESS Archive. the original document is replaced by a small shortcut file (the .alink). In Microsoft 365, your organization registers a contentACCESS file handler in the tenant so that opening an .alink directly in SharePoint/Teams/OneDrive correctly redirects you to the contentACCESS Shortcut Handler web service.
The Shortcut Handler Azure application registration is required to enable users to open modern shortcuts (.alink files) from SharePoint, Teams, and Teams-related SharePoint sites through contentACCESS. Without this configuration, modern shortcuts cannot be properly handled, previewed, or restored within the Microsoft 365 environment.
For more information about the Azure application registration for Microsoft 365 archiving, please refer to this chapter.
This section explains how to register the Shortcut Handler Azure application for:
- an existing application
- a single-tenant application (on-premises installation)
1. Register the Shortcut Handler for an existing application – Step 1/A:
If you already have an Azure application registration, you can extend it to support the Shortcut Handler. First, navigate to the Azure Portal, then open App registrations. Here, select the existing application you wish to extend with the Shortcut Handler. From the Redirect URI configuration step onward, the process is the same as for a single-tenant application. Therefore, the remaining steps are described together in the next section.
2. Register the Shortcut Handler for a single-tenant application (on-premises installation) – Step 1/B:
Navigate to Azure Portal. Go to All services -> App registrations -> + New registration. Fill in the details of the new application and leave the Supported account types settings as Single tenant only. The only mandatory field that needs to be changed is the name of the application; the other options can be left as-is. Click the Register button.
![]()
After the app is successfully registered, you will be able to see the Application (client) ID and Directory (tenant) ID in the app’s Overview. (These are used in archive settings to connect contentACCESS with the Microsoft 365 SharePoint, OneDrive, and Teams).
![]()
Step 2 – configure the Redirect URIs
Go to Manage > Authentication (Preview), and click the Add Redirect URI button.
![]()
From the menu that appears, you will need the Web and Single-page application.
![]()
First, configure the Web application by providing the following Redirect URI:
https://{Fully Qualified Domain Name}/ShortcutHandler/signin-oidc
- For example:
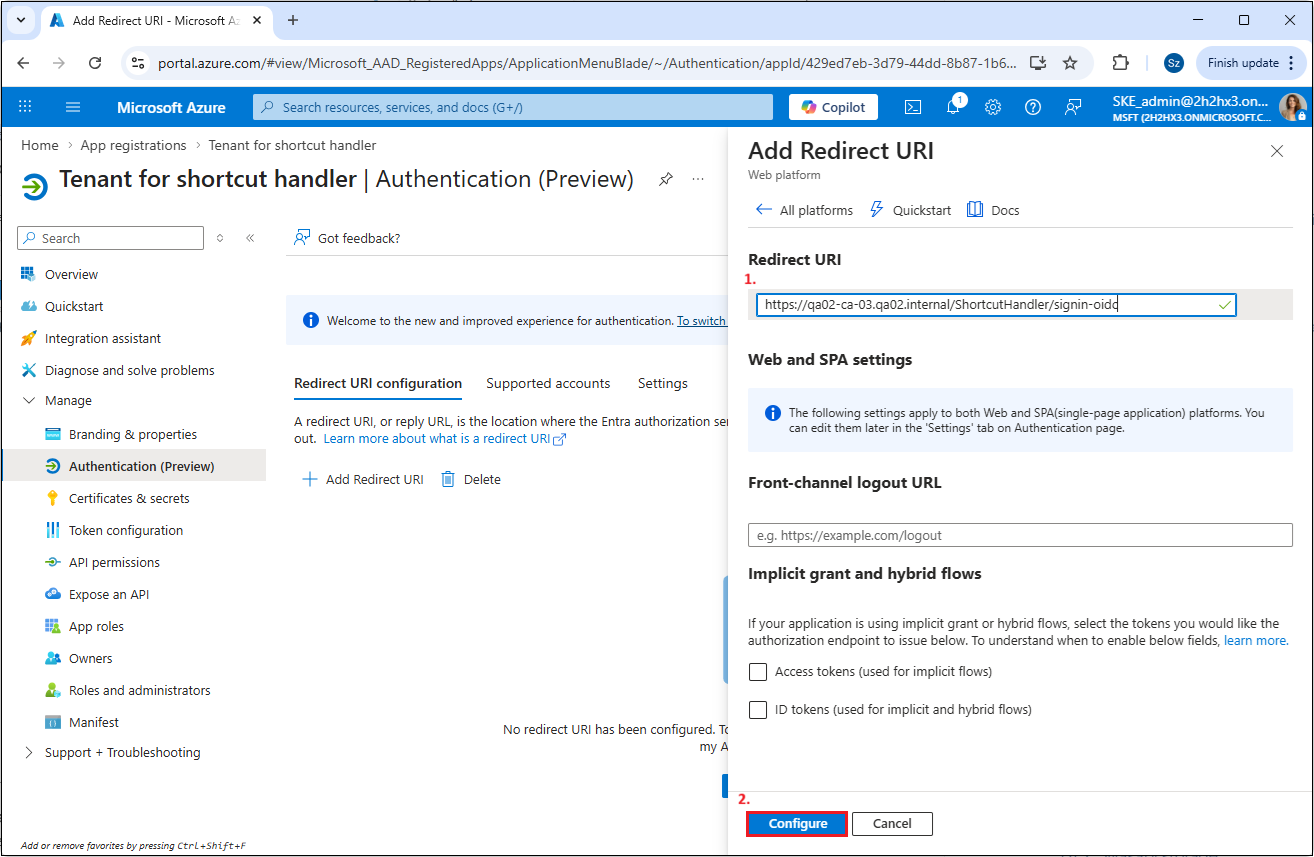
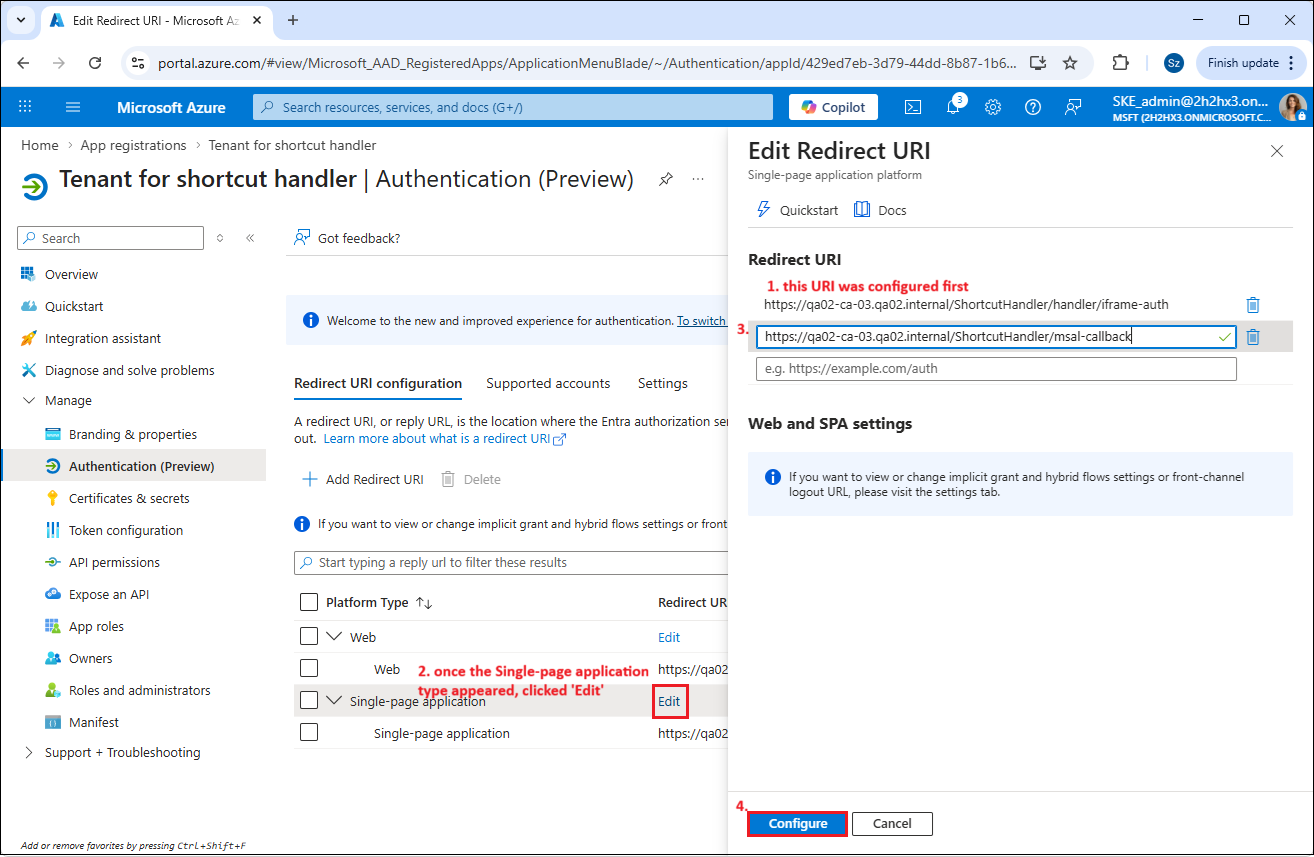
Next, configure the Single-page application. Please note, that for the Single-page application option, you cannot configure both Redirect URIs at the same time during the first setup. You need to enter one URI first and save it by clicking the Configure button. Once the URI appears in the Redirect URI list under the Single-page application type, you can click Edit to add the second required URI.
https://{FQDN}/ShortcutHandler/handler/iframe-auth

https://{FQDN}/ShortcutHandler/handler/msal-callback
- For example:
Step 3 – create a new client secret
If you created a new single-tenant application, you need to generate a new client secret. To do this, go to the Certificates & secrets tab and click + New client secret. After creating it, make sure to copy the client secret value shown in the Value dialog and store it in a secure location because it can only be viewed immediately after the creation. Once you leave the page, you won’t be able to see it.
![]()
Step 4 – add API permissions
Once both applications are set and a client secret was created (if it was necessary), go to the API permissions tab. Here, you need to click the + Add a permission button and select the Microsoft Graph option from the Microsoft APIs tab.
![]()
The following permissions need to be added to the application:
- Microsoft Graph -> Delegated permissions -> Files.ReadWrite.All
- Microsoft Graph -> Application permissions -> Files.ReadWrite.All
![]()
When you finished, grant consent for these permissions by clicking the Grant admin consent for “TENANTNAME” button.
![]()
Step 5 – Update the manifest
You also need to update the manifest with the following addIn through the editor on the Manifest tab.
{
  "id": "ec61c2d1-04d7-4feb-91b9-de53351744f9",
  "type": "FileHandler",
  "properties": [
    {
      "key": "version",
      "value": "2"
    },
    {
      "key": "fileTypeDisplayName",
      "value": "contentACCESS Archive Shortcut"
    },
    {
      "key": "fileTypeIcon",
      "value": "{\"svg\":\"https://static.contentaccess.cloud/spsh/2_0/cac-logo.svg\",\"png1x\":\"https://static.contentaccess.cloud/spsh/2_0/cac-logo.png\",\"png1.5x\":\"https://static.contentaccess.cloud/spsh/2_0/cac-logo.png\",\"png2x\":\"https://static.contentaccess.cloud/spsh/2_0/cac-logo.png\"}"
    },
    {
      "key": "appIcon",
      "value": "{\"svg\":\"https://static.contentaccess.cloud/spsh/2_0/cac-logo.svg\",\"png1x\":\"https://static.contentaccess.cloud/spsh/2_0/cac-logo.png\",\"png1.5x\":\"https://static.contentaccess.cloud/spsh/2_0/cac-logo.png\",\"png2x\":\"https://static.contentaccess.cloud/spsh/2_0/cac-logo.png\"}"
    },
    {
      "key": "actions",
      "value": "[{\"type\":\"open\",\"url\":\"https://{FQDN}/ShortcutHandler/handler/open\",\"availableOn\":{\"file\":{\"extensions\":[\".alink\"]},\"web\":{}}},{\"type\":\"preview\",\"url\":\"https://{FQDN}/ShortcutHandler/handler/preview\",\"availableOn\":{\"file\":{\"extensions\":[\".alink\"]},\"web\":{}}},{\"type\":\"custom\",\"url\":\"https://{FQDN}/ShortcutHandler/handler/restore\",\"displayName\":\"Restore archived file\",\"shortDisplayName\":\"Restore\",\"icon\":{\"png1x\":\"https://static.contentaccess.cloud/spsh/2_0/cac-logo.png\"},\"availableOn\":{\"file\":{\"extensions\":[\".alink\"]},\"folder\":{},\"allowMultiSelect\":true,\"web\":{}}}]"
    }
  ]
}
![]()
![]()
Step 6 – enable application visibility for users
This step is required to ensure that users (who belong to the registered tenant) can access the Shortcut Handler in SharePoint, OneDrive, and Teams. Go to Enterprise Applications (Home -> Azure services -> Enterprise applications) and select your application. Under Manage → Properties, set Visible to users? → Yes.
![]()
Step 7. – Force SharePoint to reload add-ins
It is important that this step is performed by an administrator to ensure access to the necessary endpoints. By completing this step, you can force SharePoint to reload, which may help the platform register the changes made in the application more quickly.
From a browser where the admin is logged into SharePoint, call the following URLs:
https://{SHAREPOINT_SITE_URL}/_api/v2.0/drive/apps?$adminForceRefresh=1

https://{SHAREPOINT_SITE_URL}/_api/v2.0/drive/apps?forceRefresh=1&select=*,promoted&expand=actions