4.3.Share page
There are two ways to share from the mobileApp:
- Share from the Share page
- Share from the item list
- Share from the context menu (in the entities)
Share items from the Share page
![]()
A pop-up window opens, where the user can specify the sharing options.
![]()
- Select the item you would like to share – it can be an image (will open the Photos app on your phone) or a file (will open the Files folder on your phone). Multiple selections are allowed, and the items can be removed from the list
- Recipients – write the email addresses of the people you want to share the item(s) with
- Share with – specify who would you like to make the item(s) accessible for:
a) Recipients only – only the recipients will be able to access the shared item(s)
b) My organization – people from your org. have access to the item(s)
c) Public – anyone with the link will be able to access the shared item(s)
Important: Batch sharing does not support the public audience. If multiple items are selected for the sharing, then only the first two options are available in the Share with section.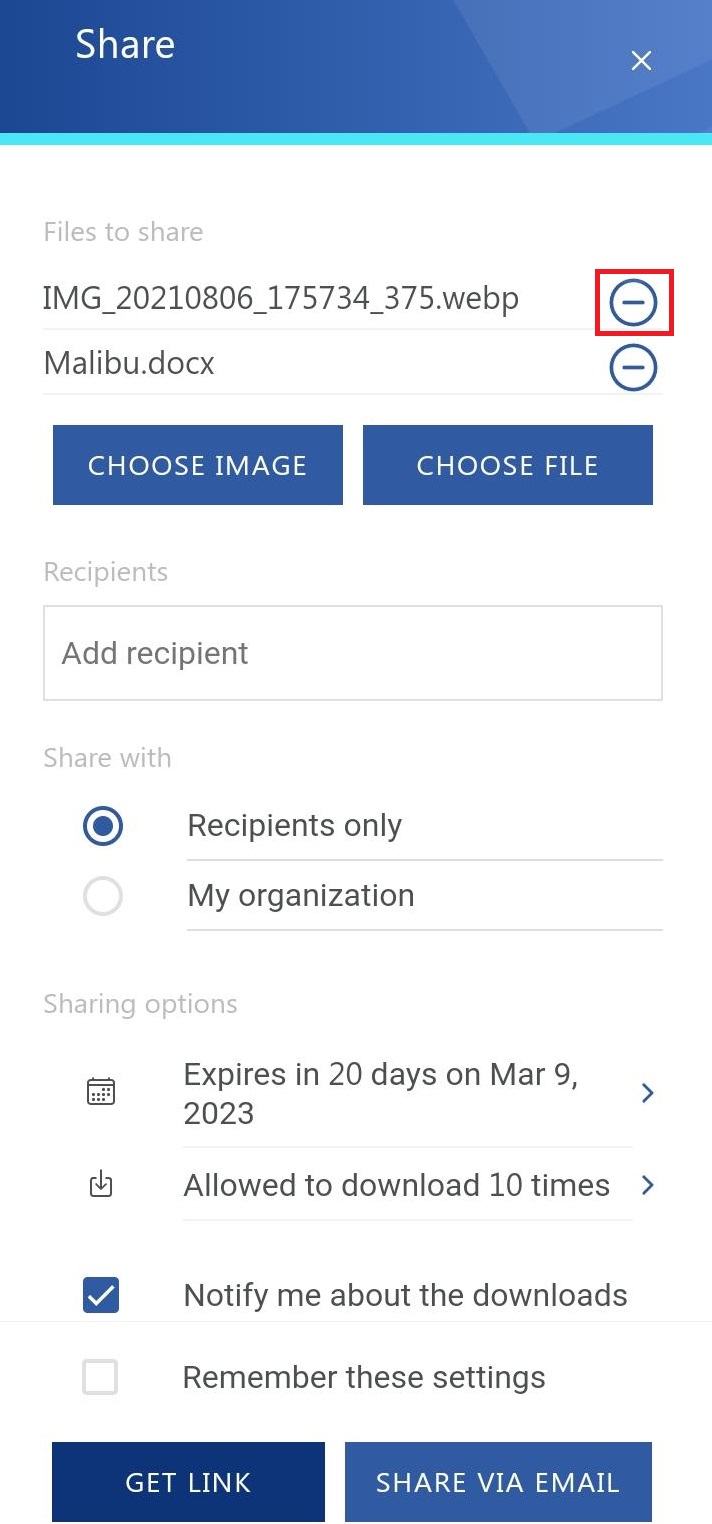
- Sharing options – specify how many days you want the item to expire or select the date from the calendar. It is also possible to limit the number of downloads, based on the option selected in Share with:
a) Recipients – number of downloads per recipient
b) My organization – number of downloads per user
c) Public – number of downloads together
- Notify me about the downloads – the owner can get information about the downloads from the recipient’s side. As soon as the users download the shared item, a notification email will be sent to the owner with the following information: user, who downloaded the item, downloaded file, downloaded time, and downloaded remaining.
- Remember these sharing settings – the user can save the sharing settings for the future that way, you won’t need to fill in the Sharing options next time
- Get link or Share via email – finish the sharing by clicking on one of the two options. If you select Get link, the link is pointing to the shared item the way you share other items from your phone. If you select Share via email, the sharing notification will be sent via email (the sharing notification is created automatically)
Share items from the entities and context menu
![]()
As was mentioned in the previous sections, the sharing is also accessible from the entities (Browse page), the search results (Search page), and context menu. The only difference is that the archived item(s) are shared from models and search results. In this case, you can select a single file (or multiple items) from the list and click on the Share action, or you can open an item’s preview and share it from the context menu. In both cases, the Share view opens, where you can specify the sharing.
If the item has been shared, a Sharing ribbon appears at the bottom of the page. By clicking on the Show details, the ribbon can be expanded.
![]()
If you have applicable rights and permissions, you will be able to modify the sharing settings. It works by the same logic as the Modify sharing options window in the Sharing entity.
When you click on the Status option, the Sharing status window opens. Here, you can check the status of the sharing. From here, it is also possible to Activate, Suspend, or modify the sharing, and resend the sharing notification by clicking on the Resend sharing notification button.
It is also possible to download the shared items on the Status page, but it depends on the user’s role. The owner can download all items regardless of their status (expired, unavailable, suspended, active). Meanwhile, the recipients are only able to download the active items. If the shared files are inactive/suspended/expired, the download icon is not available for the logged-in user.
![]()