- What is contentACCESS Portal?
- Main contentACCESS Portal functions:
- Requirements
- Installation
- Logging into contentACCESS Portal
- contentACCESS Portal user interface
- Search functions in contentACCESS Portal: “Connect to search”, quick search, advanced search, GDPR search
- Folder selection methods
- Tasks supported by entities (models)
- File System Archive
- Email Archive
- GDPR Application
- GDPR Exchange
- GDPR File system
- SharePoint Archive
- OneDrive Archive
- Sharing
- Teams archive
15.2.SharePoint archive tasks ↑ Back to Top
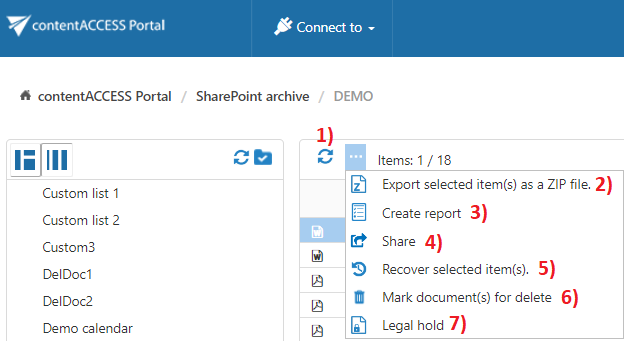
By default, the following tasks can be triggered on the selected SharePoint archive items/folders using the toolbar buttons:
- Refresh
- Export selected item(s) as a ZIP file
- Create report
- Share item(s)
- Recover selected item(s)
- Mark document(s) for delete
- Legal hold
The SharePoint archive tasks can be disabled/enabled in the Administrator’s settings on the Task types tab. For more information read section Enabling/disabling tasks.
It is possible to select
- the whole folder structure on the root,
- a recursive folder structure
- child folders
- and items to process.
For more information refer to section Folder selection methods.
-
1. Refresh – This toolbar button should be used if any items have not been displayed in the item list yet and the list of items should be reloaded.
2. Export to ZIP – To export SharePoint archive item(s)/folder(s) as a ZIP file, select the desired item(s) from the list view (or select the node(s) in the left side pane) and click on the Export selected item(s) as a ZIP file button located above the list view. The exported items are zipped in the background (on the server side). The exported items/folders can be downloaded from the Tasks list. (For more information refer to section Download of export actions)
3. Create report – Read more about this feature here.
4. Share item(s) With this option, you can easily share links pointing to the selected items, which can be later sent to other users. Read more about this feature here.
5. Recover selected items – With this function the user is able to recover the deleted item(s)/folder(s) from the archive to the original location on the SharePoint site. The items can be recovered with the original modification date, or with the recovery date.
6. Mark document(s) for delete – With this task you can mark/unmark documents to be later deleted from the archive by the Delete job. You can either way mark/unmark only the selected files, or all files from the current folder.Select the desired action (mark or unmark) from the Operation dropdown list and then click Create.
7.Legal hold – Read more about this feature here.
Help Guide Powered by Documentor
