6.14.How to create/configure databases — All databases
Processing plugins of a tenant write the metadata into the selected SQL database, which was formerly created by the administrator. The system database is always created during the installation process of contentACCESS, but it is not associated with a tenant. Databases associated with specific tenants are set up by the system administrator, on the All databases page.
Factors to be considered before creating databases:
✓ The number of users expected for your database – if the company (tenant) has more than 2,000 mailboxes, it is recommended to create more archive databases (e.g. for storage, email archive, provisioning, or to set separate databases for the Exchange groups) to ensure a better transparency of data.
✓ The amount of expected data in the database – always estimate how much space your data will require.
✓ It is also worth to consider the retrieving capacities of the database.
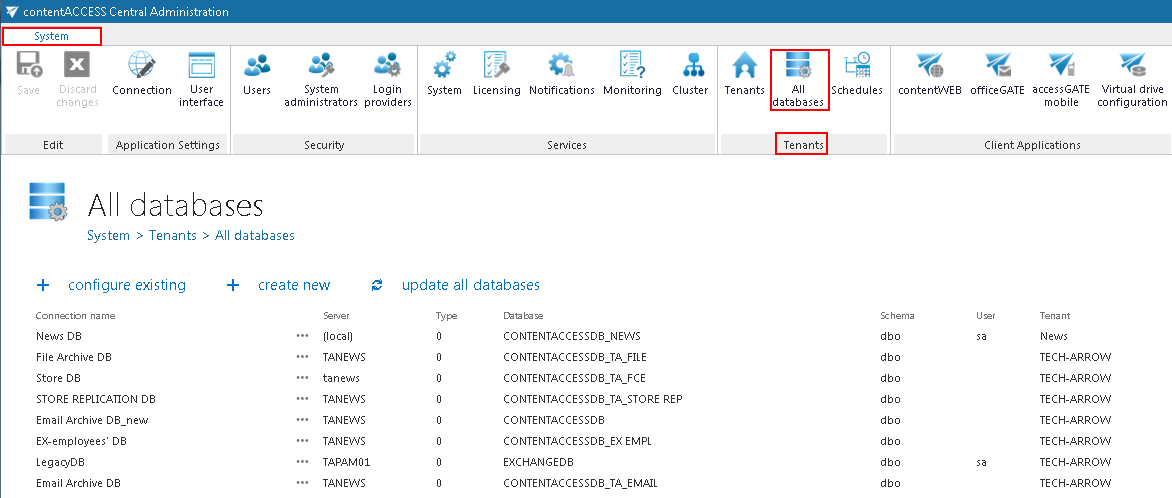
To open All databases page in contentACCESS, navigate to System tab ⇒ Tenants ⇒ All databases control on the Central Administration ribbon. On this page you may find all databases created to all tenants. The server, where the tenant databases are installed, the database name, schema, user details and the associated tenants are also displayed in the grid:

+ create new
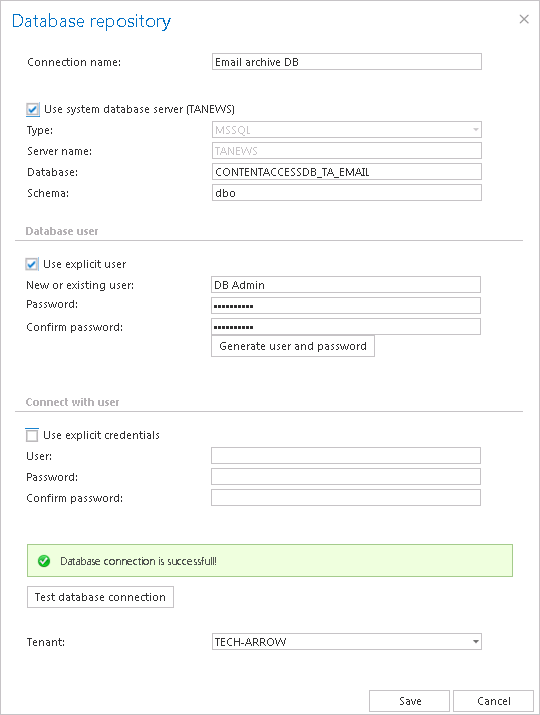
To be able to run processing jobs in contentACCESS, a new database must be created. This database must be then selected on the job’s configuration page, or in case of archiving the Exchange, it can be also associated to a mailbox from the address book. Click on + create new option and fill required data in the Database repository window.

Connection name: Enter a display name for the newly created database. This will be the name of the database in contentACCESS Central Administration.
If you want to use system database server check the “Use system database server” checkbox as it is shown on the screenshot above. This will populate the server settings. Type the database name into the “Database” field. This will be the name of the database on the SQL server. If you want to use database server which differs from the system database server, then follow the next steps:
a. Type: choose the type of database from the dropdown list (MSSQL is supported by default)
b. Server name: enter the name of the database server (where MSSQL is installed) here
c. Database: the database will be created on SQL server under this name
d. Schema: type in the database schema (optional)
Under Database user configurations you may create a database user. There are multiply options how to create a database user: 1) You can use an already existing user to connect to the database, or 2) you can create a new database user. 3) It is also possible to use the service user credentials to connect to the database, or 4) you may create a database user with random credentials (the user name can be edited).
1. If you want to use an already existing user, check the Use explicit user checkbox and enter the user credentials into the New or existing user/Password/Confirm password textboxes.

2. If you want to create a new database user with custom credentials, type them into the New or existing user/Password/Confirm password textboxes. Do NOT click on the Generate user and password button.
3. To connect with the service account, leave the Use explicit user checkbox unchecked and leave all the fields empty.
4. To create a new user with a random password check the Use explicit user checkbox, and click on the Generate user and password button. The user name can be edited directly here.
A newly created database user will have access permissions only to the currently created database.
Under Connect with user enter the credentials of the database user, who has the right to create a new database on the SQL server. If the Use explicit credentials checkbox is not checked, then contentACCESS will automatically connect to the database (MSSQL) under the contentACCESS service account. If you want to connect with an explicit user, check this checkbox, then enter the login data.
Test database connection: with a click on this button run a test connection to check if contentACCESS managed to connect to the selected database server (MSSQL).
Tenants: select a tenant from the dropdown list to which the database will be associated.
Click on Save and the New database will turn up in the list of databases.
+ configure existing
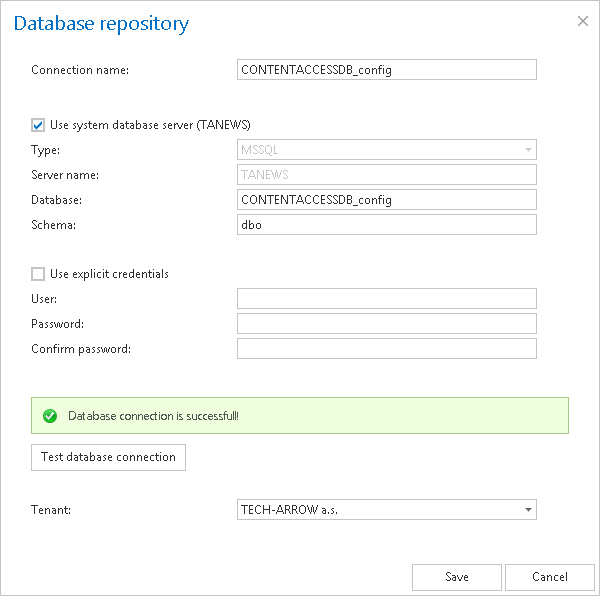
If you need to establish a connection between an already existing SQL database and contentACCESS, click on + configure existing and configure the required data in the Database repository window. In this case, you do not create a new database; an already existing database from the SQL server is used only.

Connection name: Enter a display name for the database. This will be the name of the database in contentACCESS.
If you want to use system database server check the “Use system database server” checkbox as it is shown on the screenshot above. This will populate the server settings. Type the database name into the “Database” field. This will be the name of the database on the SQL server. If you want to use database server which differs from the system database server, then follow the next steps:
a. Type: choose the type of database from the dropdown list (MSSQL is supported by default)
b. Server name: enter the name of the database server here (where MSSQL is installed)
c. Database: type here the name of an already existing database on the SQL server.
d. Schema: type in the database schema (optional)
Use explicit credentials: if this checkbox is not checked, then contentACCESS will automatically connect to the database (MSSQL) under the contentACCESS service account. If you want to use an explicit database user, check the checkbox and enter the user credentials.
Test database connection: with a click on this button run a test connection to check if contentACCESS managed to connect to the selected database server (MSSQL).
Tenants: select a tenant from the dropdown list to whom the database will belong to
Click on Save and the New database will turn up in the list of databases.
 Update all databases
With a click on this option it is possible to update the structure of all databases. Click this button and the status bar of the updating plugin will appear. In this status bar, the following operations are accessible; start/stop running, manual refresh, enable/disable auto refresh and logs (this will redirect the user to the last run session of the database updating plugin):

