contentACCESS documentation – version 3.0

  1. Introduction to contentACCESS
    1. Services provided by contentACCESS
    2. Software requirements
  2. Installation of contentACCESS
  3. contentACCESS Tools
    1. Installing Virtual drive
    2. Installing the Proxy server (contentACCESSWS)
    3. Installing the Proxy web services
    4. Installing Outlook forms
    5. Legacy email archive connectors
    6. Legacy archive connector for Metalogix Archive Manager Exchange Edition (MAM EE)
    7. Legacy archive connector for Email Lifecycle Manager (ELM)
    8. Installing TECH-ARROW’s WinShortcutter
  4. contentACCESS Central Administration
    1. Central administration login
    2. contentACCESS Central Administration user interface
  5. Tenants in contentACCESS
    1. How to create a new tenant
    2. Tenant limitations
    3. How to provide access to a tenant (adding new tenant administrators)
    4. Tenant administrator invitation types
  6. General system configurations
    1. Connection
    2. User interface
    3. Users — role types, creating new users, adding user logins
    4. How to activate your license key
    5. How to create user logins to an already existing user?
    6. System administrators
    7. Login providers
      1. External login provider configuration
      2. Associating an enabled provider with a user login
      3. contentACCESS users in third party systems
    8. System
    9. Licensing
    10. Notifications
    11. Monitoring — how to find out possible misconfigurations / reasons of potential system/job failures
    12. Distributed environment in contentACCESS — Clusters
    13. Statistics
    14. How to create/configure databases — All databases
  7. Common features
    1. Databases
    2. Schedules
    3. Retentions
    4. Storages
    5. Exchange connections
    6. Importing contentACCESS configurations from files
      1. Manual import of Exchange servers/groups/mailboxes to the contentACCESS Address book
      2. Importing File Archive root folders to be archived
  8. Creating new jobs in contentACCESS
  9. Jobs’ page, jobs’ context menu
  10. File Archive
    1. Introduction to File system archive
    2. File Archive settings
    3. Databases
    4. System settings
    5. Retentions
    6. Storages
    7. Root folders
    8. Aliases
    9. Schedules
    10. Provisioning settings and managing access to contentWEB
    11. Configuring aliases
    12. Configuration of jobs available in contentACCESS File Archive
    13. Configuration of File system archive job
    14. Configuration of a File system restore job
    15. Configuration of File system recovery job
    16. Configuration of Remote shortcutting job
    17. Active/inactive documents in File system archive
  11. Email Archive
    1. Important settings before creating an Email Archive job
    2. Database settings
    3. System settings
    4. Provisioning settings
    5. Retention settings
    6. Shortcuts in email archiving
    7. Storing of archived emails
    8. Creating email archive schedulers
    9. User experience
    10. Exchange 2013+: Mail app in OWA 2013+ or on MS Outlook 2013+ desktop version
      1. Deployment in contentACCESS Central Administration
      2. How Mail app works in MS Outlook 2013+ and OWA 2013+
    11. Exchange 2010: OWA 2010 integration
    12. Address book objects
    13. Granting access rights for mailbox users and explicit users to view the mailbox archive?
    14. Creating contentWEB users (option 1)
    15. Manage access to a mailbox archive (option 2)
    16. How the end user logs in to contentWEB (archive)
    17. Database and store assignment in email archiving
    18. How to assign database and storage to an Exchange group?
    19. How to assign database and storage to a mailbox?
    20. How to move data from source database/storage into a second (target) database/storage?
    21. Creating Email archive jobs: archive, restore, recovery, mailbox move, shortcut synchronizaion
    22. Email archive job
      1. Email archive job configuration
    23. Email restore job
      1. Email restore job configuration
    24. Email recovery job
      1. Email recovery job configuration
    25. Mailbox move job
      1. Mailbox move job configration
    26. Shortcut synchronization job
      1. Shortcut synchronization job configuration
  12. Custom plugins
  13. Email management job configuration
  14. SharePoint archive plugin
  15. Storage replication plugin
  16. Sharing plugin
  17. Datengut plugin
  18. Email synchronizer plugin
  19. contentWEB
    1. Logging in to contentWEB
  20. officeGATE
  21. accessGATE Mobile
  22. Virtual drive
  23. Terms of use
  24. FAQ

7.6.Importing contentACCESS configurations from files

contentACCESS allows to import data from files in the following available file formats: CSV, XML, Tab delimited files and Space delimited files. This simplifies adding of huge amount of data to different configuration sections in contentACCESS instead of entering each entry manually. There’s an option to set if we want to overwrite the existing items, update or skip them. The user may also download a sample file to check, if the file that he wishes to import contains all necessary information (column) for the given configuration section. Column names are displayed in the sample file if the “First row is header” option is turned on in the respective importer dialog.

Important!!! By importing Email archive and Email restore configuration sections it is highly recommended to define the mailbox folders to be imported with wildcards (e.g. %INBOX%). Wildcards ensure, that the given mailbox folder (e.g. the “INBOX” folder) will be processed regardless of the language settings of the mailbox. This is important mainly for companies who archive mailboxes using different languages.


After browsing the file to be uploaded and configuring the importer the file can be uploaded. After the initial upload the file’s columns can be mapped to the importable entry’s fields by dragging the column headers. When the mapping is finished the newly imported entries will be added to the configuration section.

contentACCESS allows to import the folders to be archived/restored/recovered/excluded:

  1. to File archive, File restore, File recovery jobs
    The import option is available on the respective job configuration page, under sections “Folders to process” and “Exclude folders”:
  2. cACCESS 2.9 doc 99

    An importable file with Folders to process contains the following rows:

    Root – mandatory
    Relative path – nullable

    Example in case of a CSV file:

    FA folders to process sample

    An importable file with Folders to exclude contains the

    Exclude pattern, e.g. if folder called “test” needs to be excluded, the CSV will look like this:

    FA folders to exclude sample

  3. to Email archive, Email restore, Email recovery jobs
    The import option is available on the respective job configuration page, under section “Exclude folders” and “Exclude addresses”:
  4. cACCESS 2.9 doc 100cACCESS 2.9 doc 101

    An importable file with Excludable folders contains the Exclude pattern, e.g. if mailbox folder called “test” needs to be excluded, the CSV will look like this:

    FA folders to exclude sample

    An importable file with Exclude addresses contains the:

    Address(es) to include
    Exclude type(s) – Sender/Recipients/All

    Example in case of a CSV file:

    EA addresses to excl

  5. File Archive provisioning job (used to synchronize the users in the Active Directory with contentACCESS) also uses this feature to import the objects to be provisioned:
  6. cACCESS 2.9 doc 102

    The importable file must include the:

    Name
    Object type

    Example in case of a tab delimited file:

    provisioning import

  7. The root folders used in File Archive may be also imported into contentACCESS from files (read more here):

    cACCESS 2.9 doc 103
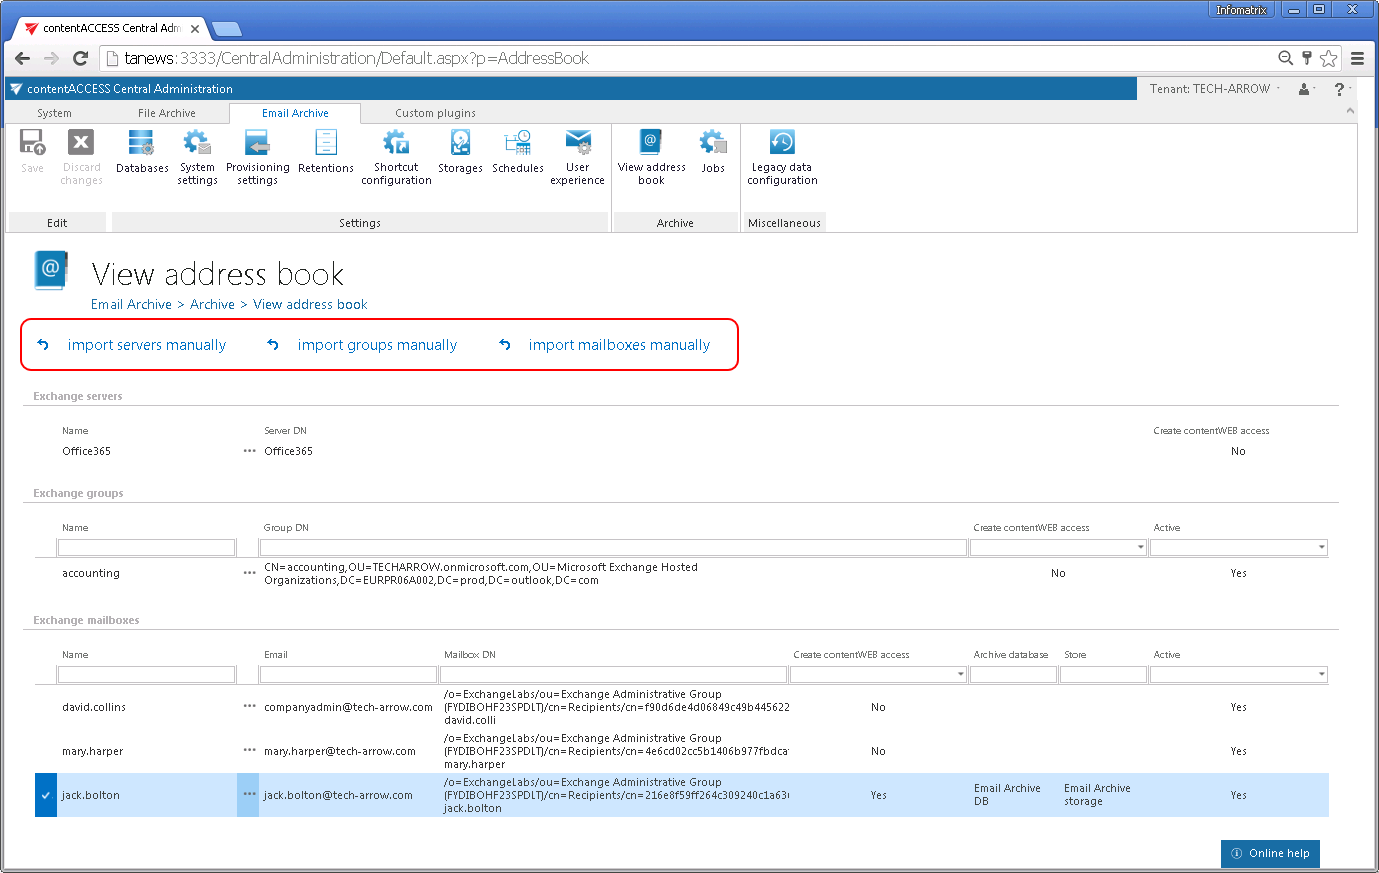
  8. Servers/groups/mailboxes can be imported from files to the contentACCESS Address book using options “Import servers manually”/ “Import groups manually”/ “Import mailboxes manually” as well (read more here):
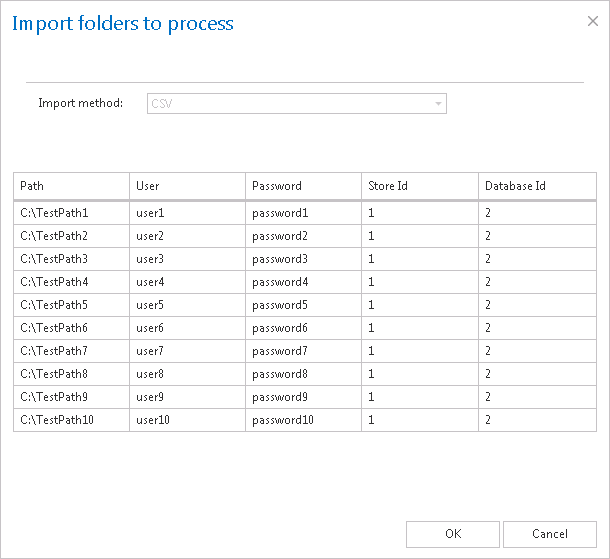
    import address book objects from files

To import a file follow these steps:

  • Click the import button on the respective configuration page. The importer dialog opens.
  • From the Import method dropdown list select an import method to be applied (in our case CSV) and download a sample file using the Download sample option. Based on the sample file prepare the file to import and verify, if your prepared file contains all necessary information for the respective configuration section.

    cACCESS 2.9 doc 104 cACCESS 2.9 doc 105
  • Further click “Browse” and locate the file to be imported. (On the picture below we have selected a CSV file.)

    cACCESS 2.9 doc 106
  • Further specify, how the selected file should be imported. Choose one from the 3 available options (the available options are configuration specific, not all are available by all configurations):

    Make a new list, delete all existing items – select this option to create a completely new list of items; any already set items will be deleted

    Skip existing items, import new ones – select this option to add the new items from the list; while the already configured items will be skipped

    Update existing items, import new ones – this option is available by importing root folders from files; it can be applied if the password has been changed and should be updated

  • Depending on the selected import method the user is further required to specify the following settings:


    In case of CSV:

    Specify the CSV separator (in our case it is a comma). If the first row in the CSV file is a header, mark the respective checkbox. Further specify the escape character, if such exists in your CSV file (in our case quotation marks)

    cACCESS 2.9 doc 107

    In case of Tab delimited file
    If the first row of the file is a header, mark the respective checkbox. Further specify the escape character, if such exists in the file.

    cACCESS 2.9 doc 108

    In case of Space delimited file
    If the first row of the file is a header, mark the respective checkbox. Further specify the escape character, if exists in the file.

    cACCESS 2.9 doc 109

    In case that the file to be imported is an XML, no further settings are required.

    cACCESS 2.9 doc 110

    • Click Upload selected file to upload the file with the desired items.

      cACCESS 2.9 doc 111
    • Click “OK”. The list of imported items will be added to the respective section.

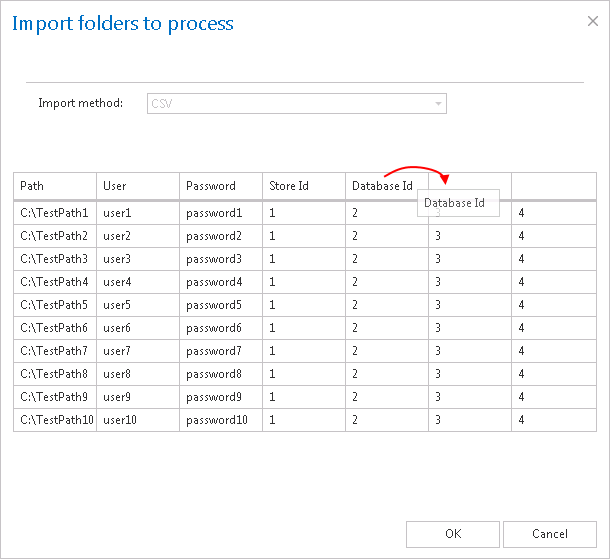
      In a file containing multiple columns the user may specify, which column should be imported. Simply drag and drop the column header (on the picture below the Database ID header) over the respective column that should be imported.

      cACCESS 2.9 doc 112
  • Yes No Suggest edit
    Help Guide Powered by Documentor
    Suggest Edit