6.10.Notifications
To increase efficiency of the troubleshooting process, contentACCESS uses notification plugins. These plugins will send notification emails to the user about the errors/warnings/misconfigurations or possible system or job failures in contentACCESS.
For Notification settings navigate to System ⇒ Services ⇒  Notifications button.

In the status bar of notifications there are 5 control buttons:
- With the “start immediately/stop” button it is possible to manually start/stop sending of notification emails;
- “refresh” control button serves to reload (manually refresh) the current state of notification plugin;
- “enable auto refresh”/“disable auto refresh”: serves for activating/deactivating the auto refresh of notification plugin status information; if enabled, then the current state will be refreshed in every 5 seconds;
- “deactivate job/activate job” button is used to deactivate/activate the job if it should not run; a deactivated job will not be started automatically, nor can be started m
- “logs”: in case that you want to check the notifications plugin events, or if any problem occurred during the sending of notifications emails, click on this control button and you will be redirected on the correspondent monitoring page, where the last run of the plugin will be pre-selected, and the corresponding run events will be displayed.
- “edit” control button is used to change the name of the notification job and to specify the node where the job should run;
- With the arrows mark (
 ) at the right side of the status bar the user may collapse or expand the progress information about the job’s running. The status bar’s last state is always stored, and the last state will be opened by navigating to the page again.
Under the status bar, in the particular sections can be configured, which Exchange provider will be used to send notification emails, who will be the real sender, or it is also possible to configure to send emails on behalf of somebody else. The condition for that is to have on behalf permissions on the mailbox of this second user.
- Scheduling settings: under scheduling settings it is possible to choose an already existing notification scheduler from the list, or to create a new one. Notification emails will be sent at time, which is set here. New notification schedulers can be also created (or edited) by selecting the “system” tenant in the right upper menu of the Central Administration user interface, and navigating to System ⇒ Tenants ⇒ Schedules button on the ribbon (refer to screenshot below).

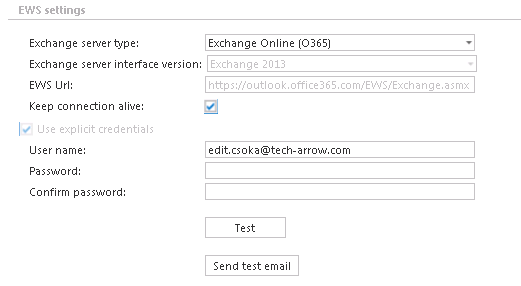
- EWS settings: set here the type and version of the Exchange provider which will send the notification emails. Insert the EWS URL (received from the Exchange provider).
- If you are communicating with one Exchange server: turn it on to increase the performance
- If you have a load balanced Exchange environment and there are communication problems with the Exchange: it is recommended to turn it off
- Notification settings: it is also a possible to send notification emails to certain administrator addresses on behalf of somebody else. The condition for that is to have on behalf permissions on the mailbox of this second user. If you want to use this option, insert the email address of this on-behalf user into the “From address” textbox. Further add the recipients’ email address into the second text box. You can also send a test email via the “Send test email” button to check, if everything was set well.

- Resource settings: under worker thread count you can set the count of simultaneously sent notifications:

Keep connection alive: If it is turned on, then the connection between contentACCESS and the Exchange server is cached, which increases the performance. If the Exchange is load balanced, some requests can land on another Exchange which causes errors in contentACCESS. In these cases unchecking the keep alive option will destroy the connection after each request and will rebuild it on the next request.
Finally enter the User name (email address) and password of the user who will be the sender of the notification emails. Click on Send test email button if you need to check if the notification emails are working properly.

