4.2.1.Connecting to contentACCESS
officeGATE can be interconnected with contentACCESS, TECH-ARROW’s great document management software. With officeGATE the user can access the contentACCESS documents directly from MS Outlook, without a need to switch to another application.
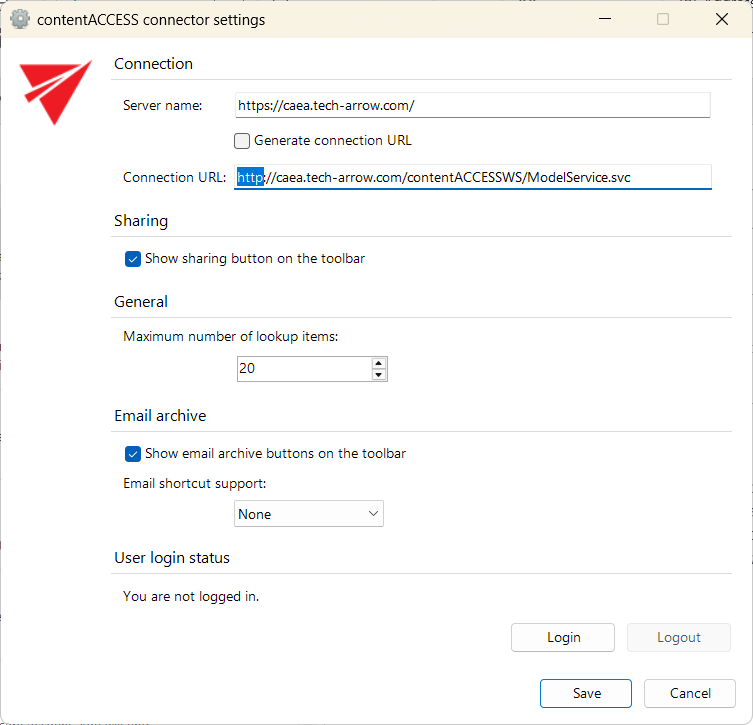
To connect officeGATE with contentACCESS, click “Settings” in the context menu or in the officeGATE settings to open the contentACCESS connector settings dialog. Further specify the connection parameters:
1. If you use proxy (contentACCESSWS) with secure (HTTPS) connection to connect to contentACCESS, configure the connection as follows:
- Check the Generate connection URL checkbox;
- Enter the contentACCESS server name into the Server name field; with this action the connection URL will be generated automatically;
- Specify a maximum number of lookup items (by default the value is set to 20).
- Specify your default sharing settings (if the Sharing plugin is not licensed in your contentACCESS, you can ignore these settings; more information here)
- Choose if you want to have Email archive buttons shown on the toolbar.
- Specify your email shortcut support level: None, Basic, or Full
- Save your settings.

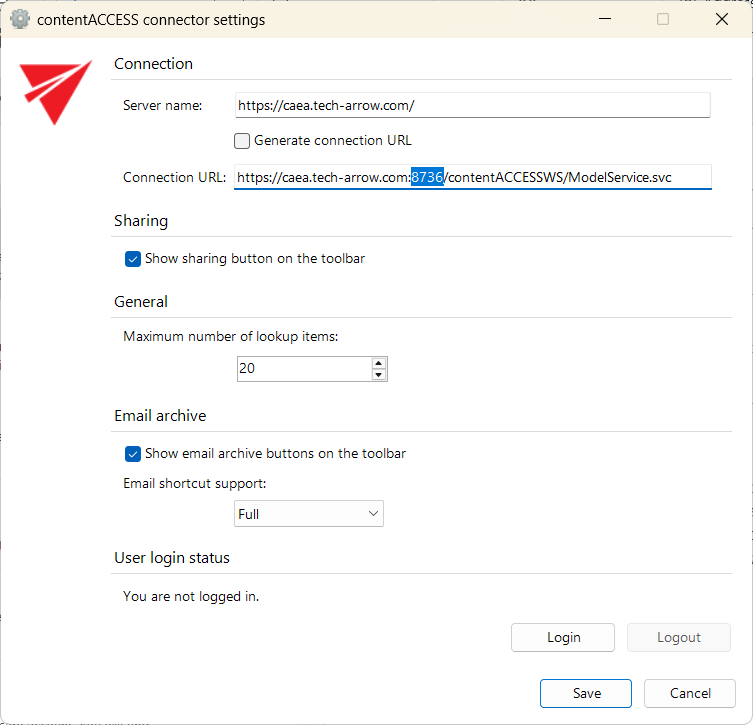
2. If you use proxy (contentACCESSWS) with unsecure (HTTP) connection to connect to contentACCESS (i.e. you use proxy but do not have a valid certificate), configure the connection as follows:
- Enter the contentACCESS server name into the Server name field;
- Enter the HTTP connection URL with the correct server name into the Connection URL field: http://[ServerName]/contentACCESSWS/ModelService.svc
- Specify your default sharing settings (if the Sharing plugin is not licensed in your contentACCESS, you can ignore these settings; more information here)
- Specify a maximum number of lookup items (by default the value is set to 20).
- Choose if you want to have Email archive buttons shown on the toolbar.
- Specify your email shortcut support level: None, Basic, or Full
- Save your settings.
3. If you use direct connection to connect to contentACCESS (no proxy is installed), configure the connection as follows:
- Enter the contentACCESS server name into the Server name field;
- Enter the connection URL with the correct server name into the Connection URL field: http://[ServerName]:8736/contentACCESSWS/ModelService.svc
- Specify your default sharing settings (if the Sharing plugin is not licensed in your contentACCESS, you can ignore these settings; more information here)
- Specify a maximum number of lookup items (by default the value is set to 20).
- Choose if you want to have Email archive buttons shown on the toolbar.
- Specify your email shortcut support level: None, Basic, or Full
- Save your settings.
What is Email shortcut support?
Email shortcut support is a setting that controls how Outlook opens HTML shortcuts (links) to emails archived by contentACCESS. When you click on an email shortcut, Outlook forms are used to open the archived emails. If officeGATE is installed, Outlook will use it to retrieve the content of an archived item from contentACCESS.
For the best performance, officeGATE’s offline synchronization feature is recommended. If the (selected) mailbox is synchronized, the email content will be retrieved from officeGATE’s offline cache instead of the contentACCESS server.
If there are performance complaints when opening HTML shortcuts, this support can be configured or turned off. There are three options:
- None – Outlook forms do not cooperate with officeGATE at all
- Basic – Outlook forms use officeGATE to retrieve the archived content. The content is saved to your computer and opened from there
- Full – Outlook forms use officeGATE to get the archived content and store the email(s) in a hidden folder inside your mailbox. This is slower but makes the email behave like a normal mailbox item, so you can use all Outlook features with it (like reply, forward, search, etc.)
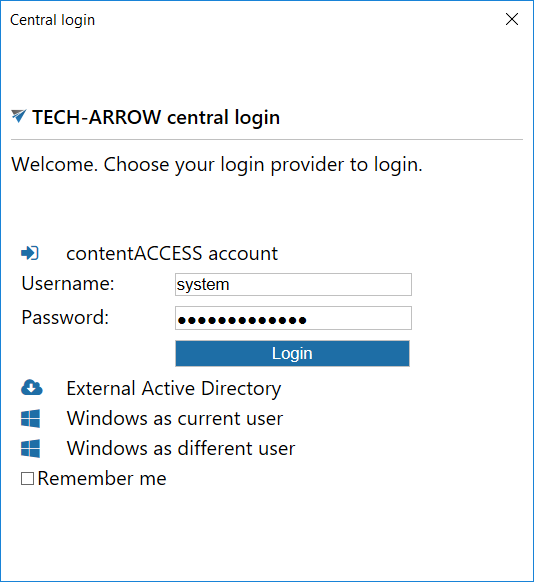
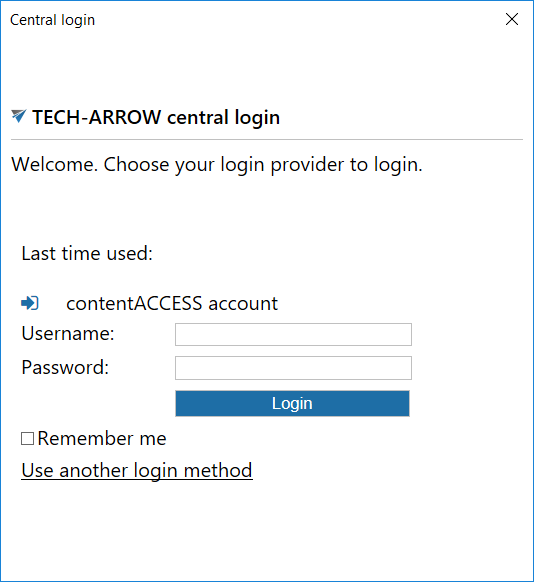
There are two possible ways to log in to contentACCESS:
- After filling in your settings and before saving, click on the Login button. A pop-up with Login providers will appear. When clicking on Use another login method, all Login providers, which are configured in Central administration, will appear.

Select the Login provider that you would like to use, enter your credentials and click on the blue Login button. Then, Save your settings.
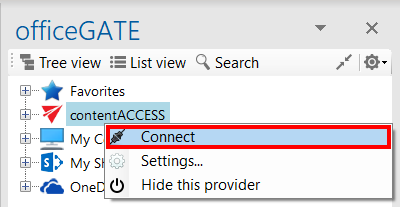
- After saving your settings, right-click on the contentACCESS provider in the officeGATE pane and select Connect from its context menu.
A pop-up with Login providers will appear. When clicking on Use another login method, all Login providers, which are configured in Central administration, will appear.
Select the Login provider that you would like to use, enter your credentials and click on the blue Login button.

The Windows authentication type for the old login works only with “current user”, other user cannot be selected.
Once the connection is well established, the licensed plugins will be listed when extending the contentACCESS provider’s node in the pane:
![]()
First you have to install and configure Legacy MAM retrieve server on the MAM server, and configure it in the contentACCESS Central Administration. (For more information refer to the contentACCESS Manual).
contentACCESS provider also has a Logout button in settings. Acording to whether the user is logged in or not, the button is enabled or disabled.
![]()