7.4.Storages
(Email Archive ⇒ Settings ⇒ Storages button;
File Archive ⇒ Settings ⇒ Storages button;
Custom plugins ⇒ General ⇒ Storages button)
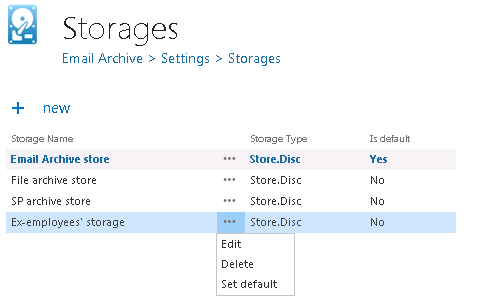
For storage configurations open the Storages page (navigate to  Storages button on your ribbon). The storage configured on this page can be selected as a destination for the processed binaries when configuring a certain contentACCESS job. contentACCESS supports Disk storage (most frequently used type), H&S Hybrid Store, Perceptive, Datengut storage etc. The table of storages is initially empty.
To configure a new storage click on + new on the Storages page. The Storage repository window will open. Type in the Store name and select a Store type from the list. The required storage settings depend on the storage type that you have selected.
Configurations of the 4 most frequently used storage types will be detailed in the following sections of this chapter:
✓ Disk store type
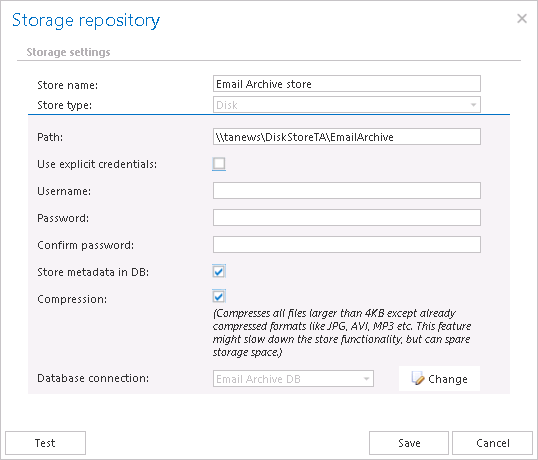
This store type is used if the user would like to store the binaries on a single local or remote disk. This is the most frequently used store type from the above listed types. After this store type has been selected, fill in the Path (the target destination for the binaries) and enter credentials if required. Choose whether you would like to have extra recovery functionality with checking/unchecking Store metadata in DB. When selected, contentACCESS saves the extended metadata into the storage database. This function can spare even more space in the database. The user also has the possibility to decide about the usage of Compression function. With checking this checkbox all files larger than 4 kilobytes will be compressed except of already compressed file formats such as JPG, MP3 etc. This feature might slow down the store functionality, but will spare storage space on the other hand. Under Database settings select a Database connection. This configuration will play an important role when using the Store replication plugin described in section Storage replication plugin. It is also possible to run a test control via Storage replication plugin. We recommend NOT to change the already configured database that the disk storage uses (however, it can be changed using the “Change” button if it is needed). We also advise to verify the connection using the Test button. The test is checking if the right credentials have been specified, and if the connection with the database has been established.
When using Disk store type, please consider requirements for data deduplication. Data deduplication finds and removes duplication within data on a volume while ensuring that the data remains correct and complete. This makes it possible to store more file data in less space on the volume. Deduplication is not supported on:
✓ System or boot volumes;
✓ Remote mapped or remote mounted drives;
✓ Cluster shared volume file system (CSVFS) for non-VDI workloads or any workloads on Windows Server 2012;
✓ Files approaching or larger than 1 TB in size;
✓ Volumes approaching or larger than 64 TB in size.
What to consider before a previously configured disk storage is changed?
In some cases it may happen, that the administrator needs to move the already configured storage to a new location (e.g. if “C” disk got full and the storage should be moved to disk “D”)? In this case, the following steps must be executed to ensure an access to the already archived data and to continue with archiving the new data:
- Stop all running jobs!!!
- Move your old storage location manually into the new storage location (e.g. the folder of “C” disk into a new location on “D” disk);
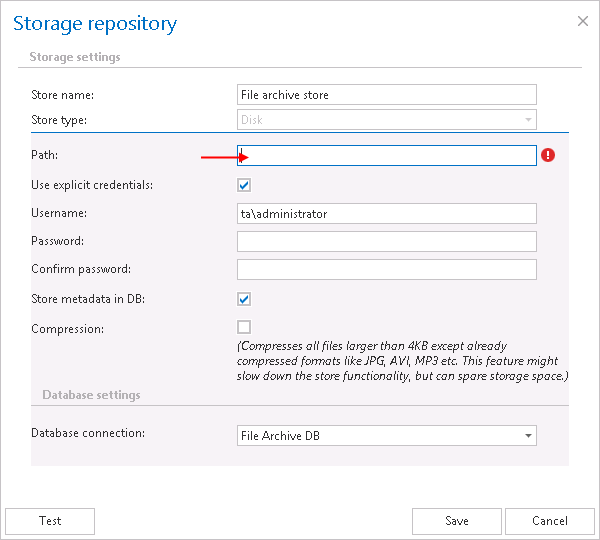
- Open the Storages page on the contentACCESS Central Administration ribbon, locate your old storage in the list, and double click on it to open the Storage repository window to it;
- In the Storage repository window specify the new storage path (where you moved your old storage location);
✓ HybridStore
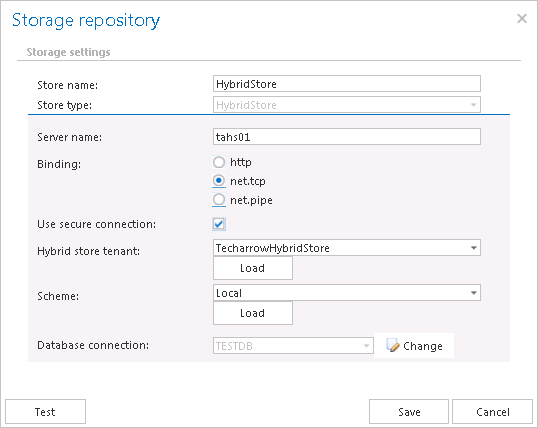
contentACCESS supports the connection with the Hybrid Store. This connection allows contentACCESS to connect to any third-party storage that is supported by this store type. If you want to store the binaries in the Hybrid Store, select it from the Store type dropdown list and specify the required connection settings. The following storage settings are required:
Store name: optional name for the Hybrid Store that contentACCESS will use
Store type: HybridStore
Server name: the server where the Hybrid Store is installed
Binding: http – universal protocol
net.tcp –can be used only in case that the Hybrid Store and contentACCESS are in the same domain
net.pipe – the fastest and recommended protocol; can be used only in case that the Hybrid Store and contentACCESS are installed on the same machine
Use secure connection: Check this option to allow a secure connection with the Hybrid Store. The communication will be secured by a Windows authentication (the contentACCESS service user will be used).
Hybrid store tenant: Click on “Load” to load the list of available tenants based on your Hybrid Store configurations and select the one that should be applied. To load the tenants, there are some requirements:
- NET.TCP or NET.PIPE connection must be used (on HTTP the loading is not supported)
- the contentACCESS service user must be a local system administrator on the HybridStore machine
If the tenants are not loaded, then the user needs to enter the HybridStore tenant ID (GUID) manually.
Scheme: Click on “Load” to load the available Hybrid Store schemes and select the one that should be applied. If Hybrid Store uses secure connection and the option is not checked in the dialog, the schemes will not be loaded.
Database settings: Select here an already created database that contentACCESS will use to store the necessary data. It is NOT recommended to change the already configured database that the Hybrid store uses. However, it can be changed using the “Change” button if it is really necessary.
It is advisory to verify the database connection using the “Test” button at the bottom of the dialog.
This storage type is currently used by synchronizing emails in multiple mailboxes. For more information refer to Email synchronizer plugin.
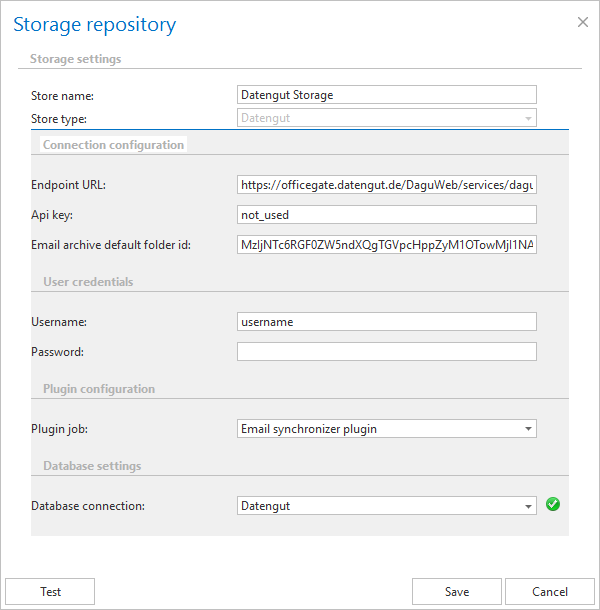
After this store type has been selected in Storage settings, name your storage. contentACCESS will use this name to display the storage on the Storages page. Further configure the following sections in the dialog:
Connection configuration: necessary settings to establish a connection with the Datengut storage
- Endpoint URL: Datengut service URL
- Api key: optional setting, any value can be entered here
- Email archive default folder id: during the archiving process Datengut storage saves the data into a specific storage folder; the ID of this folder must be set here
User credentials: set the Username and Password that can be applied to connect to the storage
Plugin configuration: The email synchronizer job(s) already created in Custom plugins ⇒ General ⇒ Jobs will be listed in the dropdown list. Select from the dropdown list the Email synchronizer job that will collect the metadata of the archived emails in a queue. This job is used to synchronize the email message categories in multiple mailboxes based on the metadata that are saved into its queue.
Note: For more information refer to chapter Email synchronizer plugin.
Database settings: select an already created database that Datengut storage will use to store the necessary data
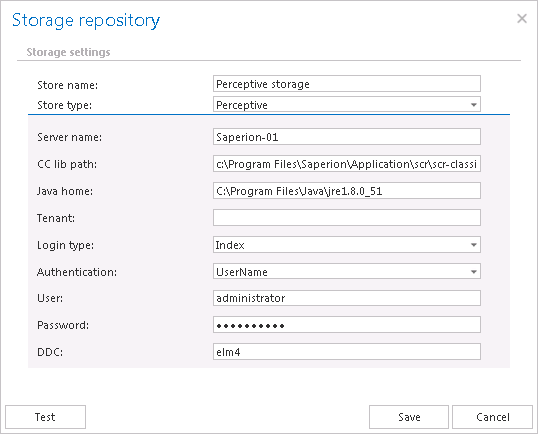
After this store type has been selected, name your storage. contentACCESS will use this name for the given storage on the Storages page. The user is further required to specify the following connection parameters:
- Server name: the server name where the storage is installed
- CC library path: path on which the Classic Connector jar files can be reached, e.g. c:\Program Files\SAPERION\Application\scr\scr-classicconnector\lib
- JAVA_HOME: JAVA home directory must be set. Depending on the application bitness x64 or x86, e.g.: c:\Program Files\Java\jre1.8.0_66
- Tenant: in case of non-multitenant system this fields is blank, otherwise the Perceptive tenant should be specified
- Login type: “INDEX”, “ADMIN” or “ELM” can be used, the recommended type is “INDEX”
- Authentication: choose the applicable authentication from the dropdown list; the recommended is “UserName”
- User, Password: specify the applicable user and credentials to be applied for the connection with the storage
- DDC: the DDC name where the files will be packed
