contentACCESS documentation – version Orion

  1. Introduction to contentACCESS
    1. Services provided by contentACCESS
    2. Software requirements
      1. contentACCESS prerequisites
  2. contentACCESS setup package
    1. Installation of contentACCESS
      1. EULA
      2. Installation type
      3. Components
      4. Prerequisites
      5. Base folder
      6. Service settings
      7. Database connection
      8. contentACCESS Central Administration
      9. Backup Administration for Microsoft 365
      10. contentACCESS Web Services (Proxy)
      11. contentACCESS Portal
      12. Preview service
      13. Central login
      14. Virtual drive
      15. Search service
      16. Search service (V2)
      17. SMTP server
      18. Overview
      19. Installation
      20. Summary
    2. Update of contentACCESS
      1. Managing the index reset or migration
  3. contentACCESS components
    1. contentACCESS Central Administration
      1. Central administration login
      2. contentACCESS Automated single sign on
      3. Central Administration logout
      4. contentACCESS Central Administration user interface
    2. contentACCESS Portal
      1. Logging in to contentACCESS Portal
      2. contentACCESS Portal Automated single sign on
    3. Backup Administration for Microsoft 365
    4. Virtual drive
    5. contentACCESS Web Services (Proxy)
    6. Central login page
  4. contentACCESS Tools
    1. Installing Outlook forms
    2. Legacy email archive connectors
    3. Legacy archive connector for Metalogix Archive Manager Exchange Edition (MAM EE)
      1. Installing Legacy MAM retrieve service and its configuration on the MAM server
      2. Configuration of the MAM server in contentACCESS Central Administration
    4. Legacy archive connector for Email Lifecycle Manager (ELM)
    5. Installing TECH-ARROW’s WinShortcutter
    6. contentACCESS Outlook add-in
      1. Installation of contentACCESS Outlook add-in
      2. How to use contentACCESS Outlook add-in
  5. Tenants in contentACCESS
    1. How to create a new tenant
      1. How to edit and disable a tenant
    2. Tenant limitations
    3. How to provide access to a tenant (adding new tenant administrators)
    4. Tenant administrator invitation types
    5. Tenant associations
      1. Tenant - database association
      2. Tenant - user association
    6. Tenant deletion
  6. General system configurations
    1. Connection
    2. User interface
    3. Users in contentACCESS
    4. Invitations
    5. Roles
      1. Creating roles
      2. Role details
      3. Role assignment
      4. Defining specific permissions of a role assignment
      5. Editing roles, editing role assignments
      6. Role cloning
      7. General use cases of how to create/assign roles
      8. Managing access to contentACCESS objects
    6. Login providers
      1. Login providers’ context menu options
      2. External login provider configuration
        1. Configuring Google OAuth
        2. Configuring Microsoft 365 login provider
        3. Exchange login provider
        4. External AD login provider
      3. Associating an enabled provider with a user login
      4. contentACCESS users in third party systems
    7. System
    8. Licensing
      1. How to activate your license key
    9. Notifications
    10. System logs — how to find out possible misconfigurations / reasons of potential system/job failures
    11. Configuration auditing
    12. Archive auditing
    13. Distributed environment in contentACCESS — Clusters
    14. Statistics
    15. Legal hold
    16. Task runner
    17. Indexing
    18. SMTP Servers
    19. SMTP Mappings
    20. SMTP Rules - selective journaling
    21. Sharing job
    22. Sharing settings
    23. How to create/configure databases — All databases
  7. Common features
    1. Databases
    2. Schedules
    3. Retentions
    4. Storages
      1. Amazon S3
      2. Wasabi storage
      3. Google drive storage
      4. Datengut storage
      5. Azure storage
      6. Disk storage
      7. HybridStore
      8. Perceptive storage
      9. Kendox storage
    5. Exchange connections
      1. Exchange performance settings – turning off the Exchange throttling policies
      2. Mixed Exchange environments in the Email Archive system
    6. Importing contentACCESS configurations from files
      1. Manual import of Exchange servers/groups/mailboxes to the contentACCESS Address book
      2. Importing File Archive root folders to be archived
  8. Creating new jobs in contentACCESS
  9. Jobs’ page, jobs’ context menu
  10. Filtering in jobs
  11. File Archive
    1. Introduction to File system archive
    2. File archive settings
    3. File archive Databases
    4. File archive System settings
    5. File archive Retentions
    6. File archive Storages
    7. Root folders
    8. Aliases
    9. File archive Schedules
    10. Provisioning settings and managing access to contentACCESS Portal
      1. File system provisioning job description
    11. Remote agents (file archive)
    12. Global rules (remote file archive)
    13. Configuring aliases
    14. Configuration of jobs available in contentACCESS File Archive
    15. Configuration of File archive retention changer job
    16. Configuration of File system archive job
      1. File system archive job description
    17. Configuration of a File system restore job
      1. File system restore job description
    18. Configuration of File system recovery job
      1. File system recovery job description
    19. Configuration of Delete job in File archive
      1. File system delete job description
    20. Configuration of File system shortcut synchronization job
      1. File system shortcut synchronization job description
    21. Configuration of Remote shortcutting job
      1. File system remote shortcutting job description
    22. Active/inactive documents in File system archive
  12. Email Archive
    1. Important settings before creating an Email Archive job
    2. Database settings
    3. Email archive System settings
      1. Hybrid exchange settings
    4. Email archive Provisioning settings
      1. Email archive provisioning job description
    5. Retention settings
    6. Shortcuts in email archiving
    7. Storing of archived emails
      1. LoboDMS storage
    8. Creating email archive schedulers
    9. User experience
      1. Exchange 2013+: contentACCESS MailApp in OWA 2013+ or on MS Outlook 2013+ desktop version
      2. Exchange 2010: OWA 2010 integration
    10. Address book objects
      1. Adding address book objects manually
      2. Removing groups and mailboxes from the Address book
    11. Granting access rights for mailbox users and explicit users to view the mailbox archive
      1. Creating contentACCESS Portal users (option 1)
      2. Manage access to a mailbox archive (option 2)
    12. Database and store assignment in email archiving
      1. How to assign database, storage and index zone to an Exchange group?
      2. How to assign database, storage and index zone to a mailbox?
      3. How to move data from source database/storage into a second (target) database/storage?
    13. contentACCESS MailApp access
    14. Remote agents (email archive)
    15. PST import
      1. PST import job description
    16. Creating Email archive jobs: archive, restore, recovery, delete, mailbox move, shortcut synchronizaion, shortcut repair
    17. Email archive job
      1. Email archive job configuration
      2. Email archive job description
      3. Email archive journal processing
        1. Recommendations after turning on journal archive
      4. Archiving of rights protected messages
    18. Email archive retention changer job
    19. Email restore job
      1. Email restore job configuration
      2. Email restore job description
    20. Email recovery job
      1. Email recovery job configuration
      2. Email recovery job description
    21. Configuration of Delete job in Email archive
      1. Email delete job description
    22. Journal post processing job
      1. Journal post processing job configuration
    23. Mailbox move job
      1. Mailbox move job configration
      2. Mailbox move job description
    24. Shortcut synchronization job
      1. Shortcut synchronization job configuration
      2. Email shortcut synchronization job description
    25. Shortcut repair job
      1. Shortcut repair job configuration
      2. Email shortcut repair job description
    26. Public folder archiving
      1. How to configure a job to archive public folders
      2. Public folders in the contentACCESS Portal archive
      3. User permissions to public folders
      4. Public Folder archiving in mixed Exchange environments
    27. Access to private emails and archiving them
    28. SMTP archiving
  13. SharePoint archive plugin
    1. SharePoint Archive settings
    2. SharePoint archive System settings
    3. Site connections in the SharePoint archive
    4. SharePoint archive Provisioning settings
      1. SharePoint provisioning job description
    5. Shortcut configuration in SharePoint
    6. SharePoint archive Address book
    7. SharePoint Archive job configuration
      1. SharePoint archive job description
    8. SharePoint archive retention changer job configuration
    9. SharePoint recovery job configuration
      1. SharePoint recovery job description
    10. Configuration of Delete job in SharePoint archive
      1. SharePoint delete job description
    11. SharePoint Publishing job
      1. SharePoint publishing job description
    12. SharePoint in the contentACCESS Portal archive
  14. OneDrive archive
    1. OneDrive Archive job configuration
    2. OneDrive archive Jobs
  15. GDPR plugin
    1. GDPR Settings
      1. GDPR Databases
      2. GDPR Schedules
      3. GDPR Index zones
    2. GDPR Processing
      1. GDPR File system settings
      2. GDPR Exchange settings
      3. GDPR Applications
      4. GDPR Jobs
        1. GDPR File system job
          1. GDPR file system job description
        2. GDPR Exchange job
          1. GDPR Exchange job description
        3. GDPR Application job
          1. GDPR application job description
  16. Teams archive
    1. Teams archive databases
    2. Teams archive System settings
    3. Teams archive Provisioning settings
    4. Shortcut configuration in Teams archive
    5. Teams archive Address book
      1. Removing objects from Teams archive Address book
    6. Teams archive Licensing
    7. Teams archive Jobs
      1. Teams archive job
      2. Teams compliance archive job
        1. Comparison between the Teams archive and Teams compliance archive jobs
      3. Teams chat archive job
      4. Teams compliance chat archive job
        1. Comparison between the Teams chat archive and Teams chat compliance archive jobs
      5. Teams archive recovery
        1. Teams recovery job description
      6. Configuration of Teams archive retention changer job
      7. Configuration of Teams chat archive retention changer job
      8. Configuration of Delete job in Teams archive
        1. Teams archive delete job description
      9. Configuration of Delete job in Teams chat archive
  17. Custom plugins
    1. Email management job configuration
    2. Storage replication plugin
    3. Sharing plugin
    4. Datengut plugin
    5. Email synchronizer plugin
    6. Categorize to Public folders plugin
    7. LoboDMS plugin
  18. ThreatTest
    1. ThreatTest configuration
      1. ThreatTest Databases
      2. ThreatTest System settings
      3. ThreatTest Schedules
      4. ThreatTest User experience
      5. ThreatTest Statistics
      6. ThreatTest Job
    2. Using ThreatTest App
  19. officeGATE
  20. contentACCESS Mobile
  21. Virtual drive configurations
  22. Teams application
  23. Application settings
  24. Terms of use
  25. FAQ
    1. Download sample for the file to be imported does not work
    2. Archiving is not working if MAPI is set to communicate with the Exchange server
    3. Virtual drive is still appearing after the uninstall
    4. Outlook forms problems
    5. Unable to open shortcuts of archived files on the server side
    6. Samples are not shown using 'Show sample" option in the Import dialog
    7. Do I need to create separate tenants for file archiving and email archiving
    8. What is the recommended database size for email, file and Sharepoint archiving
    9. The TEMP folder is running out of space when archiving big files
    10. The attachment could not be opened
    11. After updating Exchange 2013, the EWS connection might not work in contentACCESS
    12. If Windows authentication is not working in contentACCESS and an alias was created for contentACCESS
    13. contentACCESS Outlook add-in certificate issue
    14. Prerequisites for Microsoft 365 archiving
    15. PowerShell scripts for setting up Email archive
    16. How to reconfigure your email archive to use modern authentication for PowerShell
    17. Solution for Outlook security patches
    18. Solution for Outlook security patches through GPO
    19. Solution for indexing PDF files
    20. Microsoft 365 SuperUser mailbox configuration
    21. Microsoft 365 journaling
      1. Configuring Microsoft 365 journal forwarding through third-party Exchange Online Protection
    22. Organizational forms
    23. Multifactor authentication
    24. Region setting
    25. contentACCESS MailApp installation issue
    26. Azure app registration for Microsoft 365 archiving
      1. Grant permissions for Email archive
      2. Grant permissions for the OneDrive archive
      3. Grant permissions for the SharePoint archive
      4. Grant permissions for Teams archive
      5. How to request access to Microsoft Protected API
  26. Troubleshooting

16.7.1.Teams archive job

Important:Teams archive/Teams chat archive jobs are not able to archive conversations with external participants coming from a different Microsoft Entra tenant. We recommend using Teams compliance archive job for processing these conversations with external participants.

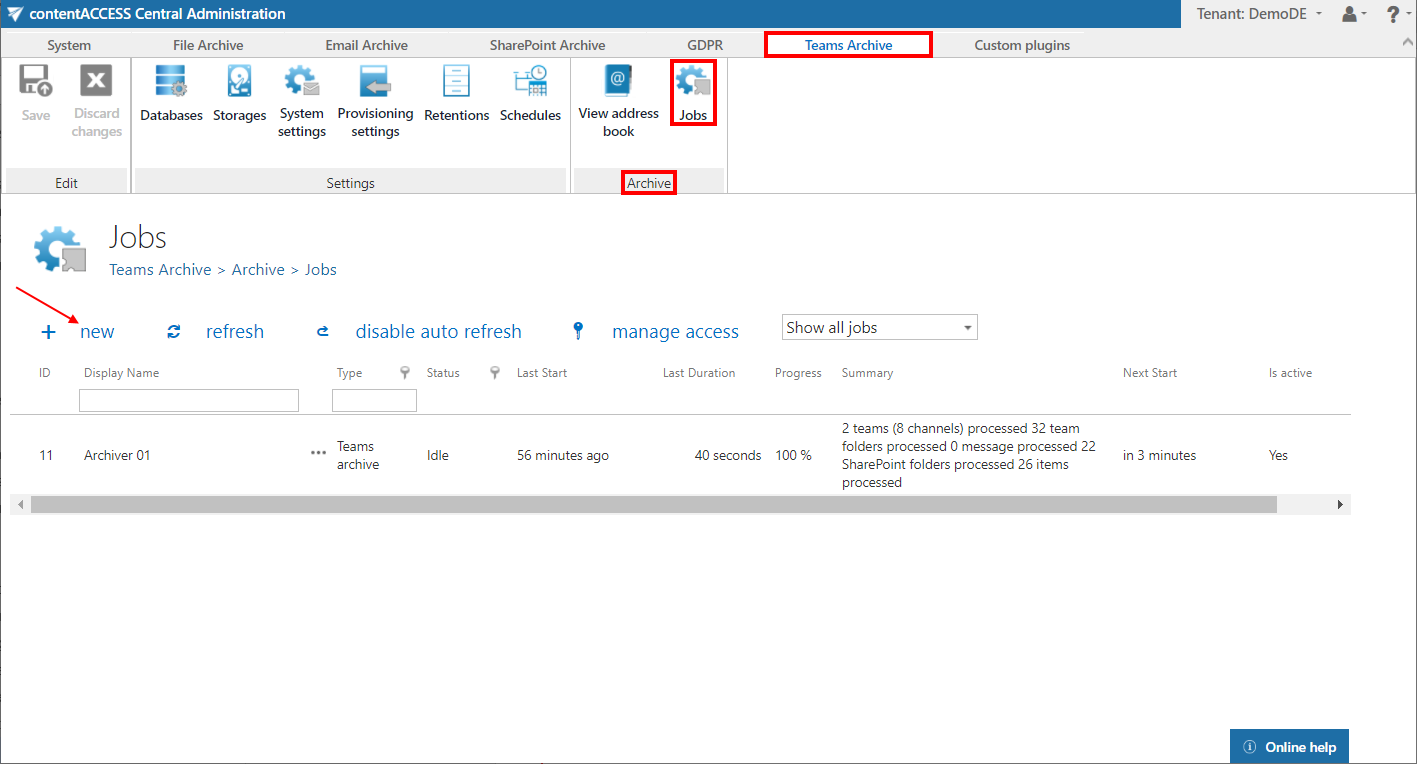
To configure a new Teams archive job, navigate to Teams Archive -> Archive -> Jobs. Here, click on +new.
In the Add new job instance dialog select Teams archive from the Available jobs dropdown list, the node where the job will run (option Run on node) and fill a Display name into the Add new job instance pop-up window. Then click on Add.
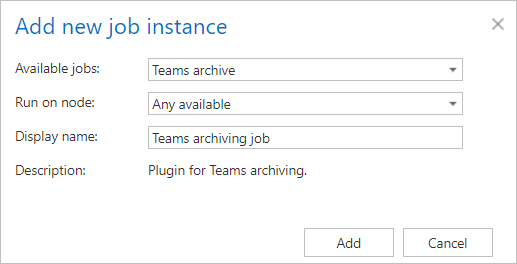
If you want to configure the job immediately, then click OK in the pop-up window and the job configuration page opens immediately. If not, the configuration page is accessible any time using the Configure option in the given job’s context menu.

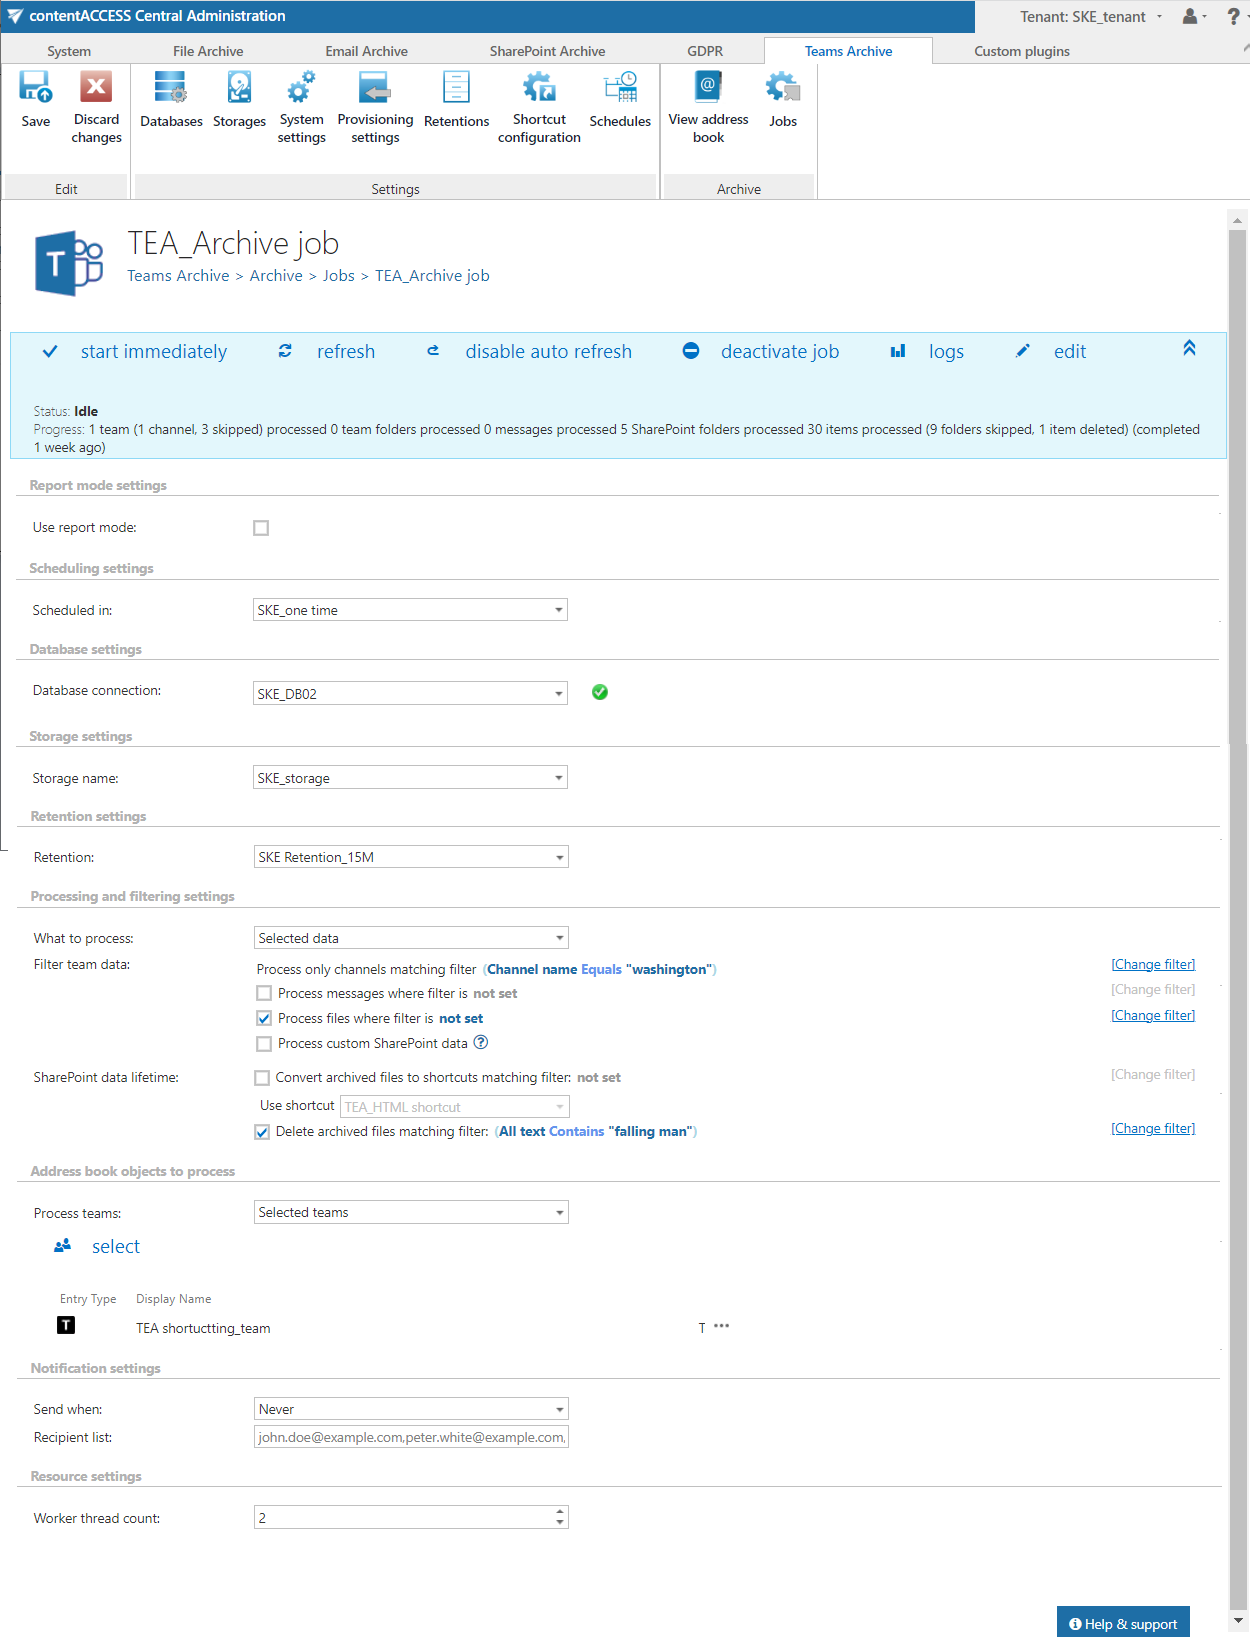
On the job’s configuration page go through the following sections:
✓ Report mode settings
If the Use report mode checkbox is checked, the job will run in report mode. After the job finishes its run in this mode, the user will be able to download a .csv report file here in this section. The file will contain a list of items that belong to the objects selected in section Address book objects to process of the job and some information to them, including whether they will be processed or not.

✓ Scheduling settings
In this step, the running time(s) of the Teams archive job must be selected. It is possible either to select a scheduler from the list or to create a new scheduler via create new … option from the dropdown list. For more information about how to set schedulers refer to the section Schedules above.

✓ Database settings
Select an already configured connection from the dropdown list. Here the metadata will be stored. We have configured for our archived Teams the database named “DemoDE”, so we set it here. For further information on how to set database connections please refer to section Databases.

✓ Storage settings
Choose an already configured storage from the dropdown list. The processed binaries will be stored here. On the screenshot below we selected our already configured disk type store: “Default”. For more information on how to set storages check section Storages above.

✓ Retention settings
Choose an already configured retention time from the dropdown list. The archived objects will be stored during this time in the storage, and it will be impossible to delete them from there. It is highly recommended to select a retention time that is required by the law of your country. For more information about how to set retentions check section Retentions above.

✓ Processing and filtering settings
In this section, the user can define which items will be processed during the archive job. First, select what to process: all data or selected data. In the case of the all data option, the archive job will include all channels‘ messages, files, and non-channel related SharePoint data.

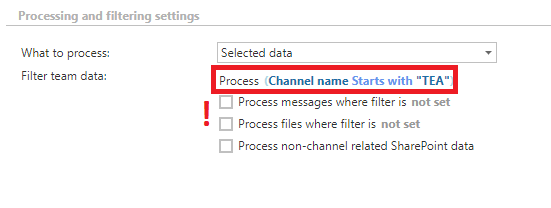
If the user selects the selected data option, the Filter team data settings appear. Here are the following options can be selected and defined:

  • Process all channels (or filter them out) – the user can decide whether all channels will be archived or just the channels matching the filtering settings. The channels can be filtered out by the name or the type (IsPrivate=Yes/No).
    Note: The default channel in Teams is General, which is created automatically with the team. This channel will be displayed in the background as „General“ even if the users set/use different languages for the Teams client. Because of this, when the user wants to filter out the default channel by the channel name, it needs to be added in English (the other channels can be filtered out with the supported languages), otherwise, the job won’t process this channel.
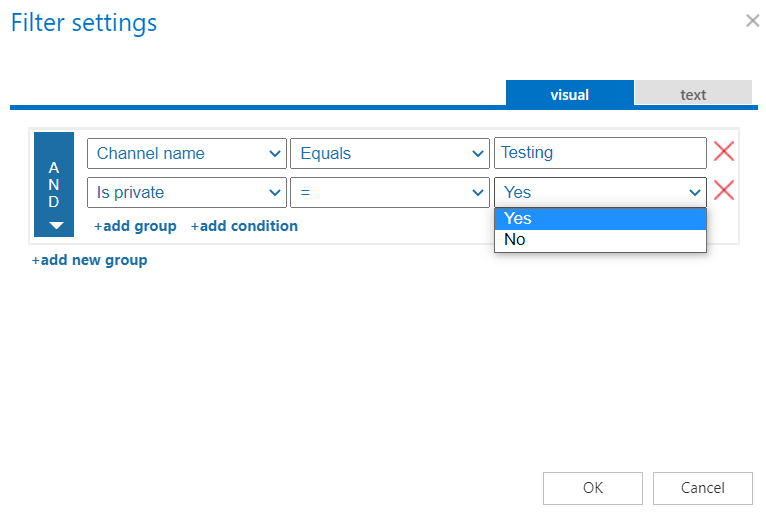
  • Note: If the Process channels filter is active (the channels are filtered out), but there are no messages or files selected, then the job won’t do anything. Without selecting the files or messages to process, this configuration means “Nothing to process”.
  • Process messages where filter is [not set] – only the messages (all or filtered out) will be archived if this checkbox is selected. If the user does not add a filter to the job, then all messages will be processed from the defined channels. It is also possible to archive only the selected messages from the team(s) by clicking on the Change filter button (or on the not set). In this case, the Filtering settings window appears, and the user can set the filters for the archive job.
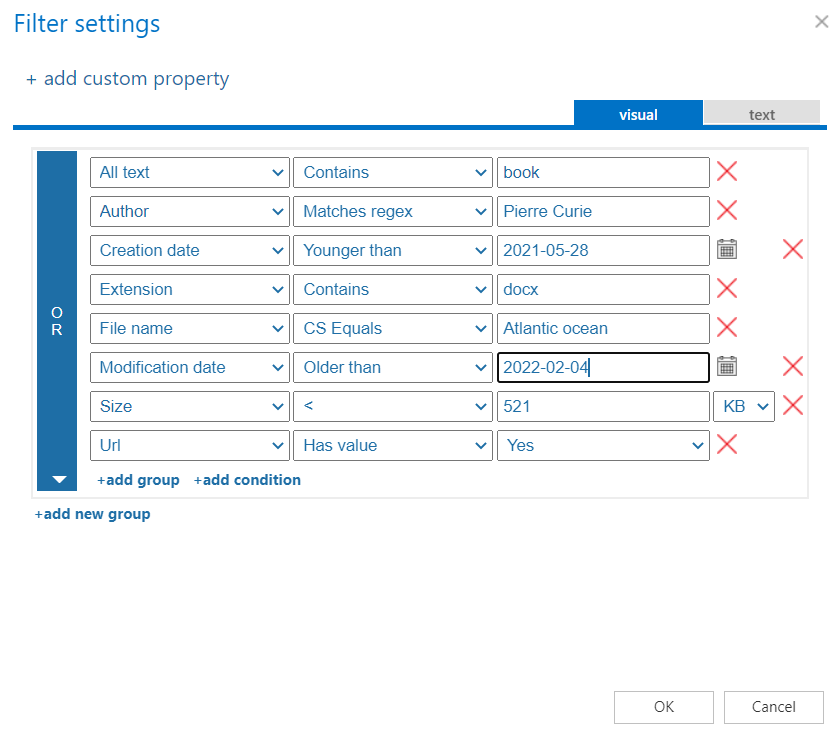
  • Process files where filter is [not set] – only the files (all or filtered out) will be archived from the selected team(s) (and/or from the Teams-connected SharePoint sites) if this option is selected. If the user does not add filters to the job, then all files will be processed from the defined channel(s). It is also possible to archive only the selected files by clicking on the Change filter button (or on the not set). In this case, the Filtering settings window appears, and the user can set the filters for the archive job. Also, the user can filter out the channel related files or the files from the Teams-connected SharePoint sites by using the Is custom data=Yes/No filter.
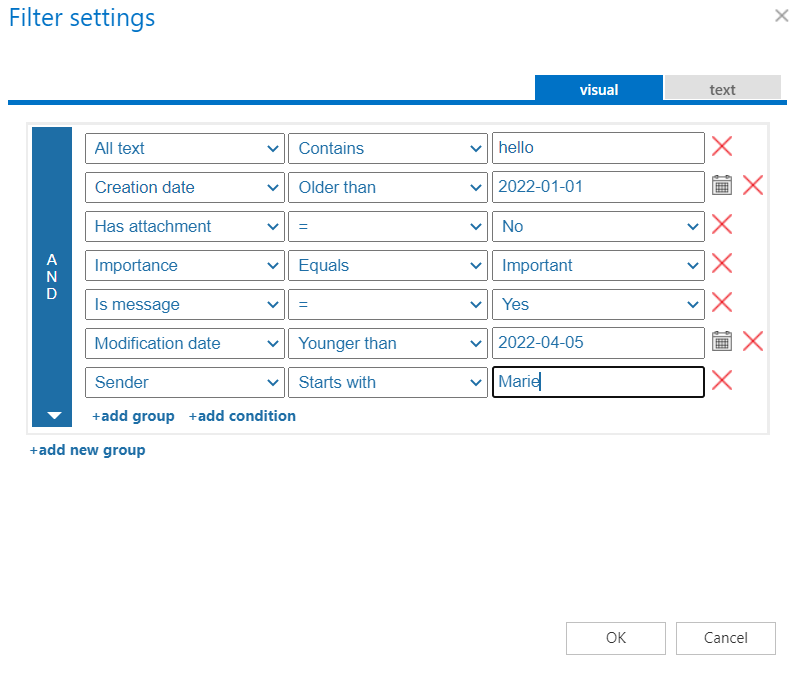
  • Process custom SharePoint data – SharePoint is deeply integrated into Teams. Files that are stored in Teams are in Sharepoint sites, and these sites can be used by Teams for file storage (these are called Teams-connected sites). These sites are created automatically whenever a user creates a team. The files stored in both Teams and SharePoint sites can be processed by the Process files option, but those items which are available only on the SharePoint sites (lists, tasks, calendar items, contacts, manually created document/picture libraries) are skipped with that option. To be able to archive those items, the Process custom SharePoint data option needs to be selected. This option allows the user to process/skip the custom SharePoint lists/document libraries. For more information about Teams and SharePoint integration, read this article.

    Important: The Process custom SharePoint data function does not work by itself. The Process files option is also needed to be selected, otherwise, the job will run without doing anything. But the files can be easily filtered out (for example: NOT Creation date has value=no), so only the SharePoint data will be processed.

    Important: Teams archive cannot process custom SharePoint data (manually created document libraries, lists) for the Private channel(s). When you create a private channel, a new site is created. This site is isolated from the team site and has separated permissions. It has its own Shared Documents document library, which is used in Teams client. The Teams archive processing has only one link to the SharePoint site of the private channel – the URL of the Shared Documents and, if there is something else besides that, the Teams archive job won’t be able to archive the custom SharePoint data, even if the checkbox is selected.

  • Convert archived files to shortcuts matching filter [not set] – in Teams archive, the Processing and filtering settings section allows the user to replace the (old) archived files with shortcuts. This option can be used independently or together with the Process files and Process custom SharePoint data options. If they are used together, and the items are matching all options, then the job will execute them sequentially in the same job run => first, the items will be archived, the version history will be checked and updated for the already archived items, then they will be converted into shortcuts. Before a shortcut is created, the item(s) is (are) checked and actualized (the missing versions are archived) to prevent losing any data before the file is modified.
    When the user selects this option, the Use shortcut dropdown menu becomes available. Here, the user can select the preferred shortcut type, which was configured on the Shortcut configuration tab.

    Shortcutting works on both ListItems and files. For the files, the job manipulates the version history based on the settings, renames the file to HTML, and overwrites the contents (creates a shortcut). For the ListItems, the job does not modify the content or rename the file (does not create a shortcut).

    Important: For ListItems, it is not possible to delete the version history!

    The user can set which files will be replaced with the filtering settings by clicking on the “not set” or “Change filter” buttons. For more information about how to work with the filtering settings, please, refer to this section of the documentation.
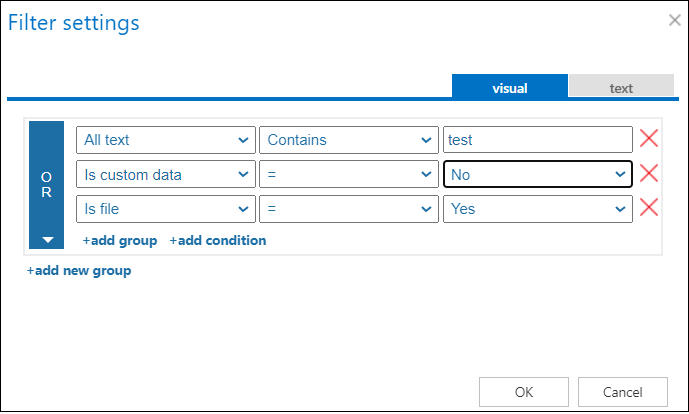
    Important: The Convert files to shortcuts option is accessible if Microsoft 365 is selected on the System settings page. In On-premise mode, only the archive and delete options are available for the users.

    Note: Please note that if you rename an HTML shortcut on the SharePoint site, the archive job or shortcutting option won’t be able to process the changes. The shortcut will keep the original name.
  • Delete archived files matching filter [not set] – this option allows the user to delete already archived files from the team and the Team-connected SharePoint sites. The delete function can be used separately or together with the other options. In this case, the item is immediately deleted – the shortcut won’t be created.
    the user can set which files will be deleted with the filtering settings by clicking on the ““not set”” or ““Change filter”” button. To learn more about how to work with the filtering settings, please, check this section of our documentation.

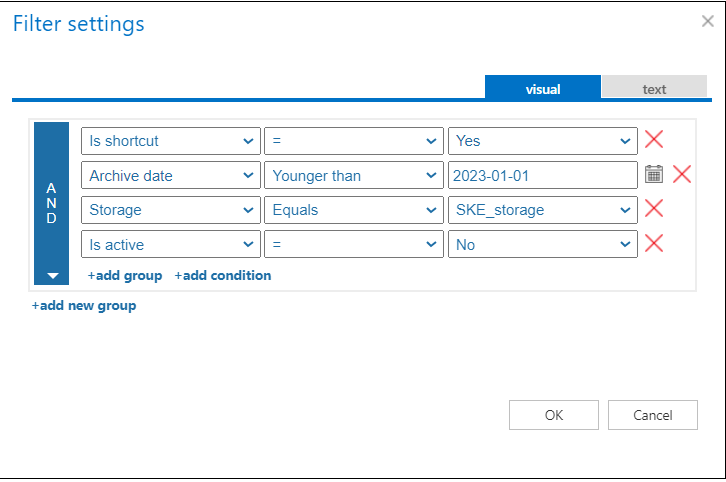
Important: Setting the filters is optional, but it is mandatory to select the items to process. if one or all of these options is not selected, the job runs without doing anything.

To set the filtering settings, click on the Change filter or not set button and set the filtering according to your needs and/or regulations. To learn more about how to work with filtering settings, please, check this section of our documentation.
✓ Address book objects to process
Here the administrator may select the Teams and groups, which will be processed by the archive job. It is possible to choose all teams or only the selected teams from the dropdown menu.

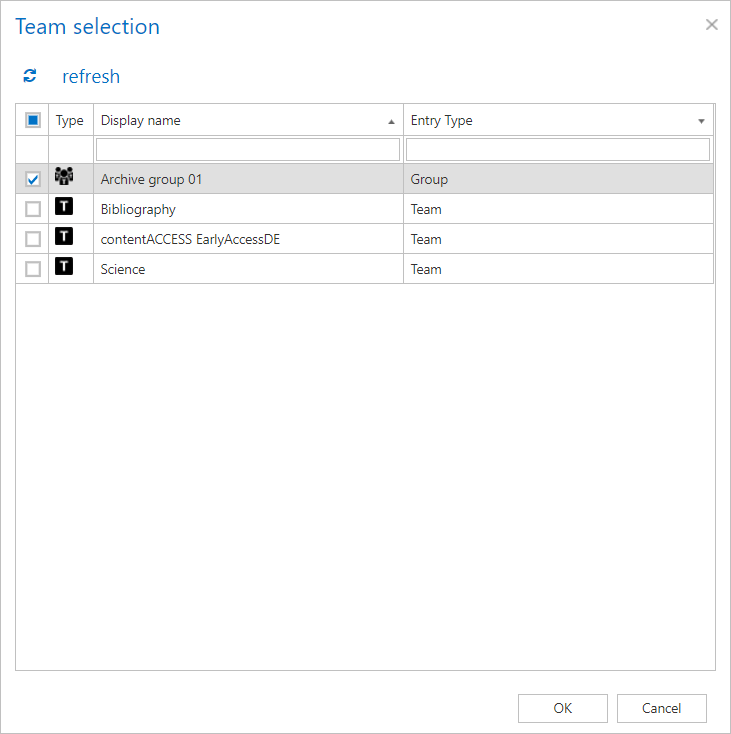
In case you choose the “selected teams” option, click on the Documentation340.1 select option and check the desired Teams or groups in the Team selection window, then click on OK.
✓ Notification settings
Select here, when you will need to get notification emails from the Teams archive job. It is possible to set here if you need such a notification email always/never, or you need it only in case that an error/warning occurred during the archiving process − for example, if the archiving of one or more items failed, then you may get a notification email about this error. Into the Recipient list textbox insert the email address(es) of the person(s), who will get such notifications. Notifications should be used if the administrator does not use the System logs feature.

✓ Resource settings
Set the value, which will determine how many items will be processed simultaneously by the Teams archive job. The recommended value is “2”.

Save your changes and start the job manually or wait until the scheduler starts the job automatically.

Yes No Suggest edit
Help Guide Powered by Documentor
Suggest Edit