- Introduction to contentACCESS
- Installation of contentACCESS
- contentACCESS Tools
- Installing Virtual drive
- Installing the Proxy server (contentACCESSWS)
- Installing the Proxy web services
- Installing Outlook forms
- Legacy email archive connectors
- Legacy archive connector for Metalogix Archive Manager Exchange Edition (MAM EE)
- Legacy archive connector for Email Lifecycle Manager (ELM)
- Installing TECH-ARROW’s WinShortcutter
- contentACCESS Central Administration
- Tenants in contentACCESS
- General system configurations
- Connection
- User interface
- Users — role types, creating new users, adding user logins
- How to activate your license key
- How to create user logins to an already existing user?
- System administrators
- Login providers
- System
- Licensing
- Notifications
- Monitoring — how to find out possible misconfigurations / reasons of potential system/job failures
- Distributed environment in contentACCESS — Clusters
- Statistics
- How to create/configure databases — All databases
- Common features
- Creating new jobs in contentACCESS
- Jobs’ page, jobs’ context menu
- File Archive
- Introduction to File system archive
- File Archive settings
- Databases
- System settings
- Retentions
- Storages
- Root folders
- Aliases
- Schedules
- Provisioning settings and managing access to contentWEB
- Configuring aliases
- Configuration of jobs available in contentACCESS File Archive
- Configuration of File system archive job
- Configuration of a File system restore job
- Configuration of File system recovery job
- Configuration of Remote shortcutting job
- Active/inactive documents in File system archive
- Email Archive
- Important settings before creating an Email Archive job
- Database settings
- System settings
- Provisioning settings
- Retention settings
- Shortcuts in email archiving
- Storing of archived emails
- Creating email archive schedulers
- User experience
- Exchange 2013+: Mail app in OWA 2013+ or on MS Outlook 2013+ desktop version
- Exchange 2010: OWA 2010 integration
- Address book objects
- Granting access rights for mailbox users and explicit users to view the mailbox archive?
- Creating contentWEB users (option 1)
- Manage access to a mailbox archive (option 2)
- How the end user logs in to contentWEB (archive)
- Database and store assignment in email archiving
- How to assign database and storage to an Exchange group?
- How to assign database and storage to a mailbox?
- How to move data from source database/storage into a second (target) database/storage?
- Creating Email archive jobs: archive, restore, recovery, mailbox move, shortcut synchronizaion
- Email archive job
- Email restore job
- Email recovery job
- Mailbox move job
- Shortcut synchronization job
- Custom plugins
- Email management job configuration
- SharePoint archive plugin
- Storage replication plugin
- Sharing plugin
- Datengut plugin
- Email synchronizer plugin
- contentWEB
- officeGATE
- accessGATE Mobile
- Virtual drive
- Terms of use
- FAQ
14.SharePoint archive plugin ↑ Back to Top
This plugin was created for scanning SharePoint sites and processing & archiving certain items and its contents into a specific storage.
After you have successfully created a new job to SharePoint archive plugin (for more information how to create a new job please refer to section Creating new jobs in contentACCESS) can start to configure it. Navigate to the Custom plugins ⇒ General ⇒ Jobs, choose the job from the list. Click on ellipses (…) and choose Configure option from the context menu. The Job configuration page will open, where the user will be required to set the following sections:
✓ Database connection:
For database settings select an already configured connection from the dropdown list, where the metadata will be stored. (For further information how to set database connections please refer to section “How to create/configure databases — All databases”.)
✓ SharePoint settings:
In this section the user will be required to configure the SharePoint site(s) which will be processed by the job. Click on + new option and fill required fields in the SharePoint site dialog box, then click OK:

In this step the user should configure the automatic running times of the SharePoint archive job. It is possible either to select a scheduler from the list (contains already created schedulers) or to create a new scheduler via create new option. (For more information about how to set schedulers refer to the section Schedules above.)

This configuration enables for you to filter among your items by 3 types of criteria: by age, size or file type. It is also enabled to use more filters simultaneously. To activate any of these filters, check the corresponding checkbox first, then click on the button to open the filter dialog:
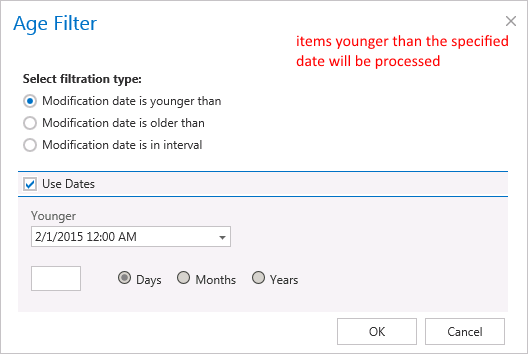
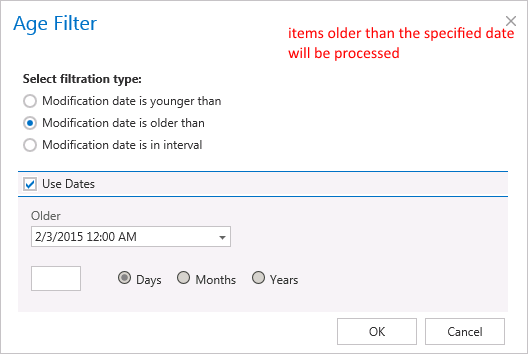
- Age filter: If you select an option from the “Select filtration type” list, and check the Use Dates checkbox, and specify a date, then the age filter will filter out all items, of which modification date is younger/older than this specific date. It is also possible to specify certain time interval with the Use Dates function. In this case the items falling under this modification date interval will be filtered out/processed. This age filtering type should be used if you would like to process documents with a specific modification date.Examples of using dates:
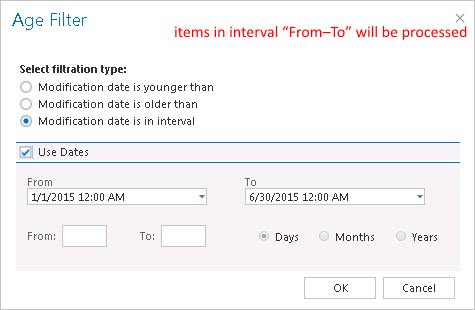
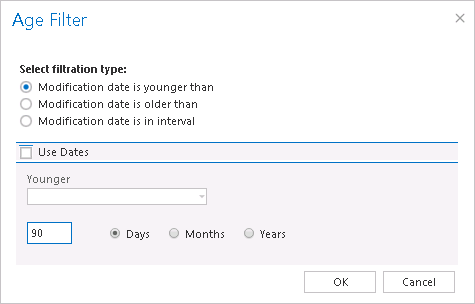
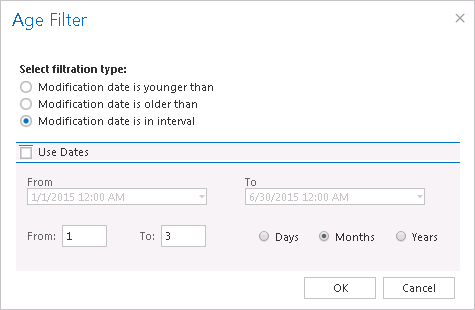
If the Use dates checkbox is not selected, then the date selection option becomes inactive. In this case it is allowed to filter between items where the Modification date is younger than/Modification date is older than a certain number of days/month/years. Enter the number into the checkbox next to the Days/Months/Years radio button (screenshot A). It is also allowed to filter items which belong to a certain period of time, e.g. between items from months 1 to 3 (screenshot B). This age filtering type should be used if you would like to process items, which are older/younger than a certain number of days/months/years (e.g. items older than 1 year). If the Age filter has been set click OK.Screenshot A: Emails younger than 90 days will be processed. Screenshot B: Emails in age 1-3 months will be processed.
- Size filter: This filter can be very useful because it enables to find the biggest files for further processing. For filtering files according to this criteria activate Size filter button by checking the checkbox next to it, then click on the active button.
In the Size filter dialog choose from the filtering types (Bigger than, Smaller than, or Between values), enter the size (in kilobytes) and click OK.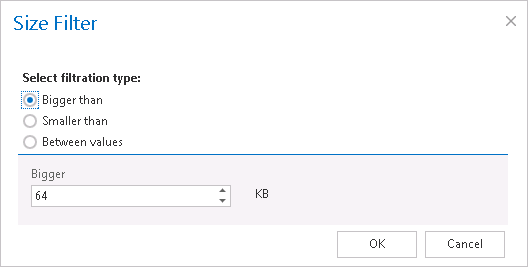
Screenshot C: emails bigger than 64 kB will be processed. Important!!!: When the user changes the file content of an already archived item, e.g. deletes a picture from the file and saves it to the original location, (and thus the file size will be reduced e.g. from 110 to 85 kB) and file size filter is set on >100 kB, then SharePoint archive job will not archive the newly created item by the next processing. The newly created item will be saved in the original location. From this reason, it is recommended to always check the size filter settings first, if a file has not been archived by the archiving process.
- File type filter: This filter was improved to select certain file types for processing. For filtering between documents according to this criteria activate File Type filter button by checking the checkbox next to it, then click on the active button.
In the File Type filter dialog the user may select the file types that need to be processed (option Process ONLY selected file types), or he may specify file types, that should be excluded from the processing (DO NOT process selected file types).
The file types selected in the whitelist/blacklist are displayed below the grid in a read-only text box. Any file types (also file types that are not included in the whitelist and/or blacklist) can be specified in the Custom file types text box (in this use case “dwg”).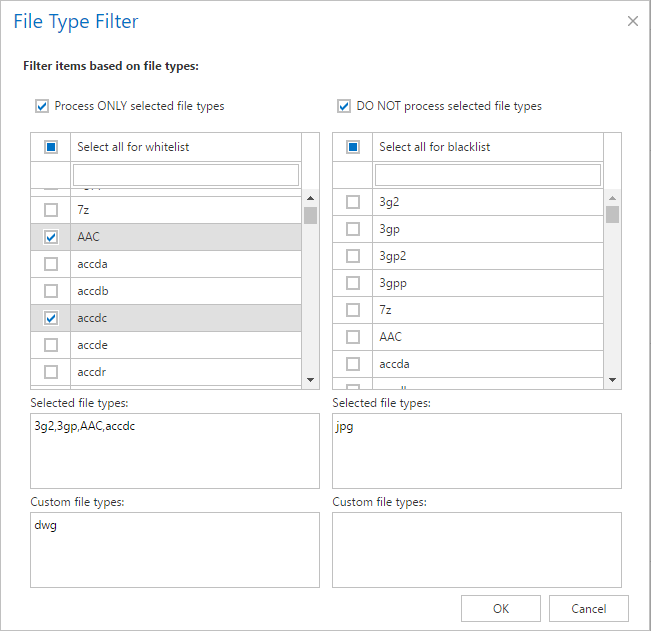
After all settings have been done a summary of filter settings will be displayed under section Item filtering.
✓ Storage settings:
For storage settings choose an already configured storage from the dropdown list. The processed binaries will be stored here. (For more information how to set storages check section Storages above.)

Under resource settings you can define the number of items that will be simultaneously crawled. It is not advisable to set here a value higher than the duplex number of cores of the processor as this might extremely slow down the whole processing.

